Shhhh…. don’t tell anyone! But I have a serious sticker problem! And this idea of finishing all my sticker posts is great, but more and more stickers keep happening over here… and it is getting out of control! So, I might need to take a break after this one… but I’m not sure yet…. so, today we will learn how to make stickers from family photos.
As an Amazon Associate, I earn from qualifying purchases. This post contains affiliate links. I may receive a commission if you purchase an item from one of my links. This will not change the price you pay.
Supplies Need to make Stickers from Family Photos
Okay, so we need a few things to make this project work:
- An iPhone or an iPad – if you don’t have one, keep reading below as I have a trick for you.
- A Cricut – I use my Cricut Explore Air 2, but any of the Explore series or Makers will work.
- Access to Cricut Design Space.
- A printer – I use my Epson ET-2850.
- Sticker Paper – I use Koala Mat Sticker paper for stickers, but the Cricut Brand also works. You can read a comparison of the two types here if you are on the fence about that.
And that’s all we need to get this project started!
If you don’t have an iPad or an iPhone, no worries! I have created a cheat sheet to show you several other programs (Free and paid) where you can remove the backgrounds from pictures and get the same results!
Let’s make some Stickers from Family Photos!
As this is a post about family photos, we need to get some family photos! Or, if you are like me, you can scroll through your camera roll and pick out one or ten that you already have. So, find some photos of your family you love, and let’s start making stickers from family photos!!
How to make Stickers from Family Photos on your iPhone
This is a super cool feature that i-products have, and I love it. When I first learned about it, I was in awe, but now it is my go-to for making stickers!
Let’s start with one picture at a time. And may I suggest that you pick a simple picture. And by simple I mean, you don’t want 3 people, a house, a car, your neighbors bike, a tree and all the things in your picture. You can have those, but we want to start off simple, as sometimes things can get too complicated too quickly. So, simple family picture. Even just one person works well.
Now, place your finger on the image. Hold your finger on the image of your family. Your screen will have a white line, almost like lightning appear, and float over the item you are holding.
Make sure you are selecting the family, and not something else around it. You want the sticker to be made of your family, not the car next to them.
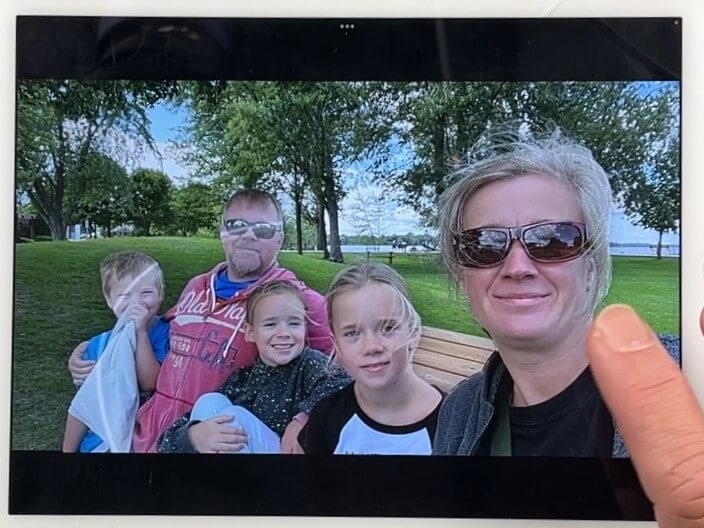
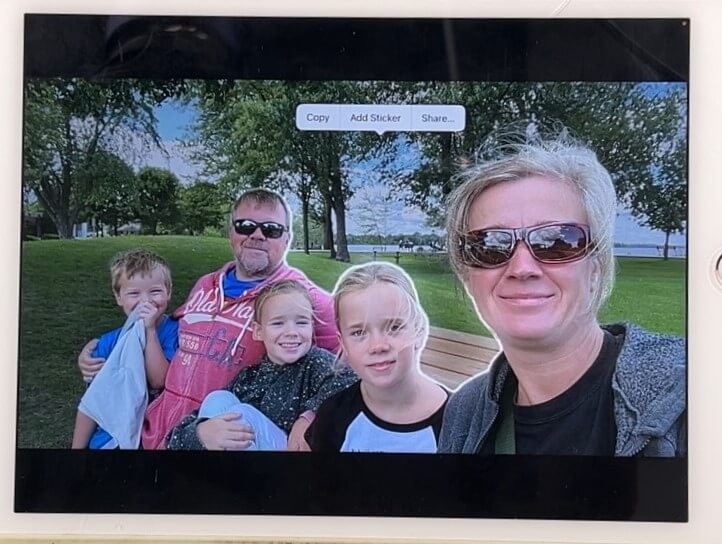
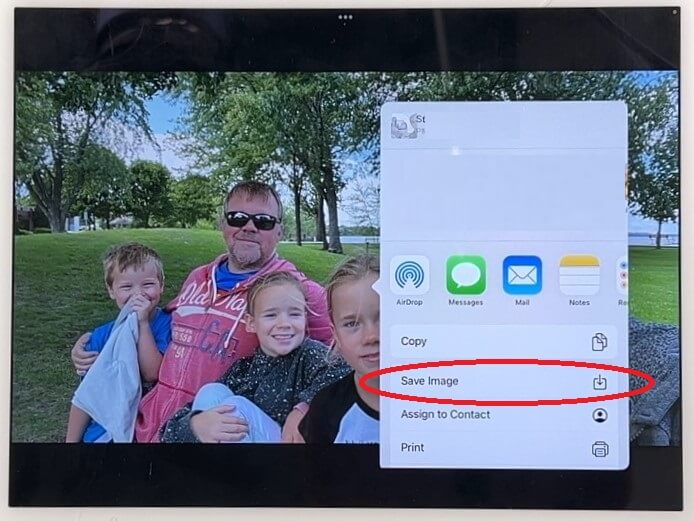
Then, select the Share… option that shows up on your screen. A drop-down menu will open. Select Save Image. Now, the image is saved in your pictures folder.
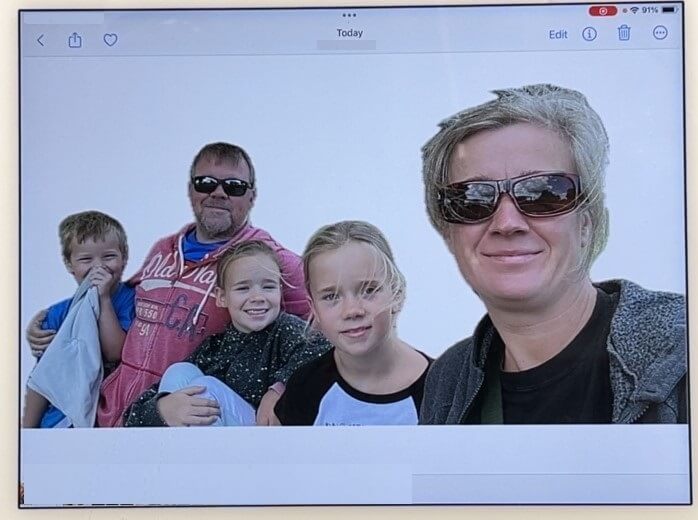
There is no background, nothing. Just the image that you selected. Repeat these above steps on as many family photo images as your heart desires.
Upload your Family Photo Sticker Images to Cricut Design Space on a Desktop
You can use Cricut Design Space on your Desktop, iPhone or iPad. First, I’m going to walk you through uploading on your desktop.
You either need to email your files to yourself, get them from your iCloud, or connect yourself to your computer to transfer the files.
So, let’s upload it to Cricut Design Space. On a new canvas select:
- Select the Upload Icon
- Select Upload Image
- Select the Browse button to upload the image you want to upload from your computer.
- The picture will appear on your Upload Image Screen. Click Continue
- Next, your picture will be brought to a Background Remover Page. You do not need to do anything on this page as we have already removed the background on our iPhone/iPad. Click the Apply & Continue Button at the bottom right side of your screen.
- The following screen will be labelled Convert Upload to. Here you will select the Flat Graphic, and then the Continue button.
- On the Image Details Page, you will want to fill in the Image Name, Optional Tags and Add to a Collection.
- Hit the Upload button.
- The file will now be in your Cricut Design Space and should appear on your Canvas.
Your family photo sticker is now in Design Space!
Repeat the steps above to upload as many stickers as your heart desires.
Upload your Family Photo Sticker Images to Cricut Design Space on an iPad
Cricut Design Space has been making numerous changes recently. The upload process on the iPad and desktop is much different, so let’s do a quick walk-through on your iPad.
So, let’s upload it to Cricut Design Space. On a new canvas select:
- Select the Upload Icon located at the bottom of your screen.
- Select the Select from Photo Library
- Scroll through your pictures to find the images we edited above.
- (If you do not have Cricut Access, you may be asked to try the Background remover, you do not need this, just hit the X in the top right corner of the pop-up box.
- Your image does not require any modifications at this point. If you want to delete bits of stuff that got caught from the original picture, you can do that now. Once happy with the details, hit the Apply Button
- The following screen will be labelled Convert Upload to. Here you will select the Flat Graphic, and then select the Next button.
- On the Image Details Page, you will want to fill in the Image Name.
- Hit the Upload button.
- The file will now be in your Cricut Design Space and should appear on your Canvas.
Your family photo sticker is now in Design Space!
Repeat the steps above to upload as many stickers as your heart desires.
Making Family Photos Stickers In Cricut Design Space
Now that your family photos are in Cricut Design Space, we have a few things we can do. We can Print Then Cut them as they are or add an outline. So, let’s walk through those steps.
Add an outline to your Family Photo stickers
Typically, I place an outline on my stickers. Maybe this is old school, but it’s just me. I think the main reason I like this is that when cutting the files out, if something is misaligned, the whole sticker will still be cut out, and only the outline will be messed up. For these stickers, I didn’t add one, but I will walk you through how to do it, just in case you want one.
So, let’s add an outline to our stickers.
Select the image that you have uploaded to Design Space.
Select Offset. Adjust the slider to the right or left to increase or decrease the outline around your photo. I like to have a nice edge around it, so about 0.05″.
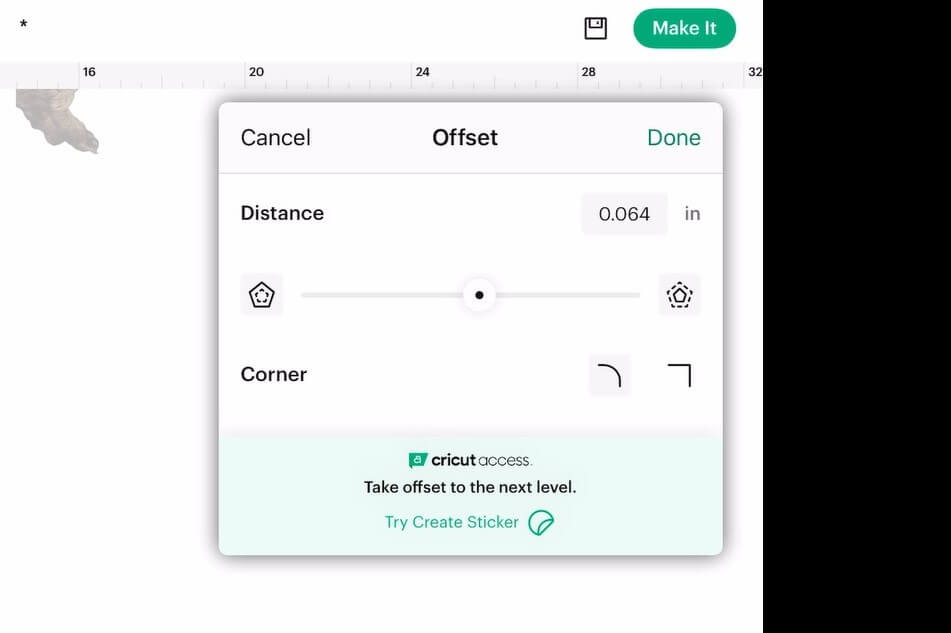
Once happy with the offset distance and appearance on your screen, hit the Apply button to accept the changes.
Your offset may be set to white, but it may be a different color. Let’s quickly select the Offset and change the color to white or any color you prefer.
If you have moved the offset off the image of your family photo, select both items, choose the Align menu, and select the Center option. This will center the offset to the family photo image both vertically and horizontally.
Next, we need to select both the family photo and offset, select the Attach and then the Flatten Buttons. This will join the two elements together for Print Then Cut. If you do not hit the Attach button the sticker and offset don’t always stay together, so I do it just to be certain.
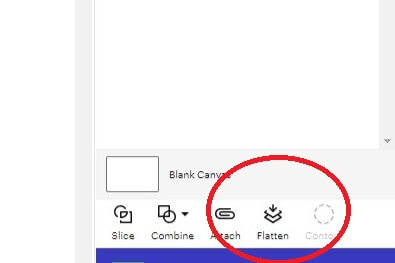
Now, adjust the size of your image to fit your desired dimensions. For family photo stickers, I like to make them around the 2″-2.5″ size, but you can make them bigger or smaller.
Once happy with your layout, repeat the above steps on all the other family photo images on your canvas.
When all your family photo images are ready for print and cutting, hit Make it.
When you are on the cutting mat view in Cricut Design Space, review your family photo images on the cut sheet. Ensure your images are connected (aka Flattened) to their offset. If they are not all connected, there will be offsets floating around by themselves. Should this be the case, hit Cancel and return to your canvas to make changes. If you do not like the locations, move items around to save as much sticker paper as possible. Once happy, hit Continue.
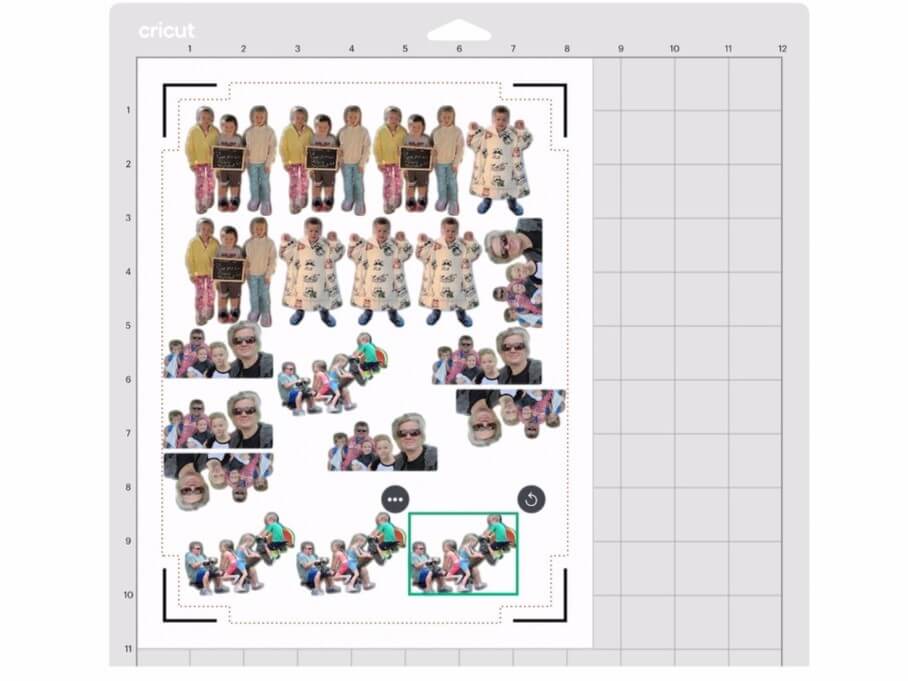
If you want to save sticker paper, read this article on how to maximize your Print Then Cut Space.
Now, it’s time to set up the print on your printer. As this is the same for Print Then Cut for both with and without offsets, I’ll talk about this in a moment, below.
Print Then Cut Family Photo Stickers without an Outline
If you want your family photo stickers to be printed without an outline or an offset as it’s called in Cricut Design Space, there are only a few items that we need to do, so let’s get started.
Check out the size of your images. Go to your dimensions, and adjust the size to be what you want, I like to have my stickers about 2″-2.5″ in size. You can make them bigger or smaller. Once happy with the size, hit Make it.
Review your family photo stickers and their locations on the Print Then Cut sheet. If you do not like the locations, move items around to save as much sticker paper as possible. Once happy, hit Continue.
If you want to save sticker paper, read this article on how to maximize your Print Then Cut Space.
When you do not add an offset around the image, on your iPad, the bleed will automatically be turned on and the image will have an outline around it. This helps for a more polished final sticker.

Now it’s time to set up our print on the printer.
Print Then Cut your Family Photo Stickers
Now that our family photo stickers are arranged on the print and cut mat, it is time to send them to the printer. Some important points to note while doing this:
- Your printer must be set up on your computer, iPad or iPhone. If you are working on your iPad and have never done a Print Then Cut on your iPad, you need to calibrate your printer and Cricut. The same goes for your laptop. If you have calibrated for one, it does not mean it will work for the other. Read How to Calibrate your Cricut for Print Then Cut Using a Computer HERE
- Make sure you know which way to load your sticker paper. Not all printers are the same! I like to do a test print on a regular piece of paper to make sure.
- Select Send to Printer – this will bring up a printer menu. Select the printer you want to use. I like to set the print quality to High.
Once your family photo images have been printed, it is time to place them on the cutting mat. Make sure to press the paper down onto the mat firmly. I like to use my scraper tool to push it down. But just in case the ink is still a bit wet, I will place my cutting mat protective sheet over the sticker paper and press down on it through the protective cover.

Set your Cricut Dial to Cardstock. I have found that this setting works for sticker paper when you want to have individual stickers cut out.
Now, select the flashing arrow button on your Cricut and feed the cutting mat into the machine.
The Cricut may take a while to cut out your sticker, depending on how intricate and how many you have.
And that’s it! You’re Done! Your Family Photo Stickers are complete!

Things I learned while making Family Photo Stickers
So, for this project, I have learned a LOT of cool things. So, let’s review what I have learned from making Family Photo Stickers.
- If there are lots of people in the stickers, the stickers need to be larger so that everyone can be visible. Small stickers are cute, but not so much if you can’t see the people in them.
- I did not make an offset for these stickers when making them. I’m not sure why, but I didn’t. They still turned out nice. When making stickers on your iPad, if you do not have an offset, the printer settings will automatically bleed the ink to go outside the cut lines. This will allow for a nice Print Then Cut image. When working on your desktop/laptop, you may need to select the bleed toggle in the print settings. The bleed setting simply pulls the colors from the edge of the image further away so that there is no white in the cutting area.
- I used my iPad when making these stickers. The process for doing the whole thing on your laptop/desktop is the same within DS, but some screens may look different. So, if you are doing this on your laptop/desktop just take your time to find the icons I mentioned, and you will be there in no time!
- I love the background remover/sticker feature on iPhones and iPads. I use this far too often for a large variety of silly projects.
- The best stickers come from things that you are purposefully isolating. I purposely used pictures that had my family isolated in the center of the photo to make it easier to work with.
- I have not figured out how to modify the stickers on the iPhone or iPad. So, if you get more stuff in your image than you want, I have not found an easy way to fix it on your iPhone or iPad. But you can remove it when uploading to DS.
- Making these stickers in Cricut Design Space is super easy and I think I need more sticker paper!
- No matter what I upload into Cricut Design Space, the size is always off. Most of the time, it is way too big, so it is important to always adjust the size when a file is uploaded into DS.
- There is a Sticker Feature in Cricut Design Space. But that is only available with the Access Subscription. I don’t use that, so that is why there are more steps here than otherwise needed, but I’m ok with that.
- I remove the background from my family photos using my iPhone and iPad but there are many other ways to remove backgrounds from images. You can get a list of the ones I have used in the past, below.
Frequently Asked Questions About Making Family Photo Stickers With Your iPhone and Cricut
I have been asked a few questions about making stickers from family photos with your iPhone and Cricut, so let’s do a quick Q&A.
Can you make stickers of anything with your iPhone/iPad?
Yes! Yes, you can! You can follow the steps I laid out for making stickers with your iPhone and make stickers out of it. It can be done with people, pets, places. You may need to crop the image if there are too many things going on around it. This will help the program get what you want.
Can I make Stickers with my IPad?
Yes, this same method works with your iPad. This feature has been around for a long time, but not everyone knows about it. It was around for quite a few generations of i-products.
What if I don’t have an iPad and want to make stickers?
Don’t worry! You don’t need an iPad or an iPhone to make stickers! You need a background remover to help you isolate your images. I have a list below of a bunch of free and paid resources you can use to remove backgrounds as well.
Cricut has a sticker feature, why not use that?
That is correct, Cricut Design Space has its own sticker feature. However, this is currently only available if you pay for Cricut Access. If you do not have Cricut Access, or even if you do, the above method works every time!
I have heard, but have not used the Cricut Sticker feature, that there are limitations to the type of sticker paper you can use and there are limitations to the feature itself. One day I will try it, but until then, I will be using this method.
Did you enjoy this tutorial on How to make Stickers from Family Photos?
Did you enjoy this tutorial on how to make stickers from family photos? I hope so! Let me know if it worked out for you! And share your project results with me! I want to know how it turned out!
If you liked this project, be sure to check out some of my other sticker and sticker-related projects here:
- How to make Holographic Stickers
- How to Make Drawings into Stickers
- Inspirational Quote Stickers with Cricut
- How to Make Custom Pet Stickers
- How to make FREE Valentine’s Day Stickers
- Make Flower Stickers With Your iPhone and Cricut
- Cricut Sticker Paper vs Koala Sticker
- Maximize Print then Cut size with Cricut
- How to Calibrate your Cricut for Print Then Cut Using a Computer