A Broken Toy Harness
It’s tough being a child in the first world. An abundance of toys! All made of plastic! All break easily! And a broken toy harness was the latest casualty at my house.
The Back Story
It was Christmas time and in usual Christmas fashion the kids get an abundance of gifts. Having twins results in double the gifts and some times two of the same gift. How could anyone resist but buy 2 identical Barbie princess unicorn and carriage thing. As my girls are into unicorns and barbies and princesses it was for the best that they received 2 of these gifts. If only they weren’t so large! And if only they weren’t so flimsy!
Within a week or two of getting said gift one of the harness/carriage attachments broke. It was a small piece of plastic that could not get glued back into place. I could have used a wire or something to do a temporary (sharp) fix but I wasn’t interested in that.
Shortly after one broke another one broke on the second carriage/unicorn set.
There’s always an easy solution
Once the part broke, I was immediately informed of the disaster at hand. I told the girls I would look into a way of fixing it but that it might take some time.
The girls are pretty easy going when I say I’ll look into fixing it. They know I will, but it just might take some time.
Skip forwards several months and I have time to fiddle with unicorns and carriages….
I was thinking of sewing a harness and then adding ribbon pieces onto it to make it look pretty. But let’s be honest, no mother feels like sewing toy harnesses for their daughters toy horses.
So, I thought why not just use ribbon? It’s only a toy horse, it doesn’t need much material.
And ribbon worked!
The Result
My first attempt was mostly successful. It just needing a better attachment mechanism for the harness to carriage, the rest was good.
Take two was better and and didn’t need any more mods. So I reworked the first one as well and both kids are happy!
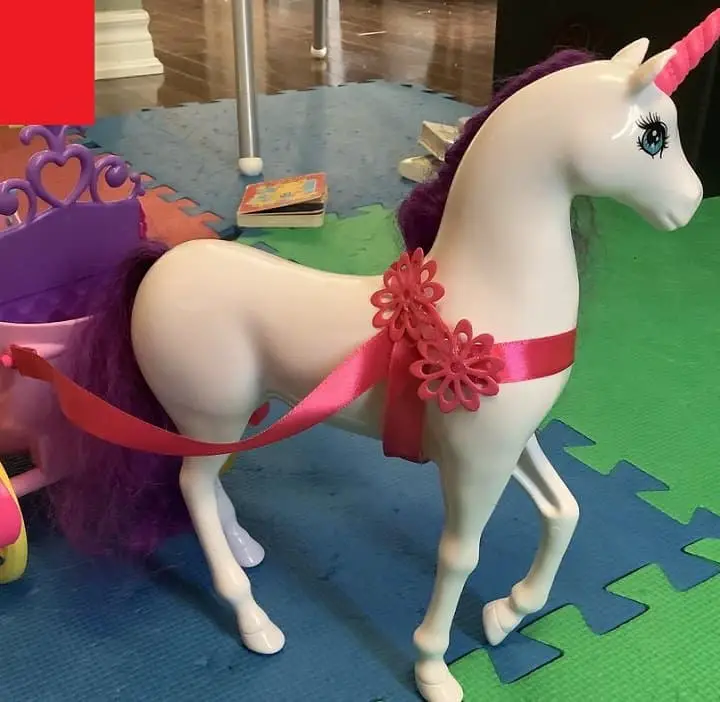
How To Make A Barbie Horse Harness
Like most toys in my house they are made of plastic that is easily breakable. And like most broken toys at my house my kids seems to think I can fix anything. Fortunately for them, most things I can fix or make new. This tutorial on how to make a Barbie Horse Harness is the result of a broke bit that couldn’t be glued back together.
It’s quick and easy and if you have ribbon and a glue gun already handy, it’s also free!
As an Amazon Associate, I earn from qualifying purchases. This post contains affiliate links. I may receive a commission if you purchase an item from one of my links. This will not change the price you pay.
What you Need:
- Barbie Horse and Carriage – don’t need to be brand name.
- Ribbon – I used 2 types
- one for the main harness
- one for the decorations
- eyelet of sorts.
- Glue Gun and glue
- Velcro – I used the one with an adhesive on the back to avoid sewing.
- About 20 minutes time – preferably when kids are asleep as they seem to like watching these creations at my house.
Let’s Begin!
Get Your Ribbon Ready!
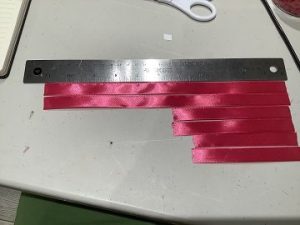
You will need 6 pieces of ribbon.
2 of each size:
- 11″
- 5.5″
- 4.5″
Just note, that the ribbon doesn’t need to be exactly the above sizes. So if your cuts are a bit off it’s ok. You can see from my picture on the right they’re not all exact.
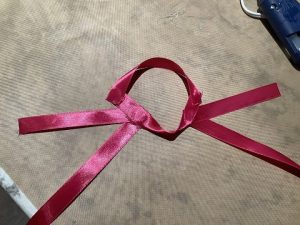
Glue To Your Hearts Content!
Now the fun part! You get to glue all the pieces together! The below 3 images show the dimensions and sizes and layout. You can do this all in one pass.

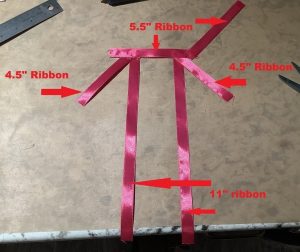
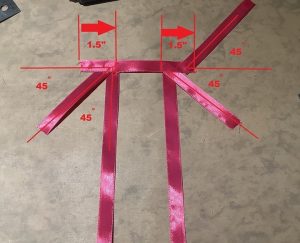
Once you have glued all 6 pieces as shown above, one final gluing needs to be done to close the loop around the harness. You are gluing the 2 x 5.5″ pieces together. The size of the harness is large enough that it will slip over the horses head. This final glue is also at a 45degree angle as shown on the image on the right.
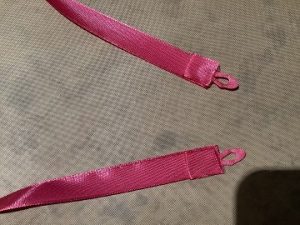
Attaching Eyelets
I’ve attached little eyelets to the end of the harness to attach to the carriage. On my first harness, I just folded the ribbon over, glued and cut. But the final result didn’t provide the ease of removal from the carriage.
I folded the ribbon 2 times and inserted the eyelet into the fold and glued it all together. This is on the 2 x 11″ pieces of ribbon. See photos below.
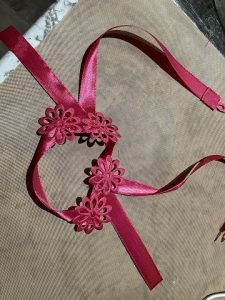
Full disclosure, I just used some ribbon flowers and cut some of the peddles off. Nothing fancy.

Add Some Pizzazz
So, the areas where the harness was glued together might look a bit rough around the edges. I glued on some flower ribbon on tops of the connection points. This covered up any glue blemishes and made the harness look pretty for the girls.
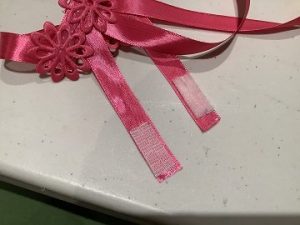
Velcro Addition
I use velcro with an adhesive backing to avoid sewing. I stuck this on the harness – the 2 loose pieces. Make sure you check the sides of the harness to get the velcro on the right sides! This stuff is sticky and won’t come off after you apply it.
If you don’t have velcro a button would work also.
Now it’s ready to put on the horse and carriage!
And That’s It! You’re Done!
Was this Tutorial Helpful?
Did you find this tutorial helpful? Let me know your thoughts in the comments below!
If you liked this tutorial, be sure to check out my other tutorials here


The ribbon looks cute! Great solutions
Thanks! Ribbons are much easier than sewing!
That worked out well. We were always looking for DIY fixes for our toys and tried to be careful with them, but sometimes it seems like they’re made to break.
Thanks! The kids love it! The only problem with fixing toys is that they stay in the house longer and don’t make it to the trash!
what a great project, well done.
Thanks so much!