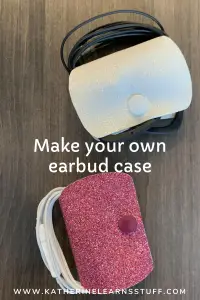
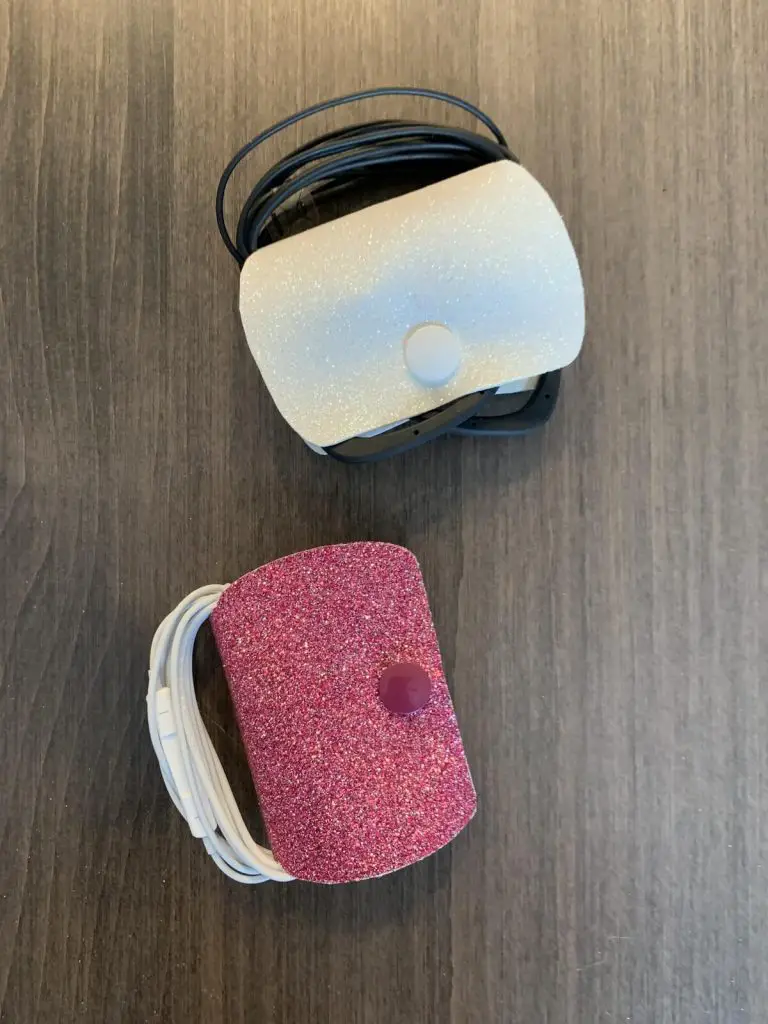
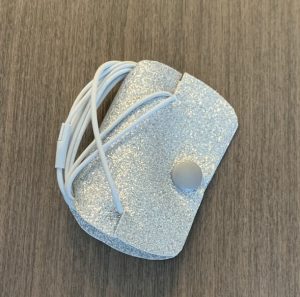
Earbuds, Earbuds, Who Lost Their Earbuds?
For ages, I have just used a zip lock bag for my earbuds. I would wrap them up into a nice ball, put them into the bag, and when I needed them next time, I would find my zip lock bag, pull out my earbuds and proceed to spend 15-20 minutes untangling them so I could use them. In the last while, I have found that I need to use my earbuds more often for meetings, so I do not really have time to play with tangled wires. So, I designed a simple earbud case to help keep things together.
This post contains affiliate links. I may receive a commission if you purchase an item from one of my links. This will not change the price you pay.
What You Need:
- Earbuds/headphones with wires – old school :p
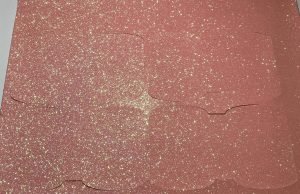
- Faux leather – this is the stuff I have – This is glittery faux leather (or was when I bought it) with excellent colors.
3. Plastic snaps – I use these – The colors of these snaps work great with the faux leather above.
4. Fabric Fusing Tape – I used this
5. Iron or Heat Press – I use my heat press although, both work great.
6. Optional – Teflon Paper – I use this – It keeps the iron/heat press clean from the fusing tape.
7. Cutting tool – Scissor, Sharp blade, or a Cricut Explore Air 2, Circut Maker or Silhouette, or any other cutting machine.
Let’s Begin!
It is Time To Design
Before you start, you need a design. There are two options:
- You can sign up for my newsletter below and get a copy of the free cut file, or;
- You can design your own.
I created my own simple design, a simple rectangle with rounded corners. I found that this shape worked the best for holding the earbuds together and surviving in my purse.

SIGN UP FOR TO MY MAILING LIST!
GET THE FREE DESIGN FOR THIS PROJECT!
ALSO, GET YOU ACCESS TO MY RESOURCE LIBRARY WITH ALL OF MY OTHER DESIGNS
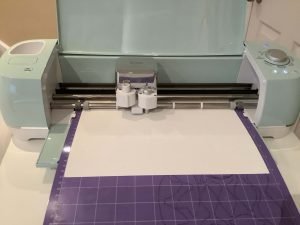
Cut The Fabric
I used faux leather because I have an abundance of it, and I find it works well for my needs.
If you have the PDF, you just need to print it off, cut out the shape and trace it on the fabric.
If you are using your Cricut or Silhouette, upload the file and check the sizes. The SVG file does not save with the correct size, sorry. I used 4.5″wide x 3″ high, which worked great for Apple Earbuds.
When cutting the faux leather, I performed the cut 3 times with my Explore Air 2 to make sure it went all the way through. If you are using a Cricut Maker you may not need to cut it more times.
Also, I cut two pieces for each earbud holder as this faux leather has a beige fabric on the back. This way, the faux leather will be pretty on both sides.
Fusing Tape
Cut about 7 strips of fusing tape. You need enough to cover the entire design, around all the edges and all through the middle. The size that I have needed 7 strips.
Do not worry if you have surplus hanging out on the sides. This stuff melts really well and will be invisible when done.
You want to make sure you have all the edges sealed well.

Combine
Once you have the fusing tape in place, carefully place the second piece of faux leather on top. Make sure not to move the fusing tape around.
Now it is time to melt that fusing tape with either your iron or heat press.
When I use my iron, I set it to the Cotton/Linen setting or with my heat-press, around 340F.
I will place Teflon paper on my working surface, then my faux leather, then another layer of Teflon paper. This keeps my workspace and iron clean from the fusing tape when it melts.
Applying some good pressure for about 15 seconds melts everything together.
When you take the iron off, you will notice everything is now one combined piece.
Let it cool down for a bit, as it is hot now.
Trim The Edges
Depending on how careful you were, and how quickly you moved, and if the iron/heat press shifted, you may have a few small edges that need to be trimmed.
Using scissors to quickly cut off any edge pieces that have shifted will make the whole thing look nice and smooth.

Add Snaps
Before we install the snaps, there are a few things we need to do.
I creased the case at the 2 bottom rectangle edges to give the case shape.
Then, lining up the top edges, poke a pilot hole in the center. Make sure you are pushing the hole-maker through both sides of the case at the same time.
Before I did this, I grabbed a snap to make sure the hole was not too close or too far from the edge.
With the pilot hole in place, you are ready to install the snap.
These are really easy to install. You need 4 pieces in total, 1 male, 1 female, and 2 backing pieces. Using the pliers provided, squeeze a male and backing pieces together, and then the same with the female part.
Just make sure the male and female pieces are facing each other.


And That’s It! You’re Done!
Final Thoughts
Some things I learned along the way.
- Depending on the type of faux leather you are using, it may not be necessary to use two-piece of fabric. Some fabrics have a nice back.
- I used fusing tape to keep the fabric together, but using a sewing machine and adding design on the edges or the center will also work.
- The design I have does not have a slot for the wire to rest in, but I did add one in by hand afterward to hold the end pieces in place. This is just a preference and can easily be added.
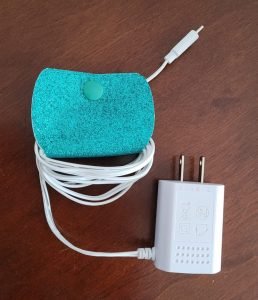
- This design can also be used for holding your charging cables. That way, they are not lost in the bottom of your purse.
Was this Tutorial Helpful?
Did you find this tutorial on how to make an earbud case helpful? Let me know your thoughts in the comments below!
If you liked this tutorial, be sure to check out my other tutorials here.
SIGN UP FOR TO MY MAILING LIST!
GET THE FREE DESIGN FOR THIS PROJECT!
ALSO, GET YOU ACCESS TO MY RESOURCE LIBRARY WITH ALL OF MY OTHER DESIGNS


great idea and so cute! best way to organize cables
It really is! The only problem is I have become addicted and now I need more!
How cute! It seems like a fun little project to work on. Thanks for sharing!
Thanks!
The process looks fun, but they turned out to be cute. Thank for sharing.
Thanks!
You always have so many great ideas! This is another one that is super useful, especially with everyone having a pair of earbuds these days. Great post!