I have been playing around with stickers for the last few weeks. And, I have to say, it is way more fun than it sounds… although there have been some hiccups along the way. But as Valentine’s Day is coming up, I thought I would learn how to design some free Valentine’s Day Stickers on my Cricut Explore Air 2. So, let’s jump in and start making stickers!
As an Amazon Associate, I earn from qualifying purchases. This post contains affiliate links. I may receive a commission if you purchase an item from one of my links. This will not change the price you pay.
Supplies needed to make FREE Valentine’s Day Stickers
But I must be honest, any craft you make is not free. You require the supplies and equipment to make it, which costs money. But for the sake of this project, let’s assume since we have the materials, it is free. With that in mind, we will learn how to design and make them for free.
So, here are the supplies we need to have before we can make this Free project happen:
- Cutting Machine – I use my Cricut Explore Air 2, but any Cricut Machine will work. As will any other number of machines, such as the Silhouette, the Brother, or others
- Printer – I used my Epson Eco-tank. for printing, but you can use any printer. Ideally, it will print in color, but not necessary.
- Sticker Paper – For this project, I use Cricut Sticker paper.
- Design Program – I designed these stickers in Cricut Design Space, as we are trying to make these for free. But you can use other programs to make Free Valentine’s Day Stickers and import them into DS.
- About 30 minutes.
Let’s Design and make Free Valentine’s Day Stickers
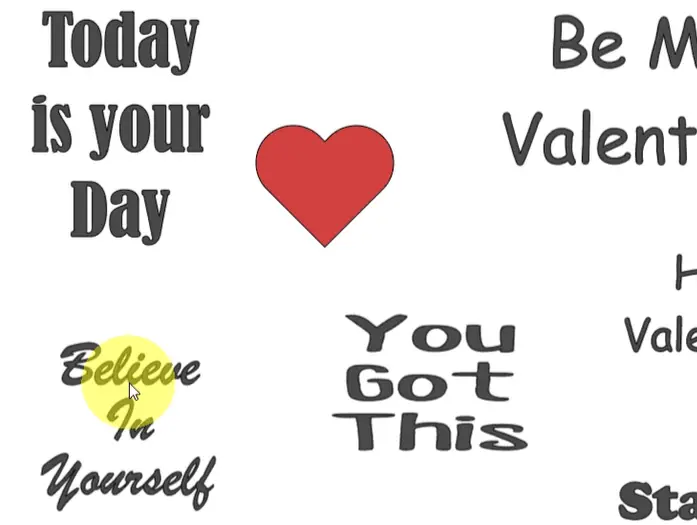
The design aspect of making free Valentine’s Day stickers is not too hard, or at least it should not be… The first thing I did was look for some Valentine’s Day phrases. I googled Valentine’s Day Phrases and came up with the below list:
- Just Love
- (heart) You
- Be My Valentine
- Happy Valentine’s Day
- Stay Positive
- You’re a Star
- Today is Your Day
- Believe in Yourself
- You Got This
The last few are more generic, as I do not want them all to be lovey-dovey. Because let’s be honest, we do not need stickers being inappropriate – as these will end up with my kid’s Valentine’s Day loot bags.
How to Design Valentine’s Day Stickers in Cricut Design Space
Add the Valentine’s Day Phrases to Design Space
With the Valentine’s phrases we have above, we can input them into Cricut Design Space.
Select the Text Icon and type in the first phrase. Then, select a new text box for each phrase and continue adding the phrases until they are all complete. If you want the phrases to be multi-colored, you can put each word or part of the phrase as a separate text item.

Once all the phrases are typed up and on your canvas, it is time to play around with different fonts to see what you like. For this, we need to select a phrase (one at a time), select the Font drop-down menu and select a font you like.
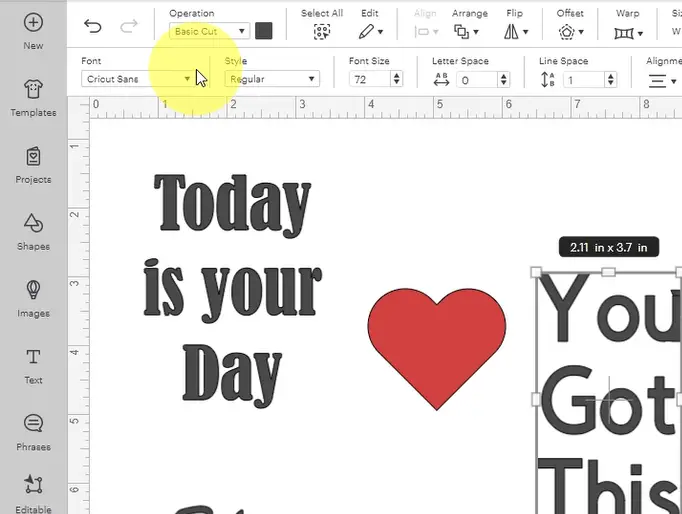
I prefer to use my system fonts because I know they are free. Some free fonts available through the Cricut Design Space are not always free. Cricut will often change which fonts are free, require Cricut Access Membership to be free, or require payment. So, if you use DS fonts, just be aware that these fonts may not be free in the future. This becomes problematic if you want to reuse this design or if not cutting the project the same day you are designing.
Now that your Valentine’s Day phrases are written and have a variety of fonts selected, you can move the words for each phrase around. You do not need to have it all as one line. It can be broken up into 2, 3 or more lines. You can move the words around so they are not inline. This can be done by duplicating the original phrase and removing parts of the phrase by hitting the Enter key to move the words onto a separate line.
Once you are happy with the fonts on each phrase, it is time to make it look more Valentine’s-y.
Adjust the Font Color
If you have not done so already, it is time to adjust the font color. Select the text box with the desired phrase. Select the color box next to the Operation drop-down menu, and select a color of your liking. For mine, I used black, white and red.
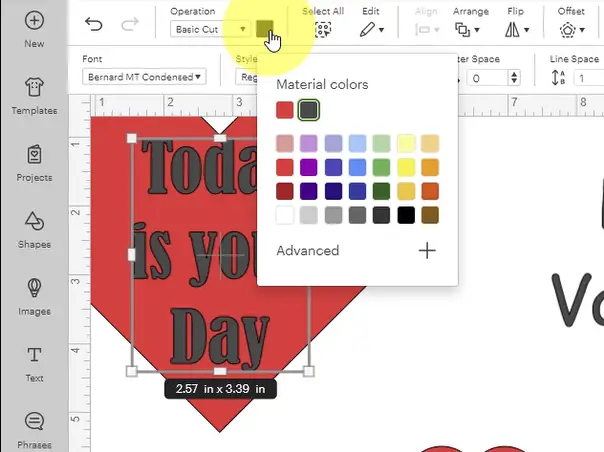
Add Hearts to your Valentine’s Day Stickers Design
Select the Shapes menu and pick a heart. Duplicate the heart several times. Place the hearts around and behind the text in any fashion you like.

You can change the color of the hearts to be anything you like. I kept mine mostly pink, red and white.
Finalize Your Valentine’s Sticker Design
Once you have a design finished, a few finishing touches are needed before we are ready to cut our stickers.
I have been working on several different designs at a time, but for this part, you need to focus on just one design at a time. This will keep things less chaotic later.
Select all of the elements of one design. Make sure they are all selected and that there is a box around all of the items.

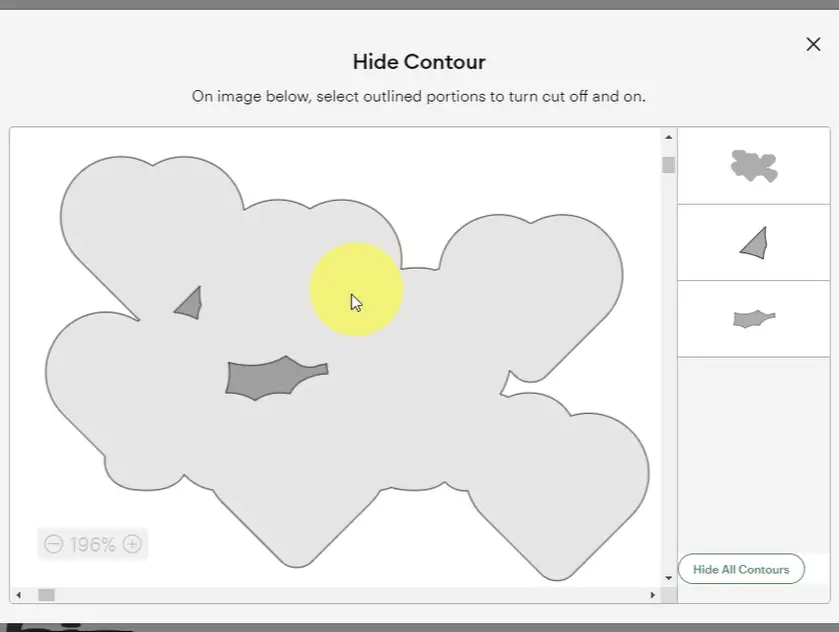
Select the Offset button. This will form an outline around the design. You can adjust the size of the offset by using the slider. Once happy with the outline around the design, select OK.

If your design has open spaces, a hole will be present in the offset. If that is the case, select the offset. Then, hit the Contour button. This will allow you to hide the holes in the offset. This should be done before you proceed any further, as it will be difficult to undo later.
Once you have your offset complete, select the entire design. Next, select the Flatten icon, located at the bottom right side of your screen.
This will make your sticker ready for print then cut.
Repeat the above for all of your other sticker designs.
Double Check your Valentine’s stickers before cutting
Once you have flattened all your designs, select the Layers icon at the bottom of your screen. This will open a panel on your right side. Do a quick review of all your design elements and verify they are flattened.
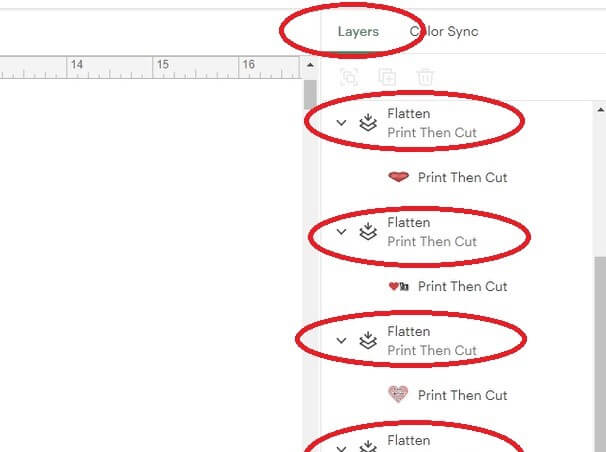
I always do a check, just to make sure.
Resize your Valentine’s Stickers
When working on designs I do not focus on the design size at the start. I focus on the design itself and then resize it at the end.
I like my stickers to be about 1” -2” in size. This way, they are not too big or too small. Select each sticker individually, select the dimensions and change them to the value that you want. Verify that your dimensions lock is on.
You can start by making everything smaller or larger if you prefer.
Print and cut your Valentine’s Stickers
When doing the final prep for cutting our stickers, we have two options. We can cut out the stickers so that they are loose stickers or that we have sheets of stickers. I will walk you through how to do each option. For Valentine’s stickers, I like to do loose-cut stickers as they are going into Valentine’s Day loot bags. But in case you want sticker sheets, we’ll talk about that too.
Perform a test Print Then Cut – Optional
If you are new to stickers, you may not be certain that everything is ready to go. One thing I like to do before I commit to printing on sticker paper is perform a test print and cut.
I will simply print the design out on regular paper and put it through my Cricut to cut it out. This will show me if the designs work and if the flattened items are done properly.
Even though this may take a few minutes to perform, I find it helpful as it has saved me many sheets of sticker paper when I was learning.
Loose cut Valentine’s Stickers
If you are like me and like having loose stickers to give away, then this is the method for you.
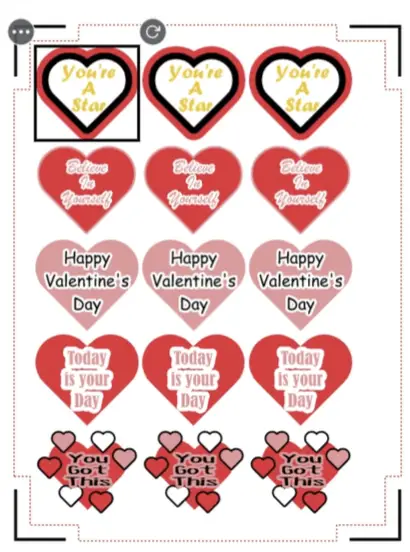
Now that all our checks are done, select MAKE and get it ready to print then cut.
I like rearranging the stickers on the cutting mat to put as many stickers on a page as possible. I find that Cricut Design space does not conserve paper very well. So, I will spend a few minutes moving the stickers around to fit as many onto a sticker sheet as possible.
Printer Settings for Loose Cut Stickers
Once you are ready to print then cut your stickers, you will need to send your sticker sheet to print.
I make the following adjustment to my print setting:
- Print quality = high/best quality – this will make the color of the stickers pop as much as possible.
- The bleed toggle is set to ON – this helps with the color around the edges when printing/cutting
Once happy with the printer settings, send the sheet to your printer to print your sticker sheet.
Cricut Cut Setting for Loose Cut Sticker
Now that your sticker sheet has been printed, place it on your cutting mat. It is important that the sticker page layout is the same as that on the DS cutting mat screen. Do not want it to be upside-down because your sheet will cut out wrong.

You have several options for how to cut loose stickers. I found that the following works best:
- Set your Cricut Dial to Custom – Select Printable Sticker Paper, White, (gray liner printing)
- This typically cuts your stickers out with no issue. However, if your mat is not sticky enough, or is too sticky, your sticker paper may not peel away from your stickers completely.
- Set your Cricut Dial to Cardstock
- This will cut your stickers nicely. It will perform 2 cuts on each sticker, so it may take a bit longer.
- Set your Cricut Dial to Light Cardstock
- This will cut your stickers, but if your blade is a bit dull, it may not cut all the way through.
You may need to play around with your machine to see which setting works best, but there are the ones that I find are best for loose-cut stickers.
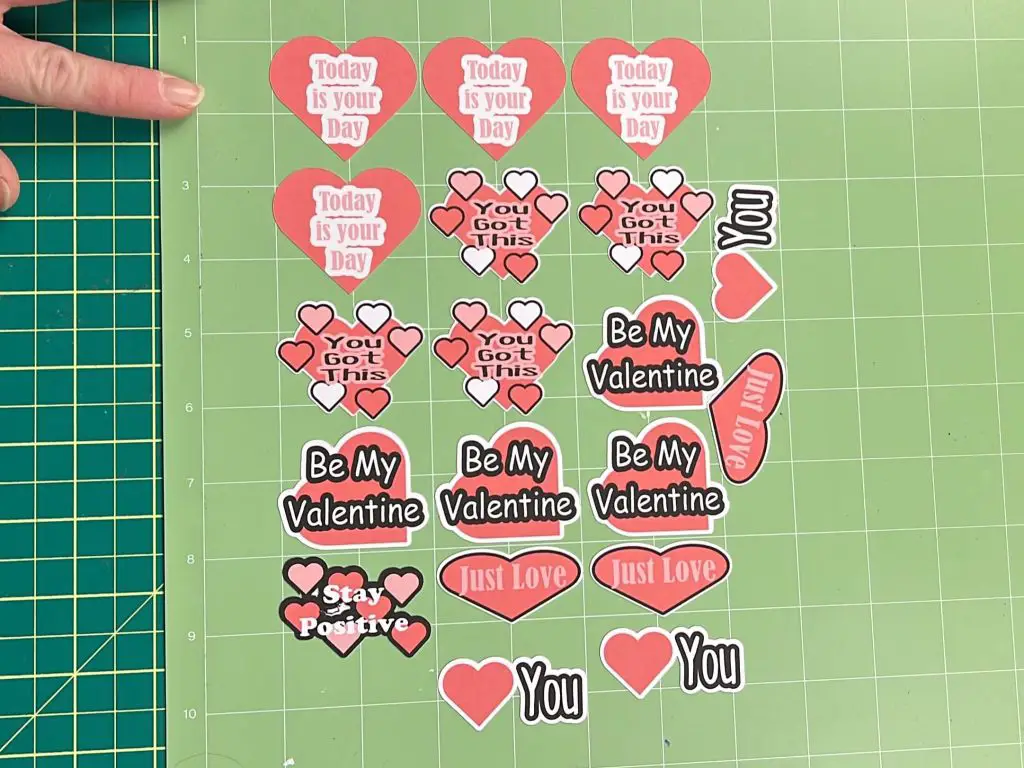
Push the flashing C on your Cricut and wait for your stickers to cut out.
Once they are cut out, flip your cutting mat upside down and peel the mat away from the sticker paper and stickers.
Kiss Cut Valentine’s Stickers
Using the Kiss Cut for stickers is a great way to make sticker sheets. You can allow Cricut Design Space to arrange the stickers on the sheet for you, or you can arrange them yourself.
If you want to arrange the stickers by yourself, it is fairly simple. While still on your Canvas in Cricut Design Space, you will need to arrange the stickers in the layout that you want them to be cut.
Once happy with the placement, select all the stickers and then select the Attach button. This will force all the stickers to stay the way they are next to each other.

It is important to note that depending on the layout of your sticker arrangements, you may be outside of the print then cut area. The max print then cut size on an 8.5″ by 11″ sheet is 6.75″ x 9.25″.
Now, select MAKE and it will go to your cutting mat layout.
Printer Settings for Kiss Cut Stickers
Once you are ready to print then cut your stickers, you will need to send your sticker sheet to print.
I make the following adjustment to my print setting:
- Print quality = high/best quality – this will make the color of the stickers pop as much as possible.
- The bleed toggle is set to ON – this helps with the color around the edges when printing/cutting
Once happy with the printer settings, send the sheet to your printer to print your sticker sheet.
Cricut Cut Setting for Kiss Cut Sticker
Now that your sticker sheet has been printed, place it on your cutting mat. It is important that the sticker page layout is the same as that on the DS cutting mat screen. Do not want it to be upside-down because your sheet will cut out wrong.
I have tried several options for cutting kiss-cut sticker sheets, and I found that so far, the below works. As I experiment more, I will update this list with my findings:
- Set your Cricut Dial to Custom – Select Washi Sheet (not Washi tape)
- This cuts only the top layer of the sticker paper and not all the way through the sticker sheet.
You may need to play around with your machine to see which setting works best with your machine, as you may have different results.
Push the flashing C on your Cricut and wait for your stickers to cut out.
Once they are cut out, flip your cutting mat upside down and peel the mat away from the sticker paper. It should all come off as one piece of paper.
Now, you can use either your scissors or a paper cutter to remove the edges of the sticker sheet with the Cricut cutting markers on.

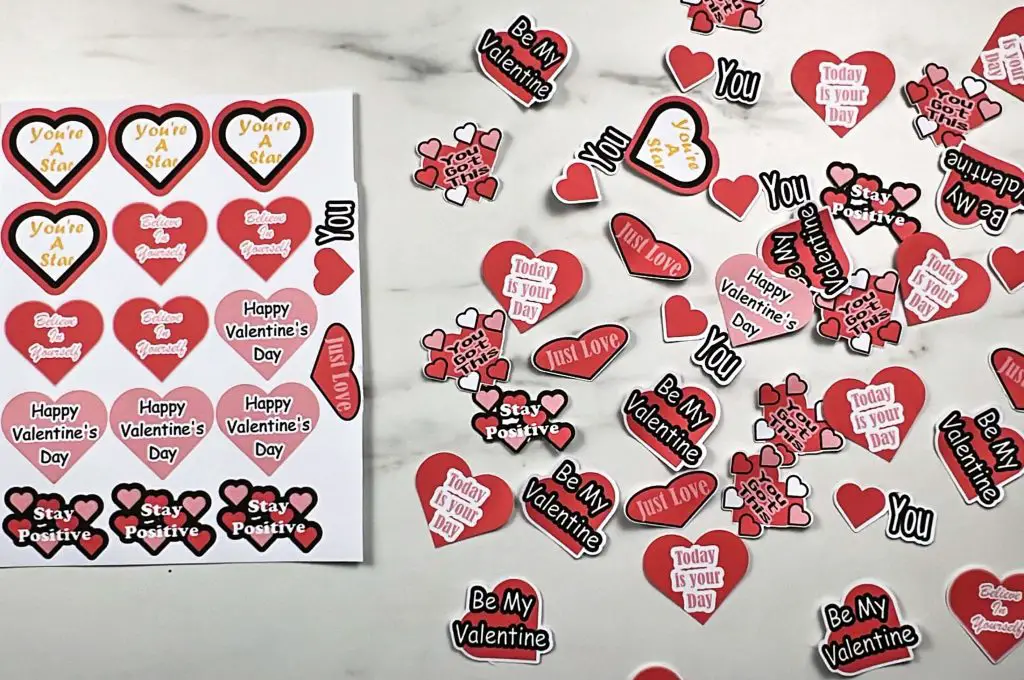
And that’s it! You’re done! Your Free Valentine’s Day Stickers are complete!
Things I learned while making these Stickers
As always, there is something to learn when crafting. This time, while I learned how to make free Valentine’s Day stickers I learned a bunch. So, here goes:
- Designing stickers is not too hard, but I feel like my design capabilities, or my idea of what looks good, might be stuck in the late 80’s or early 90’s…. So maybe I should work on updating that… hahaha.
- I prefer to use my system fonts because I know they are free. Some free fonts available through the Cricut Design Space are not always free. Cricut will often change which fonts are free, require Cricut Access Membership to be free, or require payment. So, if you use DS fonts, just be aware that these fonts may not be free in the future. This becomes problematic if you want to reuse this design or if not cutting the project the same day you are designing.
- The basic colors found in Cricut design space are not as bold and vibrant as in other design programs. My printer, the Epson Eco-tank 2850, prints vibrant colors, so I know it’s not the printer. If you can design in another program, such as Inkscape, and import the drawings, you will have a nicer color pallet at the end of the project.
- Some of my designs have holes in the offsets. I thought that I had removed them all when working on the design. While cutting the stickers, I learned that I had not. This cut a small hole in the middle of the stickers. It kept with the design that I wanted, but the cut for the loose-cut and kiss-cut stickers did not look right. So, I would recommend removing any gaps in the sticker design.
Frequently Asked Questions about Making Stickers
How to make kiss-cut sticker sheets with cricut?
Set your Cricut Dial to Custom – Select Washi Sheet (not washi tape). This cuts only the top layer of the sticker paper and not all the way through the sticker sheet.
You may need to play around with your machine to see which setting works best with your machine, as you may have different results.
How to make loose-cut stickers with Cricut?
You have several options for how to cut loose stickers. I found that the following works best:
- Set your Cricut Dial to Custom – Select Printable Sticker Paper, White, (gray liner printing)
- This typically cuts your stickers out with no issue. However, if your mat is not sticky enough, or is too sticky, your sticker paper may not peel away from your stickers completely.
- Set your Cricut Dial to Cardstock
- This will cut your stickers nicely. It will perform 2 cuts on each sticker, so it may take a bit longer.
- Set your Cricut Dial to Light Cardstock
- This will cut your stickers, but if your blade is a bit dull, it may not cut all the way through.
You may need to play around with your machine to see which setting works best with your machine, as you may have different results.
What is the max print then cut area with Cricut?
It is important to note that depending on the layout of your sticker arrangements, you may be outside of the print then cut area. The max print then cut size on an 8.5″ by 11″ sheet is 6.75″ x 9.25″.
If you manually arrange your stickers on the cutting mat, you can maximize the use of your sticker paper.
Tips for making stickers
If you are designing your own stickers, I recommend having an offset or a shape outline behind the sticker design. Any small loose parts around the edges of the sticker, or holes in the middle of the stickers can make your stickers rip easier.
Did you enjoy this tutorial on how to make free Valentine’s Day stickers with your cricut?
Did you enjoy this tutorial on how to make free Valentine’s Day stickers? Let me know in the comments below! Did you try this craft? Let me know how it turned out!
If you enjoyed this craft, check out my paper crafts here.
If you liked making stickers with me, check out some of my other sticker tutorials listed below:

Thank you Katherine. This was very informative and helpful. I have done stickers before so this was more of a review for me but I learned a few things that will help make my stickers even better in the future!
Glad you found the info helpful! Thanks and Happy Crafting!