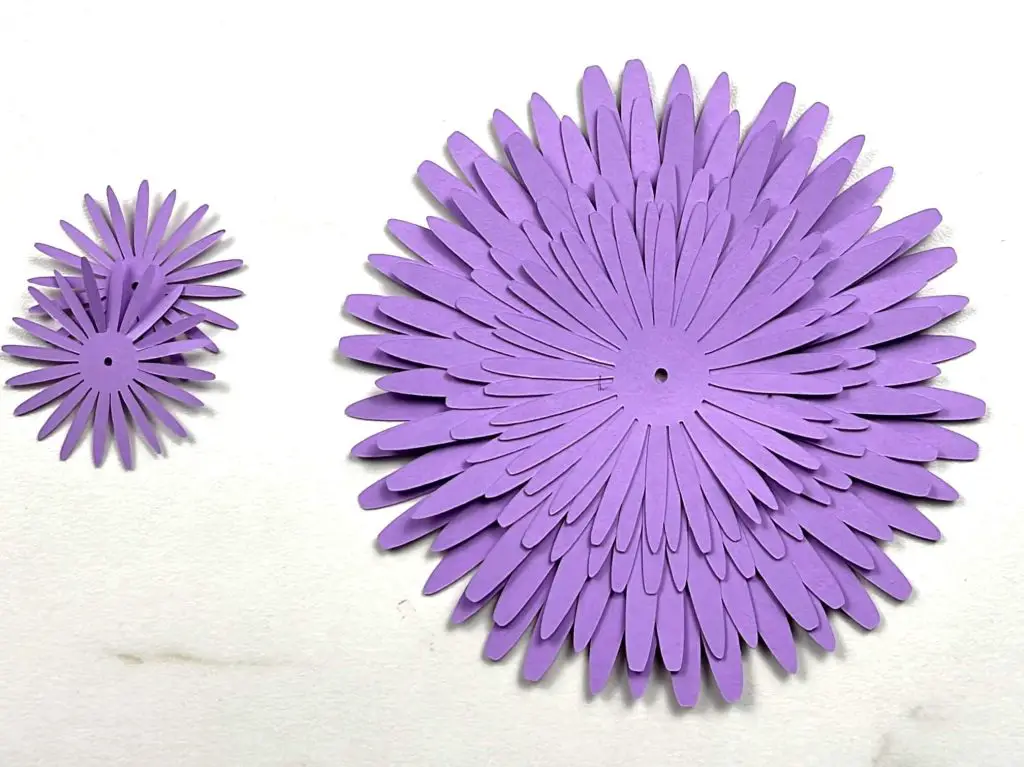
For the longest time, I didn’t know what these flowers were called. And then, when I started to learn flower names, I thought these were chrysanthemums. Well, good thing Google has features where it can identify things in pictures, so I finally figured it out! These are Gerbera Daisies! So, let’s make some paper Gerbera daisy flowers!
Supplies needed to make paper Gerbera daisy flowers
Ok, staying on the simple paper flower theme, we will stay with the simple supplies list. I will be walking you through making a purple Gerbera daisy, so if you want to make different colors, substitute purple with your color.
- Cardstock – I used Recollections brand cardstock. I find that the 8.5″x11″ works best for me. You will need 3 colors:
- Light purple – 3-4 sheets of 8.5”x11”, depending on how well you can organize the pieces on your cutting mat layout. This is for the flower petals.
- Light pink – 1 sheet of 8.5”x11”, or a scrap piece of paper large enough to fit the smaller petals. This is optional for the small center flowers.
- Brown – one sheet of 8.5” x 11” for the flower center
- Green – one sheet of 8.5” x 11” for the leaves
- Metal flower stem – I often buy my flower stems from the local dollar store, but this time when needed, the dollar store had none in stock. So, I bought these ones on Amazon. I would have preferred thicker stems for these flowers as they have very thick stems in real life.
- Glue – There is a fair amount of gluing required here. So, you will need:
- Crafting glue – I used my Bearly Art Crafting glue. This is for the flower petals and center.
- Hot glue with a glue gun – this is for working with the stems.
- SVG cut file – You can get a copy of my SVG cut file here.
- Cutting Machine – I used my Cricut Explore Air 2, but any cutting machine will work.
Now that we have all our supplies ready, it is time to make these paper Gerbera daisies!
Using the Paper Gerbera Daisy Flower SVG file
You will want my paper Gerbera Daisy Flower SVG file, which you can get here.
Once you have downloaded the file, there are a few steps that need to be taken when working with this file. So, I’ll do a quick walk-through of what we do.
- Download the file to your computer or tablet.
- Unzip the file.
- Upload the file to Cricut Design Space.
- Select the Upload Icon on the left side of your screen.
- Select the Upload Image button.
- Select the Gerbera Daisy File from the location where the file was saved the unzipped file.
- Select the Gerbera Daisy file from your DS Recently Uploaded documents. There should be a green rectangle around it.
- Hit the Add to Canvas button.
- Once the Gerbera Daisy is on your DS canvas, select the image, and hit the Ungroup Icon on the top right side of your screen.
- Select the group of flower petals. The size should be around 4.5”-5” size. If it is not, or if you want them to be bigger or smaller, select all of the items from the design and increase or decrease the size to your liking.
- Duplicate the flower as many times as you wish.
Once happy with the number of flowers, hit the Make button and send the flower to your Cricut to cut.
You may need to rearrange the flower elements on your cutting mat within DS to make the best use of paper.
Assembling your Paper Gerbera Daisy
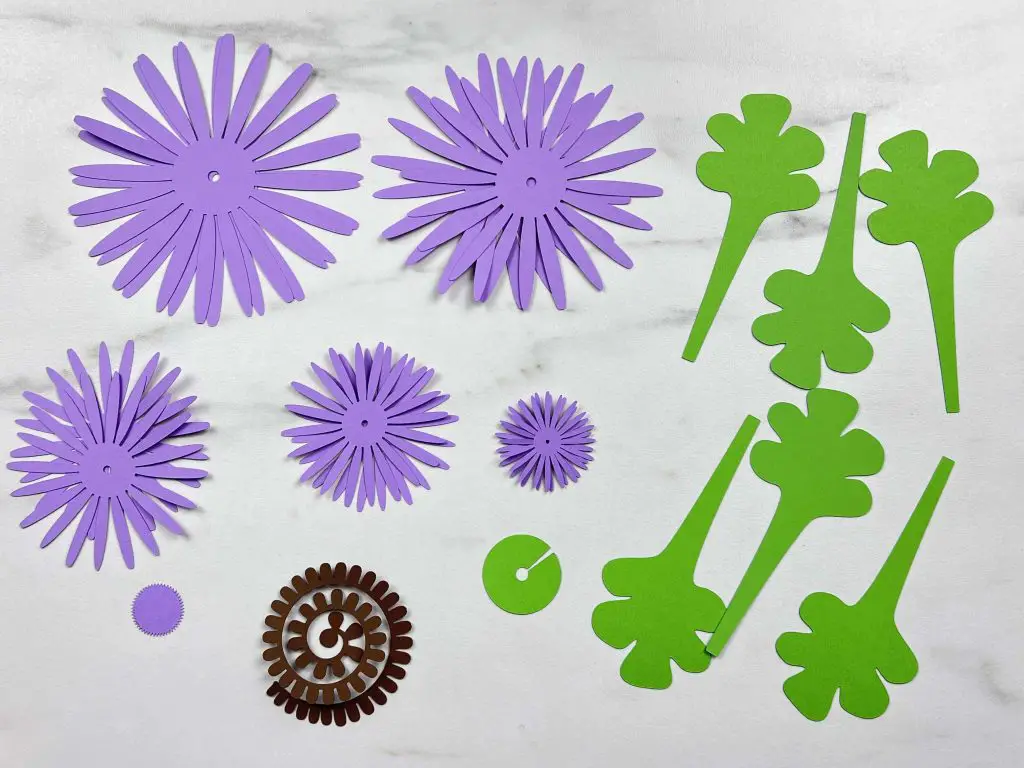
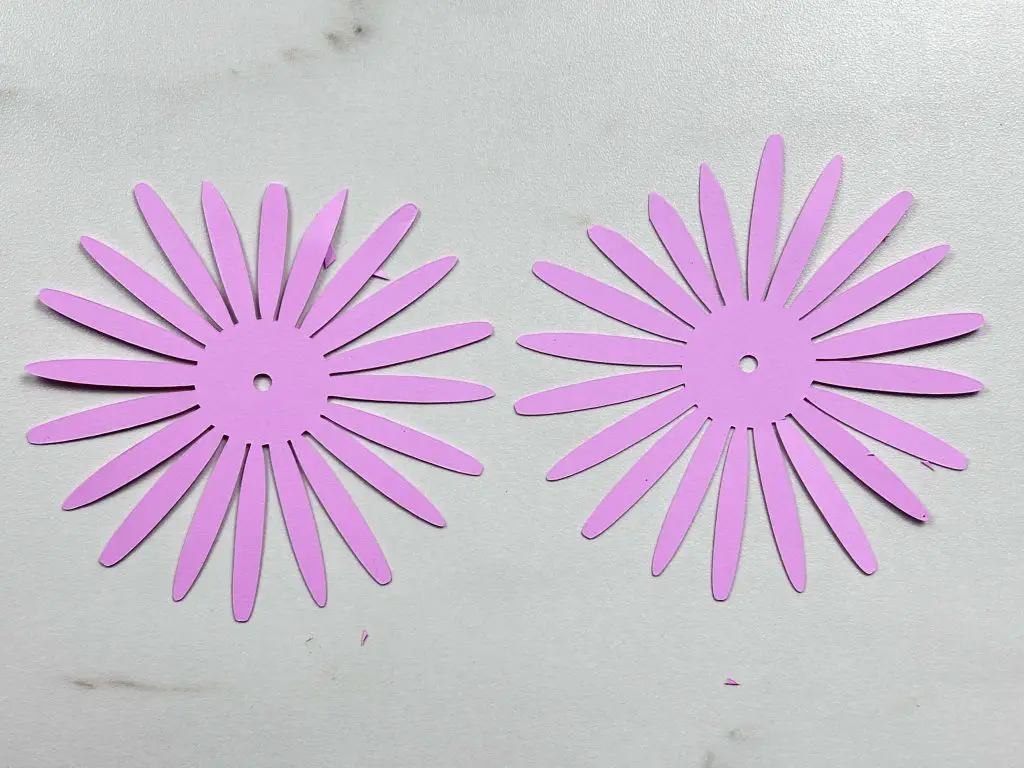
Once you have cut out your Gerbera Daisy, you should have the following pieces:
- 2 extra-large purple petal sections
- 2 large purple petal sections
- 2 medium purple petal sections
- 2 small purple petal sections
- 2 extra small purple petal sections (if you want to make this multi-colored, these petals can be another color.)
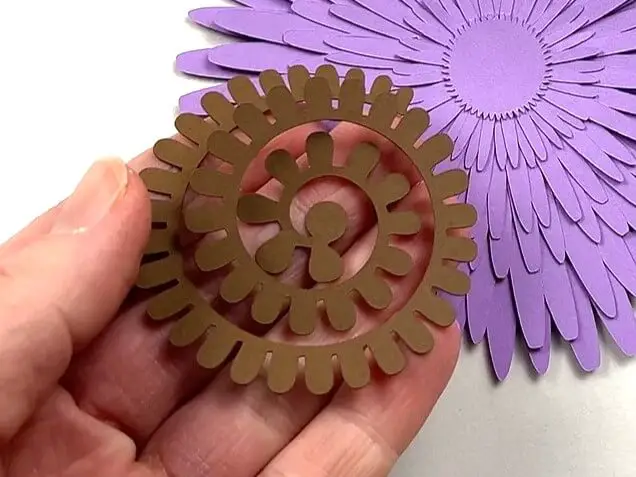
- 1 purple center circle with jagged edges
- 1 brown spiral flower
- 1 green circle with a cut through the side
- 6 green leaves
Now that we have all the pieces cut out, it is time to assemble our Gerbera Daisy.
Assemble the Paper Gerbera Daisy Flower Head
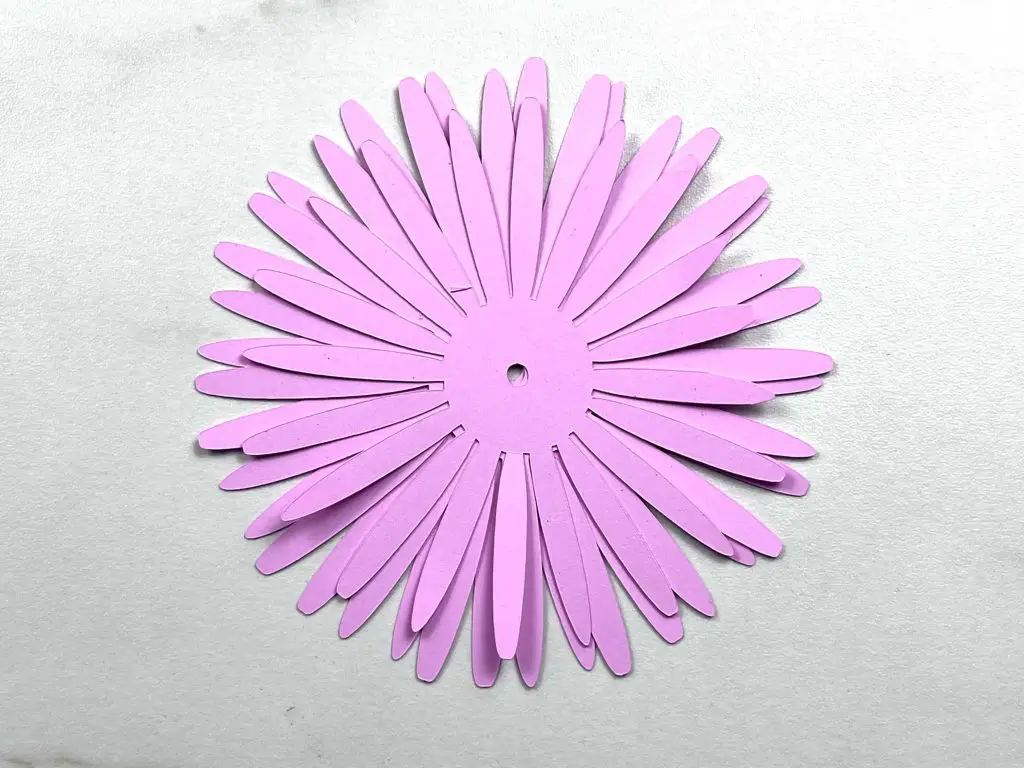
I like to start working on the flower head, or top part, the part where all the petals are. Assembling this part is easy.
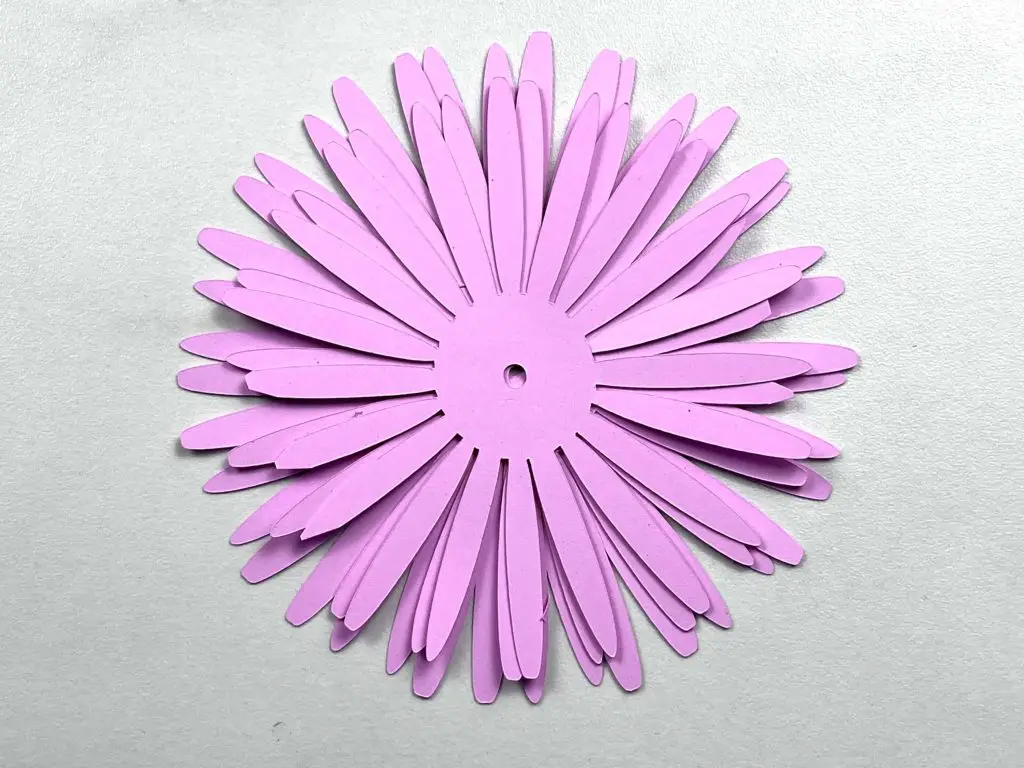
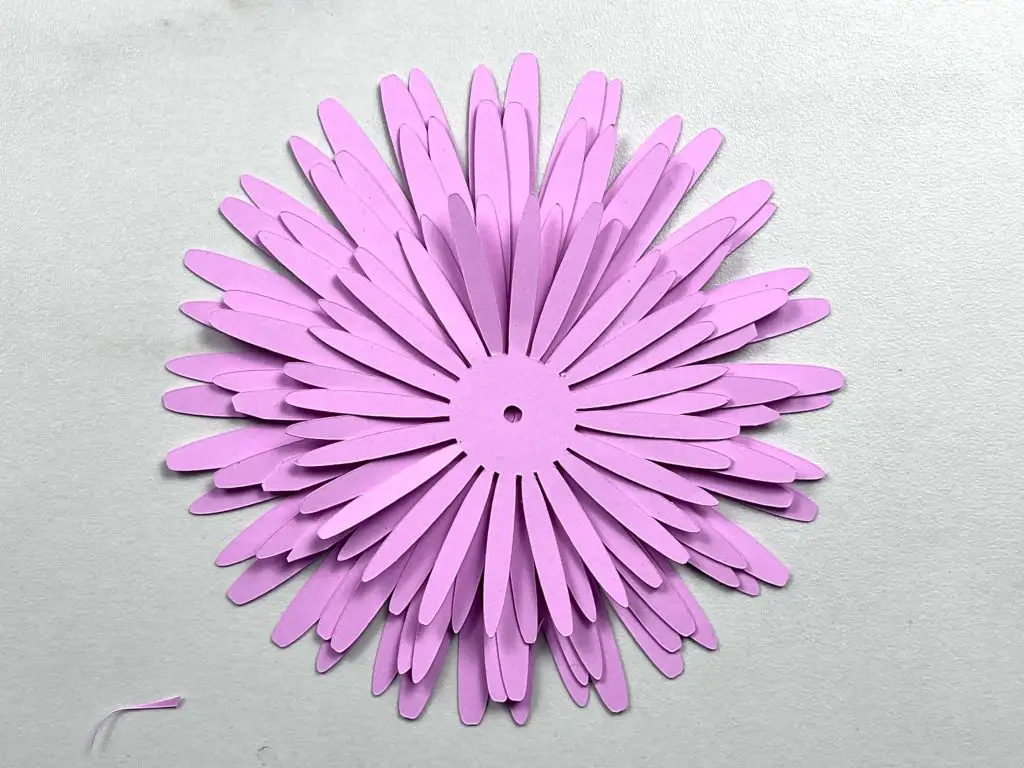
Simply match up your petals by size. Starting with the extra large petals, glue the two petal sections together. Apply some glue to the center of the petals and place the second one on top. When gluing them, you want to rotate the top petals slightly so they fill in the gaps for the bottom petals. The hole in the middle of each petal section is to help you align the petals so they are centered. These holes do not need to be perfectly aligned. Next, apply glue to the center of the extra large petals and place the large petals on top. Continue gluing each of the petal sections onto the next until you have glued all of the petal sections together. Then, glue the little purple circle with jagged edges onto the top center of the extra small petals.
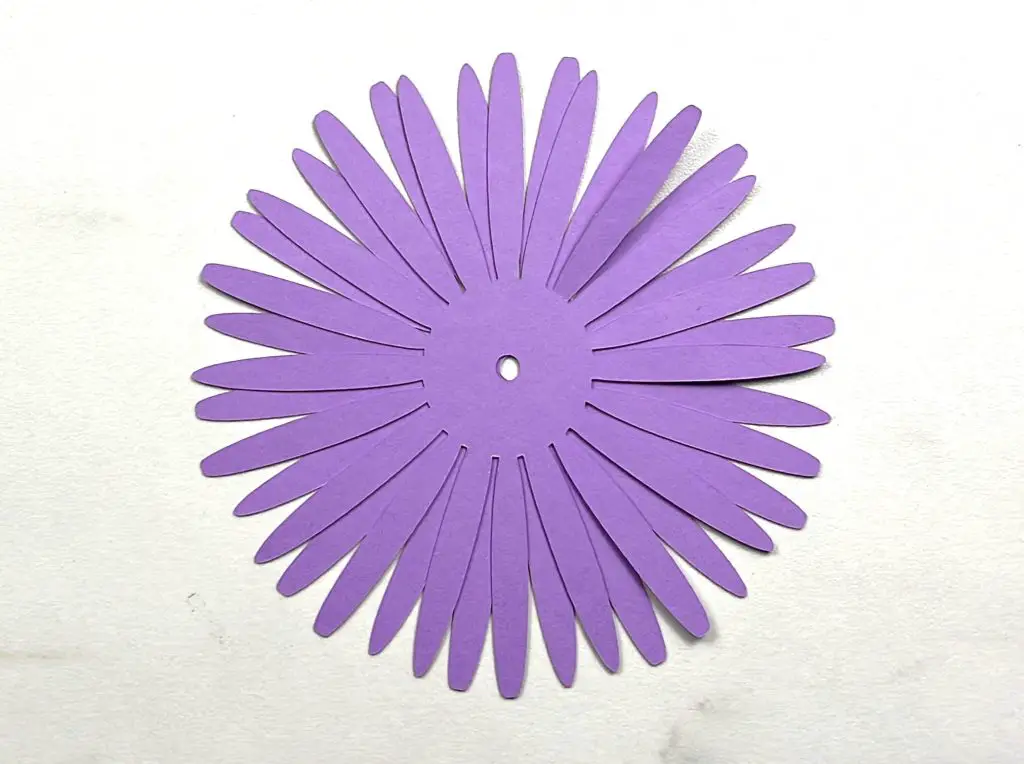

Once the glue has dried on these petals, you can fan out the petals. Pushing/rolling the larger petals backwards and the smaller ones forwards. You can do this now or at the end of the project.
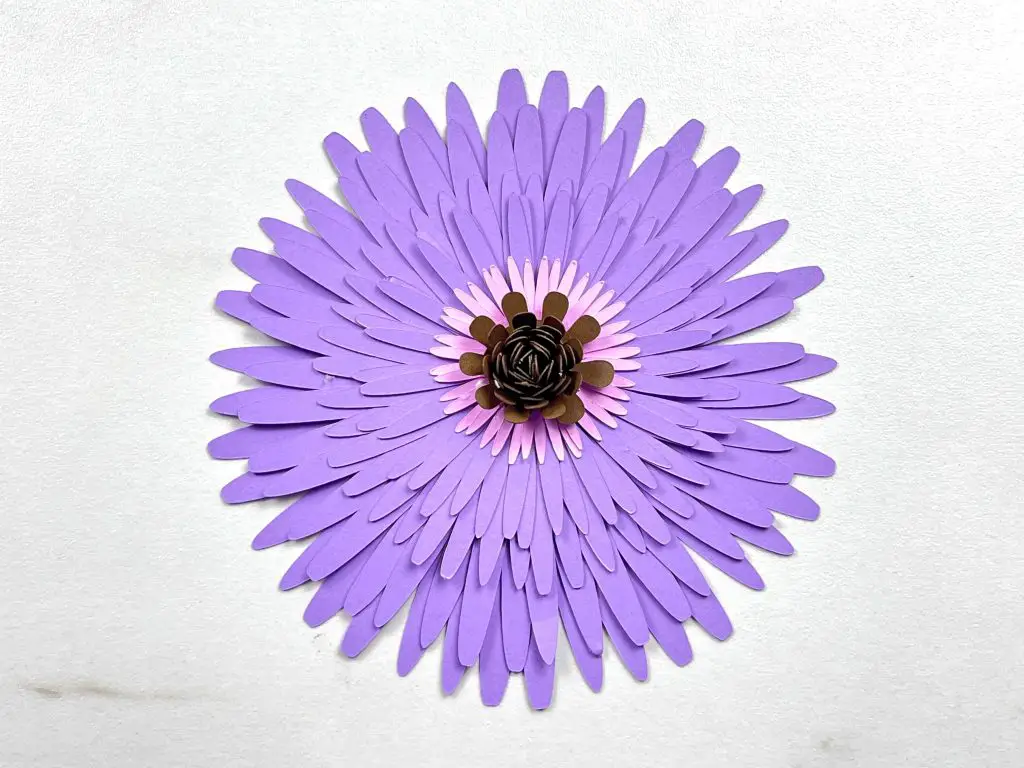
Roll the Gerbera Daisy Flower Center
Now, it is time to roll the brown center of your Gerbera Daisy paper flower. Begin at the outside edge of the brown spiral and slowly roll it into a small circle. I find squishing the paper with my fingers and making it more pliable helps with rolling. Keep rolling until the entire spiral is rolled.
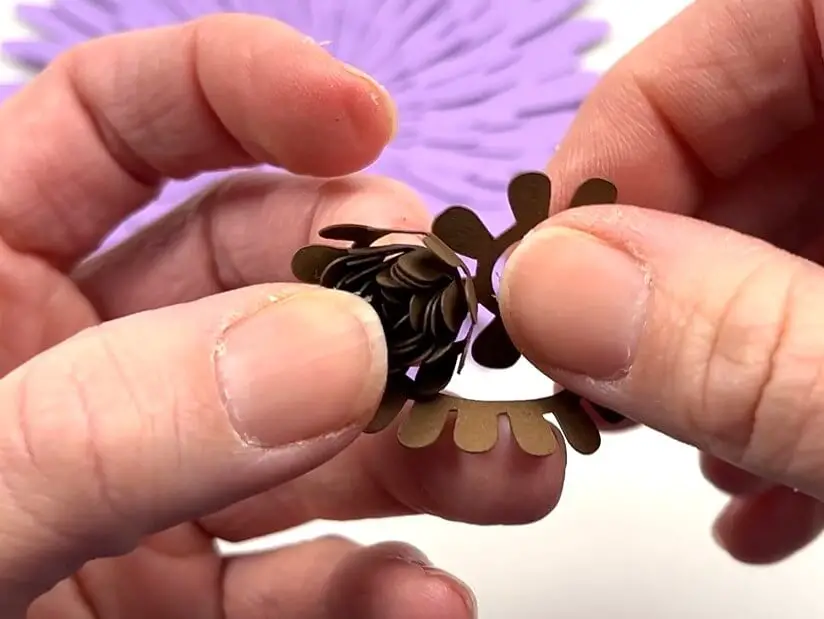
This is IMPORTANT – you do not need to roll this center tightly. You want it to be loose. When you start rolling, you can roll it tightly, but at the end, you want to release it a bit so it has more volume.
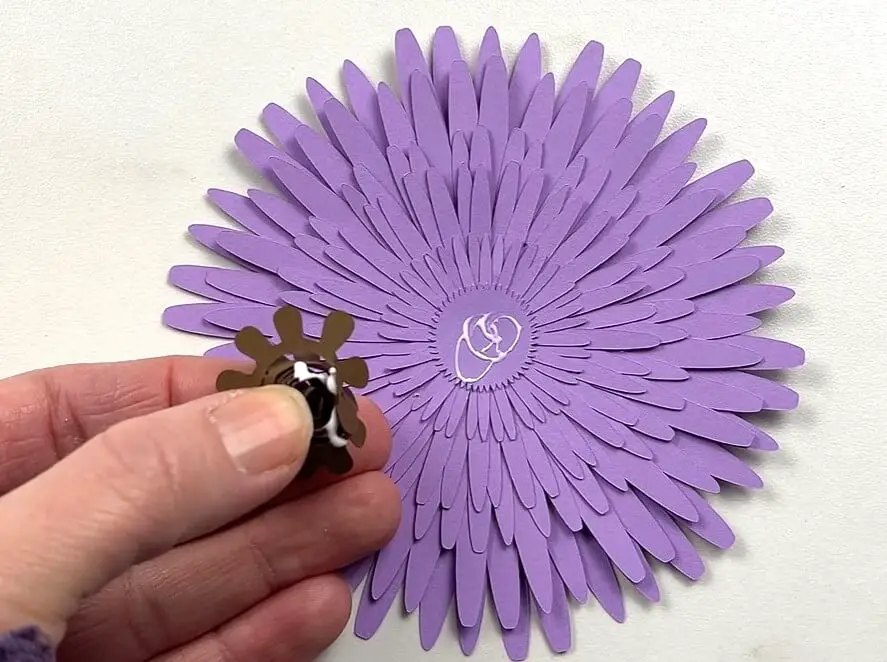
Once you have rolled the center of the flower, there is a little circle at the end. This is used to help glue it in place. But all of the rolled center will not fit on this center circle. Carefully apply glue to the inside portion of the center circle as well as the bottom edge of the rolled flower. Now, place it in the purple center on the petals. Hold it in place for a few seconds while the glue dries. Remember, you want the center to be loose, not tight, so it is ok if it falls apart while being glued into place.

Attaching The Leaves To The Stem Of Your Paper Flower
When attaching the leaves to the stems, I find that working with my hot glue and glue gun works best because these need to dry quickly. So, let’s warm up our glue guns and start attaching leaves to our stems!
As I mentioned, there are 6 leaves per stem. You do not need to use all 6 on each stem. I found that using 1-2 per flower was sufficient.
I’m going to walk you through one leaf. Then repeat the steps for however many leaves you want to add to your stem.
Find a location on the stem where you want the leaf to be. Angle it at about 45 degrees from the stem. Drop a dab of glue at the bottom of the leaf. Attach it to the stem. Start rolling the leaf around the stem. You should be able to get 2-3 turns around the stem with the paper leaf. Add a small dab of glue on the leaf at the edge of the stem to hold the leaf in place.
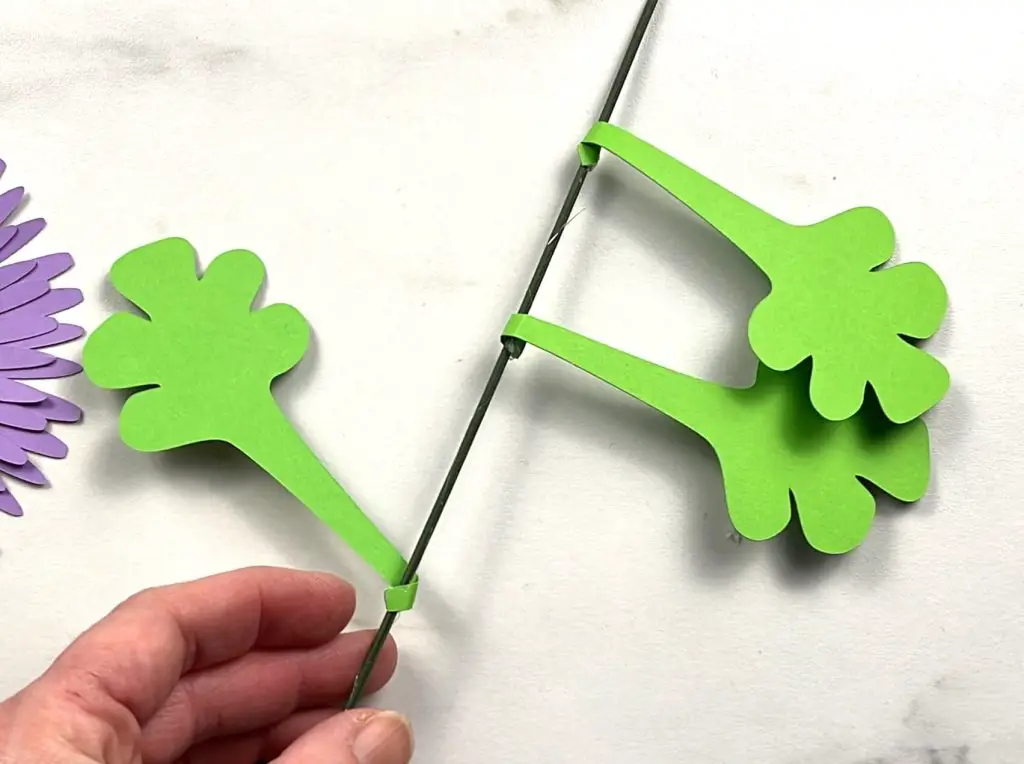
Repeat this process for as many leaves as you want on the stem.
Attach the Gerbera Daisy Flower to the flower stem
Now that we have all our pieces ready, it is time to attach the flower head and the stem together.
For this, I like to use my hot glue and glue gun. I find that craft glue doesn’t dry fast enough and doesn’t always hold the two pieces together.
The first thing I like to do is to give the tip of the stem a bit of a bend. This will allow the flower head to sit a bit off the stem.
Then, apply a dab of hot glue onto the back of the flower. Place the stem onto the glue.

At this point, you can attach the green backing to cover the connection point between the flower and the stem. This will cover the glue spot if you would like.
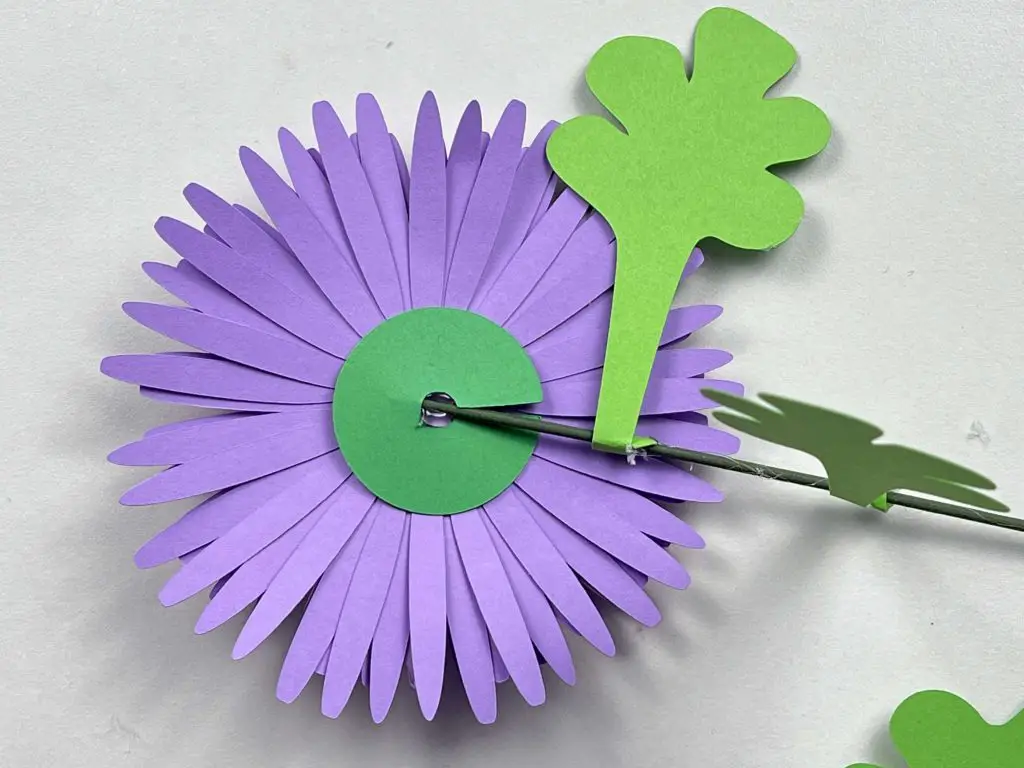
Repeat this for each flower.
Once you are done, all that remains is to place the flowers into a vase, and your paper Gerbera daisy flowers are complete!
And there you go! Your Paper Gerbera Daisy Flowers are complete!
Things I learned while making these paper gerbera Daisies

My flower-making days are just at a start, so there is always lots of learning happening. And here are my latest takeaways:
1. These flowers require a lot of paper. Cricut Design Space does not do a good job of maximizing the space used on paper. I spent a lot of time rearranging my flower petals on the cutting mat to get as many pieces on a sheet as possible. So, be prepared to spend a good amount of time on this activity if you want to save on paper.
2. There were several petal pieces that, when got cut, either cut outside the paper edges, or the petal ripped off when I was removing it from the mat. These pieces are not garbage, and can still be used.
- If your flower petal cuts outside the paper edge, you can trim the short petal to be curved like the other pieces and leave it shorter. With all the petals on the flower, you will not see that there are incorrect pieces.
- If you have more than one petal section with miscut petal pieces, simply arrange the short pieces on opposite sides of the flower. This way, the short and long petals will bend in.
- If you are missing a petal, you can still use the petal piece. For best results place the petal piece with the missing petals behind the full piece.
- If each of your layers is missing a petal or two, have them rotated away from other missing petals. With all the other petals, it will be hard to see the missing pieces.
3. I like to fan out my petals after I have assembled the flower. I find it is easier to glue the petals together when the paper is flat. But you can fan and roll the petals at any point in the process.
4. Adding more colors to the flower can add some more depth to the flower. I made several flowers of one color and a few with 2 colors. The only advice I have about multi-colored flowers is that you should try to match the colors so they complement each other. If your colors are too far apart, it can make the flower look fake.
5. Real Gerbera Daisies have a very thick stem. When I was looking for stems for these flowers, I was unable to find anything close to the thickness of a real Gerbera Daisy. But even with the thin ones they still look great.
Frequently Asked Questions about Paper Gerbera Daisies
How do I resize a flower template for paper gerbera daisies?
The file that I designed has the large petals at about 4.5” in size. If you want the flowers larger, all you need to do is ensure the dimensions are locked, select all the design elements and stretch them out. Or you can manually increase the size by typing in a size larger (or smaller). I found that 4.5”-5” is a good size, as this is similar to the size of real Gerbera Daisies.
Best glue for assembling paper gerbera daisy petals?
When assembling the petals on my paper Gerbera Daisy, I found that craft glue works best. I used Bearly Art Craft Glue. This glue dries clear and quickly and is wonderful to work with.
Can I use recycled paper for paper gerbera daisies?
These flowers can be made with any type of paper. My example was made with purple cardstock, but you can use any style or color. You can even use scrap pieces of paper or recycled paper, as well.
Tips for adding realistic details to paper gerbera daisies?
A few things that can be done to these paper flowers to make them look even more realistic are:
- Using a scoring stylus, you can add a line or two in the center of each petal to give the petals more definition.
- Rolling/curling the petals back and forth to give the flowers more shape makes them look more life-like.
Creative ways to display paper gerbera daisies?
I think that Gerbera Daisies are an awesome-looking flower. And they look great set up anyway, but if you are looking for some more options on how to display your paper Gerbera daisy flowers, here are some more options:
- Displayed in a simple vase
- Placed into a paper flower arrangement with other flowers.
- Placed into a display in floral foam bricks in an elegant tray
- Placed on top of a card when given as a gift
- Placed on top of a gift box.
- Made into a floral wreath
Did you enjoy this tutorial on making paper gerbera daisy flowers?
Did you enjoy this tutorial on making paper Gerbera daisy flowers? Let me know in the comments below. Did you try making these paper Gerbera Daisy Flowers? let me know how they turned out!
If you enjoyed this paper craft, check out my other paper craft here.
If you like making paper flowers, check out my other flowers listed below:
- How To DIY Mini Chrysanthemums
- How To Make Paper Lavender Flowers
- Black-Eyed Susan Paper Flowers
- How To Make Beautiful Paper Hydrangeas