The other day, I was walking the kids to school and was fumbling with my keys and phone. It was a nice day outside, and I had no pockets on me. I didn’t want to carry a bulky purse on the walk to school, so I decided I needed a fanny pack. But not one of the big ones that everyone has. Just a small flat fanny pack, that carries 1-2 small things. I don’t need my wallet in there, and I don’t need the car keys in there. All I need is my phone and house key. That’s it! So, off I went to make a small flat fanny pack!
As an Amazon Associate, I earn from qualifying purchases. This post contains affiliate links. I may receive a commission if you purchase an item from one of my links. This will not change the price you pay.
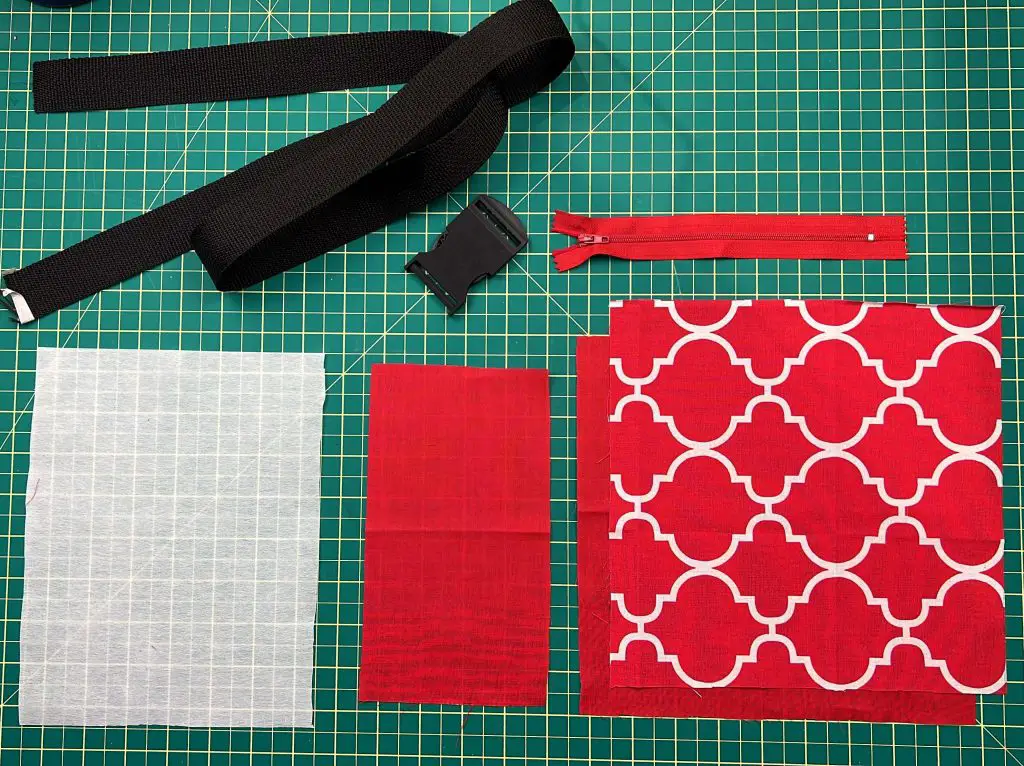
Supplies needed to make a flat fanny pack
As I explained above, I wanted this fanny pack to be small and flat. Only enough to carry my phone and keys. And maybe a card or two. But nothing else. So I’m making this small. Here’s what we need:
- 9″x 9″ fabric for the outside of your fanny pack. This can be plain or have a pattern on it. I opted for a pattern.
- 9″ x 9″ fabric for the inside liner. Again, you can have this any color, matching your outer layer or scraps from previous projects.
- 4.5″ x 8″ fabric for the pocket – I used the same color as my liner.
- 7″ x 9″ interfacing. This is optional. But if you use this, I recommend the stuff that you iron on and not sew in, as it makes the final stitching easier. If you are using the iron on stuff, you can reduce the dimensions to 6.5″ x 8.5″.
- Zipper – 7″ in length, color to match your fabric, preferably.
- 1.5″ buckle and tri-glide slider
- 1.5″ nylon webbing. I wanted 1.5″ for looks, but you can go bigger or smaller. Just keep in mind that if you change this size, you need to adjust your bucket and tri-glide slider as well.
- Chalk pen or fabric marker.
- Thread – matching to your color scheme. I used black thread so it would stand out in the pictures for this post, but matching looks better.
- Sewing machine – you can do this by hand, but that will take a lot more time, so I recommend a sewing machine.
- Iron and Ironing board or place to iron
- About 45 minutes
Also, any fabric we use should be ironed for ease of sewing.
If you want a bigger flat fanny pack, I have made some notes below on how to modify this design to make it work.
Let’s Start Making our Flat Fanny Pack!
Okay, there are several steps involved in making a flat fanny pack, so let’s start off with the easy bits.
How to make a card pocket for a fanny pack
When making the pocket for the fanny pack, we first want to use our 4.5″ x 8″ piece of fabric. Fold it in half, and iron flat. Sew along the 3 open edges of the fabric. On the last side, leave a small gap, about 1″ from the edge.
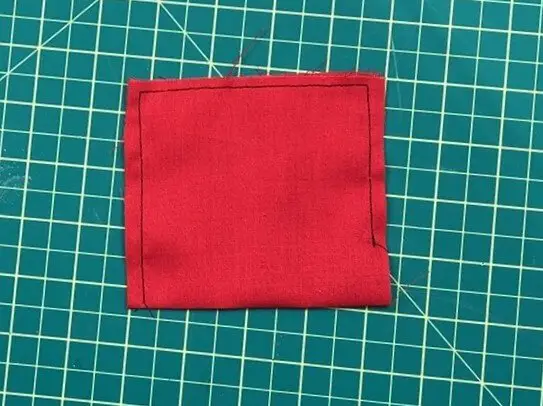
Once done sewing, snip the 3 corners but not the fourth with the gap next to it.
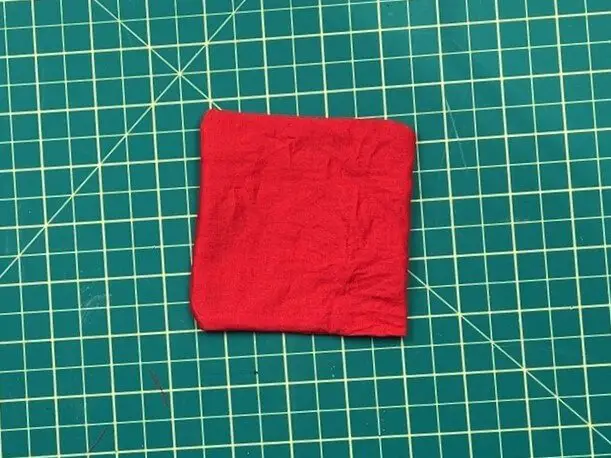
Flip the fabric inside out so that the seams are hidden. Flatten out the pocket and push the corners out as far as possible. Once done, iron the fabric to make it smooth.
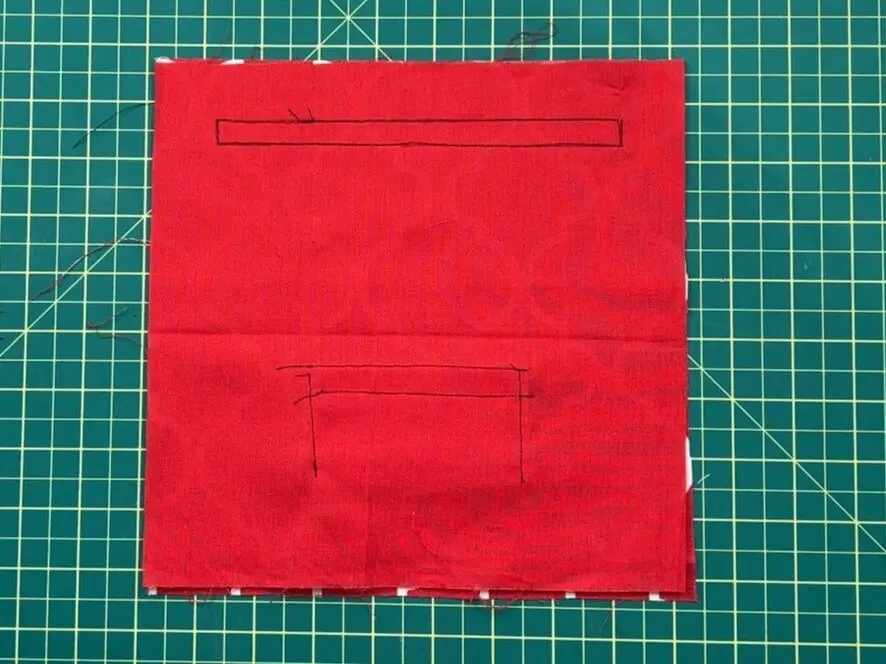
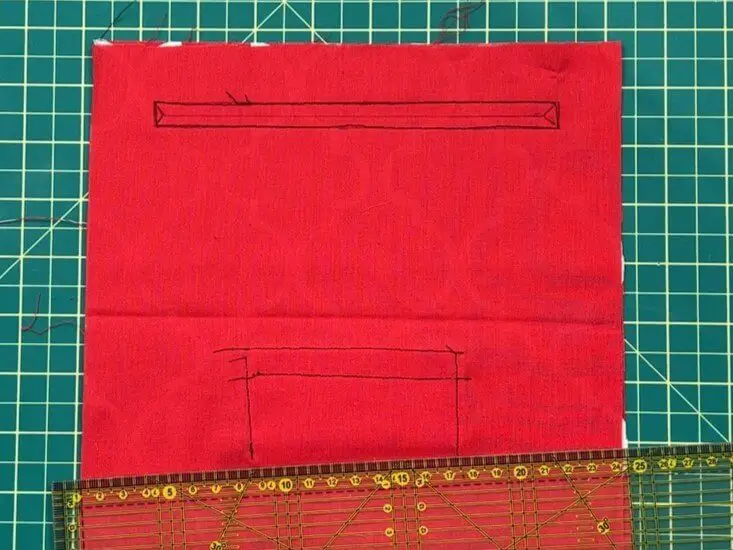
Place your pocket on your work table. Draw two lines from the top edge, one at 1.5″ from the top and the other at 2″ from the top.
Place your liner on your work table. You want to find the center of the liner at the top of the fabric. This will be 4.5″ from the edge. Draw a line down the fabric about 4 inches. Find the center of your pocket and mark it down. Now, you want the top of your pocket to be 1.75″ from the top of the liner. And you want to align your centers.
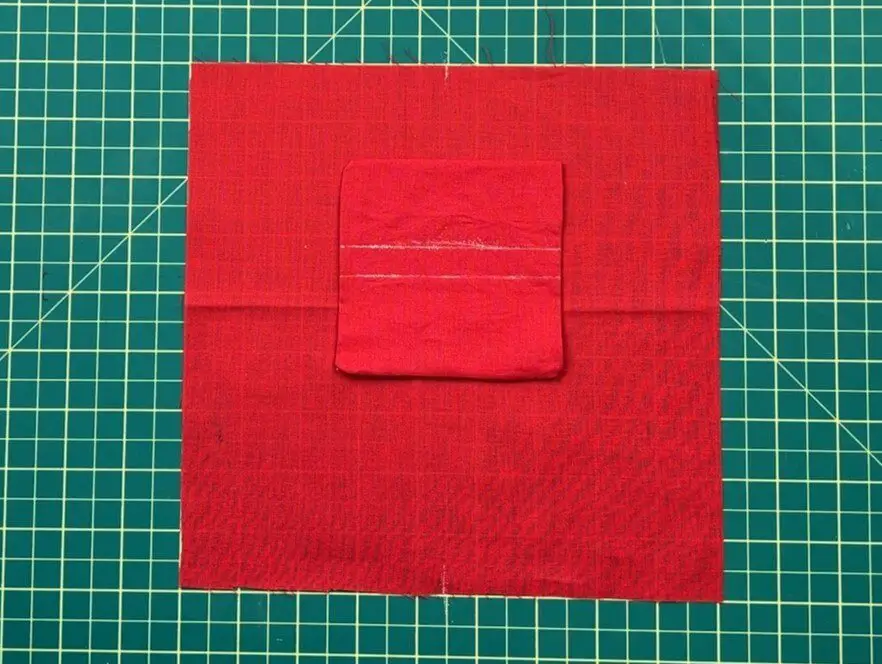
Pin the pocket onto the liner. The two lines that you drew onto the pocket – using those lines sew the pocket onto the liner at those lines.
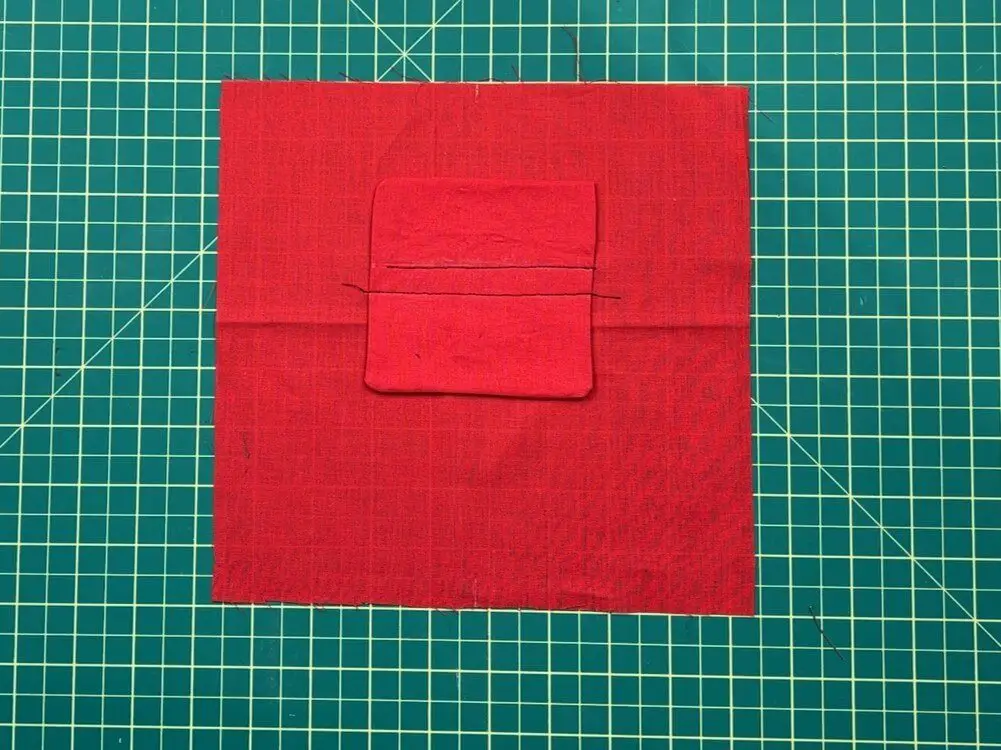
Bring your pocket and liner back to your ironing board, and pull the bottom portion of the pocket up, fold it, and iron it down. It will look like 2 steps.
Once flat, sew a line along both edges of the pocket.
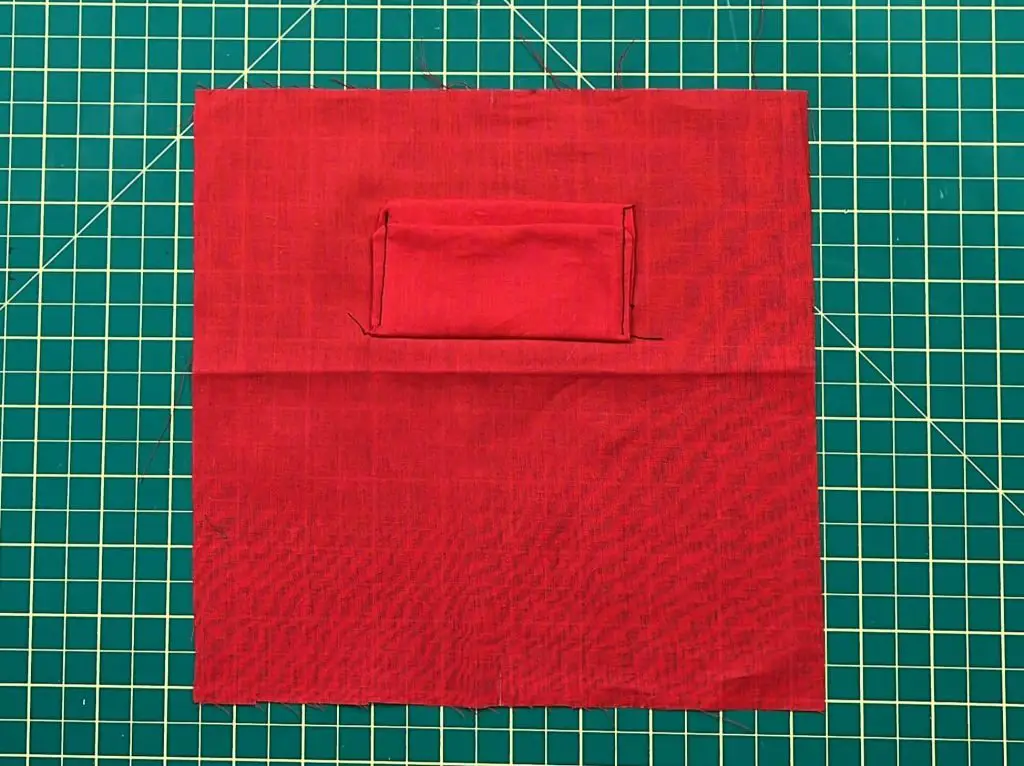
You can test your pocket to see if your credit card or driver’s license will fit in.
Okay, the pocket is done!
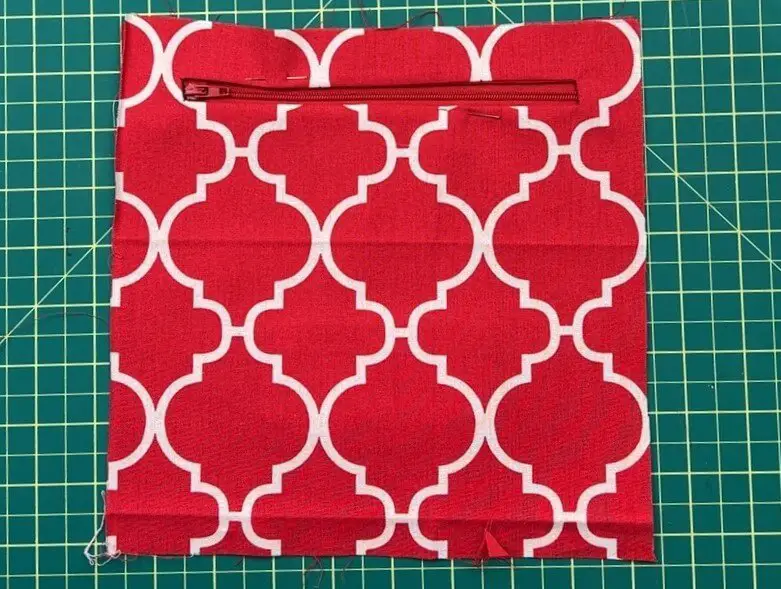
How to install a zipper in a fanny pack
With the liner we were working with, you want to face the liner so that the pocket is facing downwards so that it is at the bottom.
There are two ways to mark off where your zipper will go:
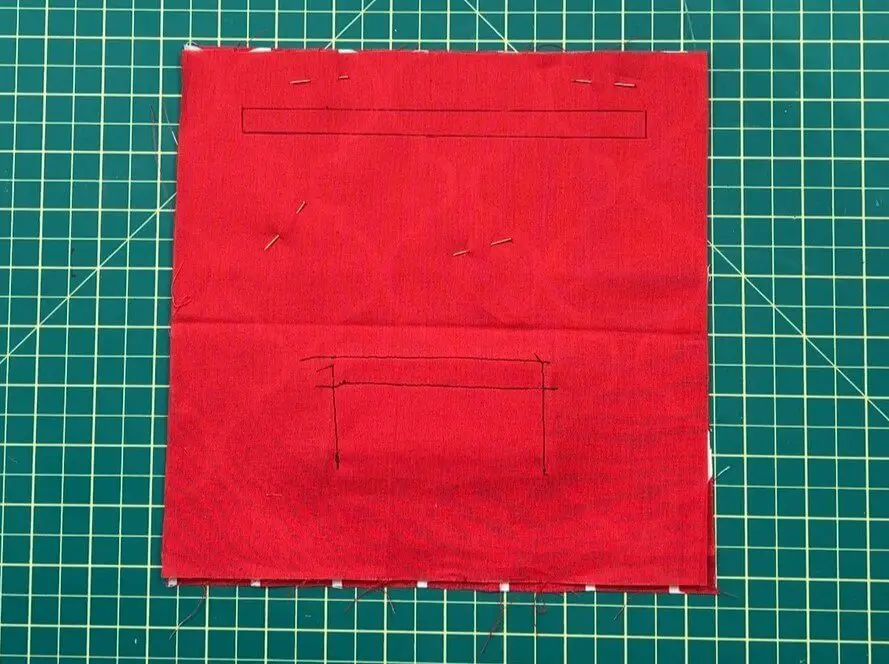
- Find the center of your liner and draw a line down the liner with chalk. Mark across the fabric, from left to right, 1″ from the top and 1.5″ from the top. From the center line, at the 1″ and 1.5″ marks, draw a line 3.5″ in both directions, left and right. Connect the 1″ line to the 1.5″ line, making a rectangle.
- Using paper, cut out a rectangle that is 9″ x 2.5″. From the top of the paper, mark off 1″ from the top, and 1.5″ from the top. Sketch out 3.5″ out from the center in both directions. Connect and make a rectangle. Cut out the center square. Pin the paper to the fabric and trace the rectangle. Use a rule if needed to hold the paper and fabric in place. I found this method worked better as the fabric would pull when I tried method 1, leaving me with a weird-shaped rectangle.
I used a pen to mark off the rectangle, but you can use a sewing marker that erases. But as this is on the inside of the liner, it doesn’t really make a difference as it won’t show up.
If you are using iron-on interfacing, this is the time to iron it onto your patterned fabric. Iron it onto 1/2″ from the bottom of the outer fabric.
Now that the rectangle is drawn onto the liner, place your outer (patterned) fabric face-up on your work table. Place the liner, pocket side down, on top of the outer layer. Align them so they are even, and pin them together.
Now it is time to stitch along the rectangle. You want this rectangle to be perfect, as it will work better with the zipper. Starting near the middle of the top, stitch all the way to the corner. At the end, leave your needle in the fabric and rotate the fabric 90 degrees. When sewing the short side of the rectangle count the number of stitches. Again, at the corner, leave your needle in place and rotate the fabric 90 degrees. When you get to the second short side, stitch the same number of stitches as you did on the first side. Sew all the way around the rectangle.
Once your rectangle is sewn, cut a slit through the center of the rectangle. At about 1cm from the ends, you want to cut towards the corners in a triangle shape. Cut as close to the corner as possible but do not cut the sewn thread.
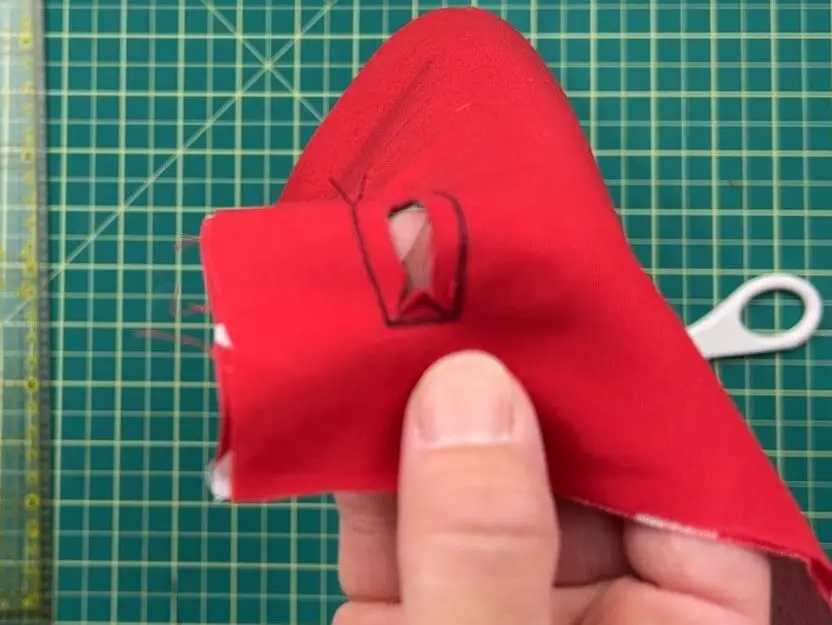
Before we flip the liner through the cut hole, I like to iron the liner at the seams so that it is easier to align once flipped. Simply pull the liner up, to the left, right and down, and iron those sections down at the seam. Flip the liner through the hole and pull the fabric at the seams to make a nice rectangle. Once happy with the shape of the rectangle and the location of the seams, iron the fabric to keep it flat.
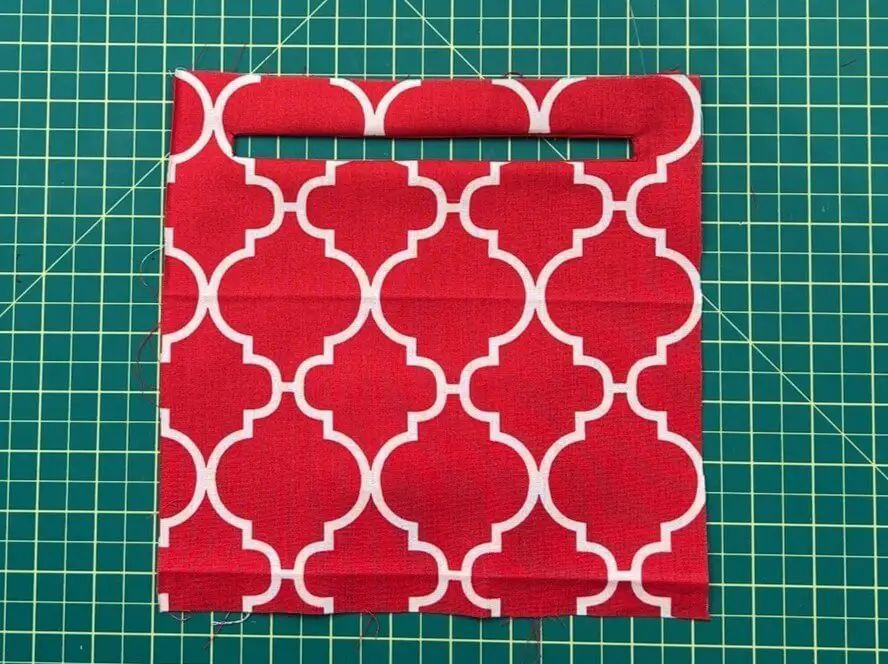
Finally, place the fabric on top of the zipper. You can either pin it into place or leave it loose. You want to sew the zipper as close to the edge of the fabric seam as possible. It is best to use a zipper foot on your sewing machine, but if you don’t have one, you can still make it work, just go slowly around. Sew all the way around the zipper. Make sure to note where the metal end of the zipper is to not hit it with your needle.
As I don’t have a zipper foot for my sewing machine when I got to the pull on the zipper, I would move it up and down, out of the way of my needles and sewing foot so not to hit it, but while keeping the zipper secure in its place.
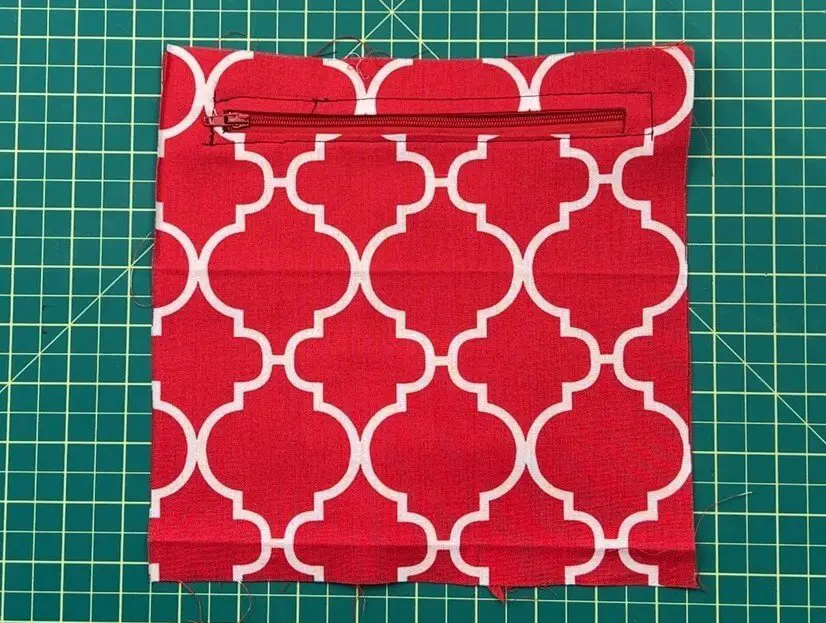
Okay, the zipper is installed!
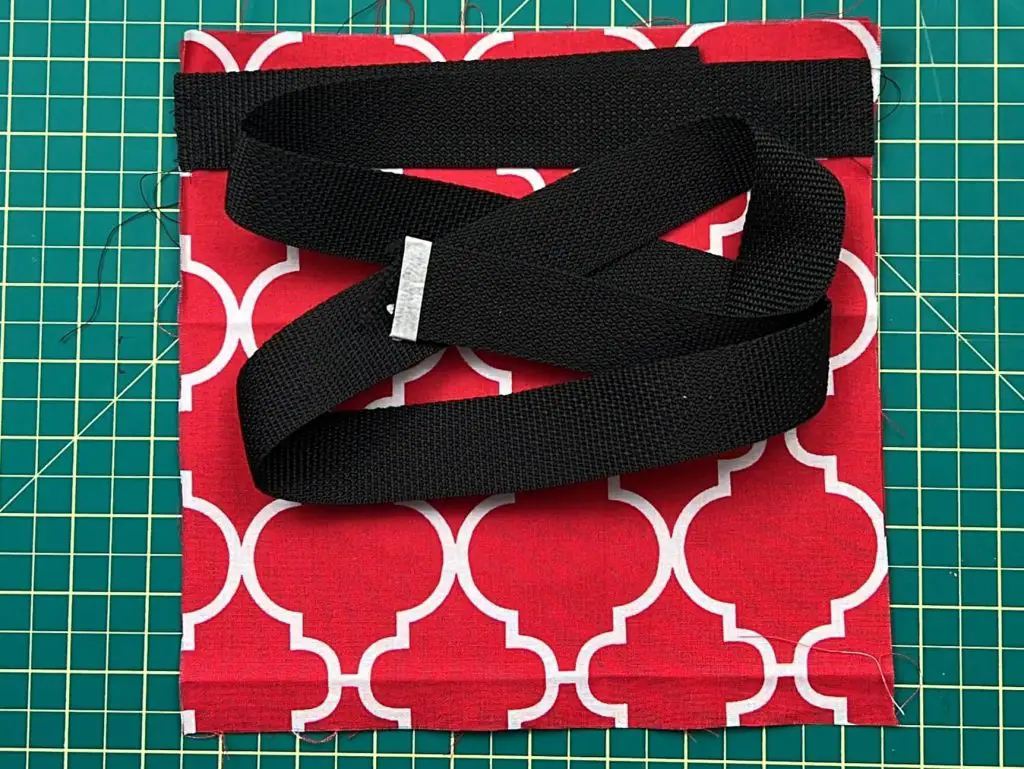
How to attach straps to a fanny pack
Before we attach the straps to the fanny pack, some things you need to consider:
- Do you want to have the buckle in the back, on your left or on your right? This will dictate how long or short to cut the nylon webbing.
- If you have the buckle on the left or right, cut one piece of nylon webbing to 8″. Cut the other piece so that it goes from the front of your fanny pack to behind you and then back several inches. It is best to use a measuring tape before cutting. Or if you have a long length of nylon, you can measure it by pinning it to the fanny pack and pull it around and see how much you need.
- Which way do you want the buckle to pull? The direction of the buckle will be important for removing the fanny pack. I’m right-handed, so I place the push part/male end of the buckle on the long nylon webbing as it’s easier to pull it out that way. Worst case scenario, if you don’t like how it was installed, you can always fix it later.
For the purpose of my blog post, I’m going to have a short and long piece of nylon webbing, and I want the short side to be on my right side (so the left side of the fanny pack when looking down at it).
You want to place the edge of the nylon against the edge of the fabric, and the fabric is facing the pattern side up. The strap should be roughly centered on the zipper. You want to sew the nylon onto the fanny pack. Repeat for the second strap.
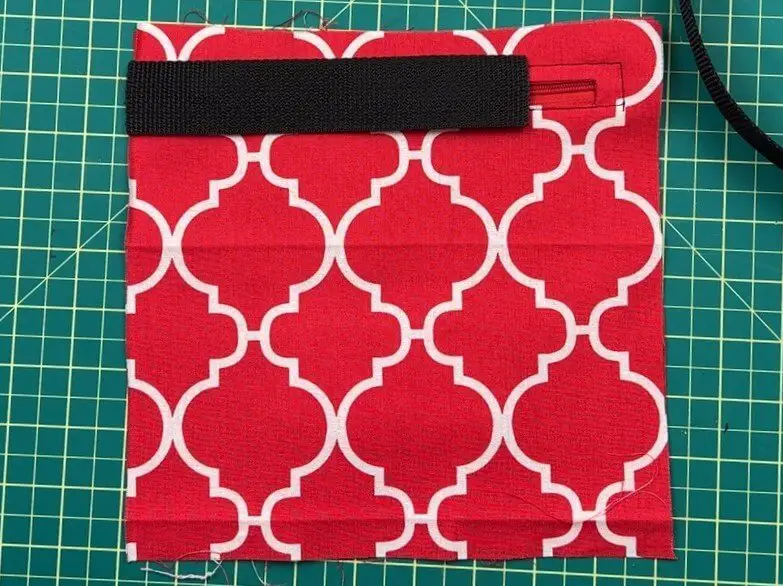
I like to sew the straps on before I sew on the buckles, but you can do that first.
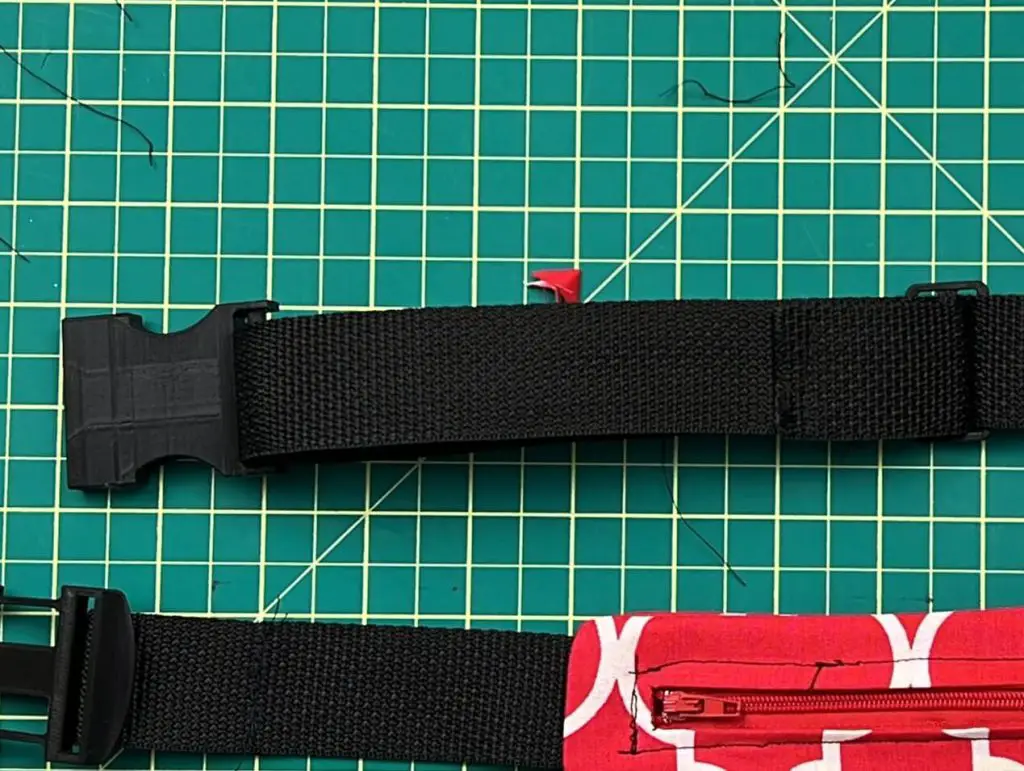
Take the buckle apart and pull the short strap through the opening of the female end of the buckle. Pull it through enough to hold the nylon webbing on the other side. Run it through your sewing machine to close it. I did a few passes for fun.

With the long strap, first, pull the tri-glide slider through. You want the middle bar of the slide to be facing out. Then pull the strap through the male end of the buckle. It can be tricky, but you want to pull the nylon webbing through the tri-glide slider again, but from the underside The easiest way to do this is to make a big loop in the strap already pulled through. Then go under and out of the tri-glide slider. Again, you want enough webbing through the slider to sew it together like we did above with the buckle.
Give the straps a test run and make sure the fanny pack fits! Adjust the tri-glide slider to your comfort level.
Ok, the straps are done!
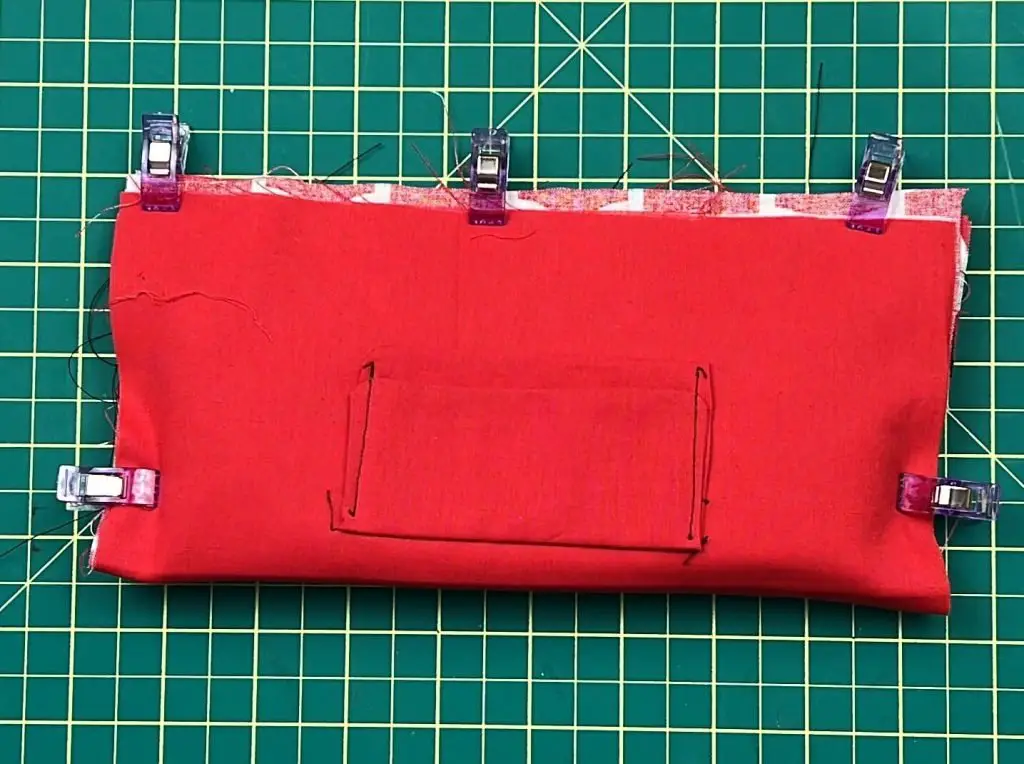
Closing Up the Flat Fanny Pack so it’s Ready to wear
Time to close up the flat fanny pack!
Lay your fanny pack down on your work table, design side up.
If you want to use interfacing, place it between the liner and top fabric now. You do not have to use interfacing if you don’t want to.
Now, open your zipper. Lay as flat and as compact as you can, the straps on top of the fabric. Fold your fabric in half, bottom up to the top. Align it in all directions. Pin or clip as needed. MAKE SURE YOUR ZIPPER IS OPEN and that none of your straps are caught in the edges.
Slowly sew around the 3 sides of your fanny pack. Make sure to adjust the fabric as needed. You may notice that the straps cause some issues with sewing, so take your time.
Once you are done, go in through the zipper, pull out the straps and flip the flat fanny pack right side out.
Do a quick iron, but not over the zipper or nylon webbing.
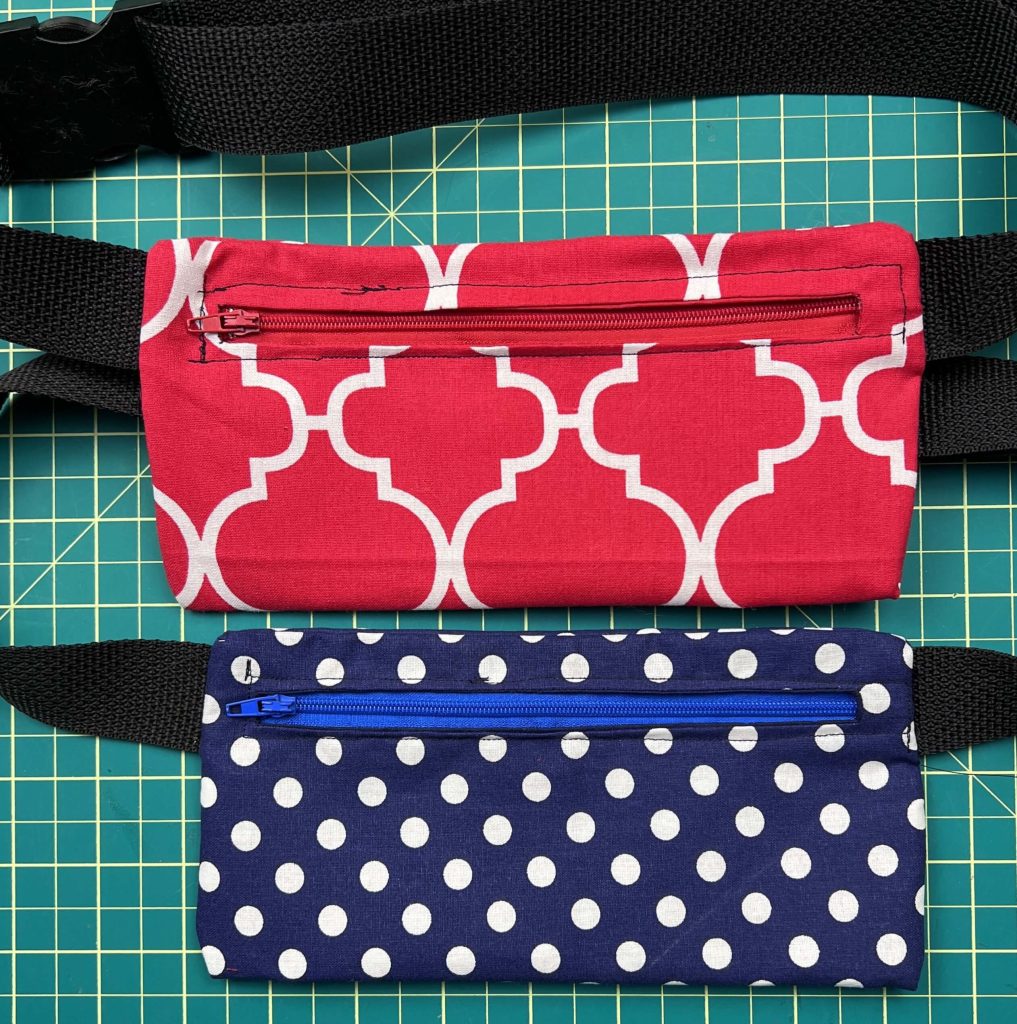
And that’s it! Your Flat Fanny Pack is done!
How to make a bigger flat fanny pack
If you want the fanny pack bigger, here are some things to keep in mind when modifying this design:
- If you want the fanny pack wider or you want a bigger zipper – You need at least 1″ on either side of the zipper, so if you use a 9″ zipper, you will need to have the width of your starting fabric to be 11″.
- If you want the fanny pack deep – you will need to multiply your length by 2. So, if you want the fanny pack 1″ deeper, you will need to add 2″ to the overall length, making it 11″. If you want it 2 inches deeper, you will need to add 4″ to the overall length, making it 13″.
Keep in mind that this design was for a small flat fanny pack. The larger you make it, the more it will bulk out.
Things I Learned While Making this project:
I am always learning new things, and this project was a challenge. So, here are some of the things I learned:
- I have been wanting to make a fanny pack for months! I’m not kidding! And I have been very hesitant as my sewing skills are still novice, at best. So I was really putting this off. And after sitting down and committing to it, I was truly surprised at how easy and quick it was.
- Working with zippers can seem intimidating. I have read and heard lots of concerns and worries about how hard it is to work with zippers. I was surprised that it wasn’t that bad. Now, mind you, I just did a simple straight-line installation of a zipper, but it wasn’t hard, and there is nothing to be intimidated about!
- You need a lot more nylon webbing than you think you need! I bought 6 feet of nylon webbing for the waistband. I even measured twice around my waist at the store to make sure, that was barely enough for 2 fanny packs. So, if you want the fanny pack to be over your shoulder as well, triple-measure how much you need!
- Before installing the zipper, and after you have flipped the fabric right side out – if there are major creases in the corners, that means you have not cut the fabric close enough to the corners. You want to be as close as possible. This will give you a better result. If you leave it, your liner will be short at the top and leave you with a shortage of fabric when sewing it all shut.
- I went to the fabric store to buy interfacing. I was looking for the stuff that you iron onto your fabric. Sadly, a sale caught my eye, and I bought about a thousand feet for $4 when I could have bought the exact amount I needed of the exact stuff I needed for $12. The sale caught my eye, and now I’m stuck with more interfacing than I’ll ever need…. So, make sure you are getting what you need and don’t let the sale fool you!
Did you enjoy this sewing project?
Did you enjoy this sewing project? Let me know in the comments below! Did you try it out? Drop me a note and tell me how it turned out!
If you liked this project, don’t forget to check out some of my other sewing projects here:
And you can check out my favorite sewing project – how to make a cell phone pouch, here: