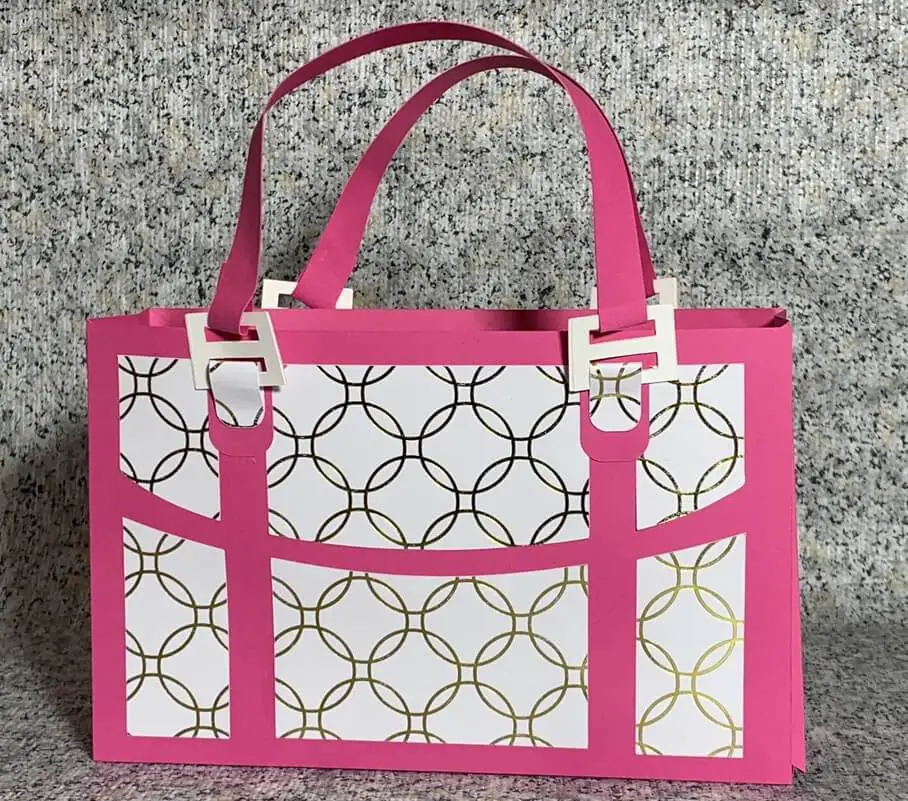
The other day, I was perusing my crafting Facebook threads and saw a neat purse that everyone was making. They called it a Galentine’s Day Purse. I really like it and thought it would be fun to make. So, I did some searching and found it in Cricut Design Space, and it was being sold for about $15 for the cut file. That was more than I was willing to spend on a paper purse, so I decided to design and make my own! And after I finished the design, it was time to learn how to assemble a paper purse!
How to design a paper purse
I like to design my files outside of Design Space so that I can share them. The 2 main programs I use for designing are Vectornator and Inkspace. But honestly, I rarely sit at the computer to design recently. And Vectornator is on my iPad, is free and does not require internet, all of which makes it very handy for creating designs. So I will do a quick tutorial in Design Space and Vectornator below on how to design a Galentine’s Day Purse. And after the design was complete, it was time for assembly!
This post describes how to assemble the design that I made. You can get a free copy in my Resource Library. Remember to Sign up for my newsletter to gain access!

As an Amazon Associate, I earn from qualifying purchases. This post contains affiliate links. I may receive a commission if you purchase an item from one of my links. This will not change the price you pay.
Materials Required for a Paper Purse
This project is mostly simple to make, so all you need is:
- Cardstock – you can use patterned pages, just blank pages, or even create your own designs.
- Glue – I used my Bearly Art glue – I find it dries well and does not leave any wrinkles on the paper when dried.
- Cutting machine – I use my Cricut Explore Air 2. As we designed this in design space, you are really bound to use your Cricut Product.
- About 20 minutes.
How to Assemble A paper Purse
Cut the paper Purse with your Cricut
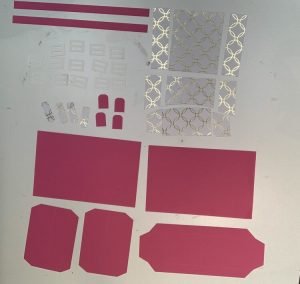
Once your purse is designed from above, or you grabbed my free cut file in my resource library, it is time to cut the file.
If you are using my files, make sure that you grab the inner rectangles and triangles on the side and bottom panels, change them from cut to score lines and attach them back to their pieces. You do not want to have all those loose pieces!
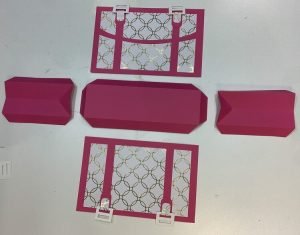
The front and the back of the purse look identical if you want them to. My file also has an extra design for the back, in case you want them to be different. Make sure to pick one only for cutting.
Assemble the front of the purse
The front and the back are mostly identical. You want to glue the designed/arched and cut rectangle onto the larger rectangle. And let it dry.
While drying, do the same for the back of the purse.
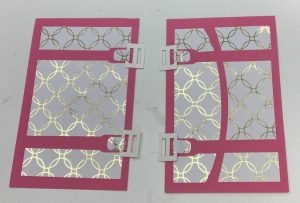
Assemble the clasps and Buckles
My file has 8 clasps that look like a blocky-eight. I made extras to help add integrity to the purse. Glue 2 pieces together, so that you have a total of 4 glued claps.
Next, you want to insert the claps into the buckles, and delicately fold them so the rounded ends line up. Glue those together. Repeat for all the buckles.
Once these are dry, you will glue the folded clasp onto the larger clasp. Again, repeat for all 4 pieces.
These clasp buckle assemblies get glued onto the front and the back of the purse, in the location of the sliced rectangles.
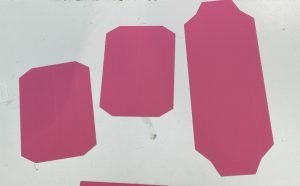
Fold the sides and the bottom of the purse
Fold the 4 tabs on the bottom panel of the purse. This will complete the bottom of the purse.
Fold the 3 tabs on the side panels of the purse. Also, carefully fold the line and triangles on the side panels. You do not need to fold them all the way, just give them a nice straight crease.
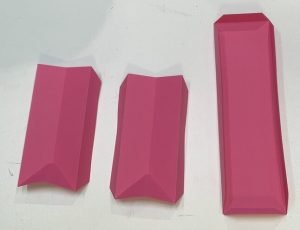
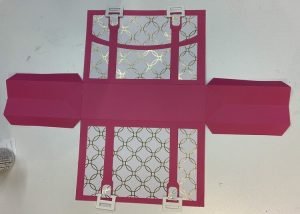
Assemble the body of the purse
Laying all of your pieces out, with the bottom panel in the center, the front on top, the back on the bottom, and the side panels on each side glue all 4 pieces to the bottom panel.
Once the glue dries, glue the sides of the front, back and side panels together.
Add handles to the purse
Now for the final touches – handles. If you are using cardstock handles, they just need to be glued through the buckles.
You can change it up a bit and use ribbon for the handles instead. If you are going this route, I recommend using a hot glue gun.
And that’s it! Your paper purse is assembled!
Watch how to assemble a Paper Purse in Design Space on YouTube instead
Again, you can watch this on YouTube if it is easier.
Frequently Asked Questions about Paper purses
What can a paper purse be used for?
There are many uses for paper purses. It all depends on where your imagination starts and stops. Just to list a few:
- Gift bags for any number of occasions, including:
- Galentine’s Day Gifts bags,
- Birthday Gifts bags,
- Mothers Day Gift bags,
- Bridal Shower Gift bags
- Party Favors, for occasions that include:
- Girls night out
- Bridal Showers
- Bachelorette Parties
- Kids accessories – every little girl wants a purse to play with!
How durable is a paper purse?
If you use cardstock that is heavy, like 80lb, 100lb or greater, it will give the purse more integrity and allow it to last longer. But it is safe to say this is a 1 or 2-time use item.
Am I limited only to one paper purse design?
There are lots of paper purse designs. I currently have 2 available in my resource library, but there are many more out there!
Was this tutorial helpful?
Did you find this tutorial on how to assemble a paper purse helpful? Let me know in the comments below!
If you liked this tutorial, check out my other paper crafts here.

Goodnight,
Are you no longer making this file available? I would love to have
Hello,
To access this file, you simply need to sign up to my newsletter where I will give you access to my resource library. And the files are available there. If you’re not able to access it, please send me an email and I”ll help you out.
Thanks,