There was a time when that I did not even imagine it was possible to make my own shirts. I would spend hundreds of dollars on custom shirts. One day a friend introduced me to her Cricut, and when I saw the capabilities of making my own shirts with it, I was sold. Of course, I purchased a Cricut without thinking twice, and then I had to learn how to make an HTV vinyl shirt. There was a lot of trial and error, and over time I have mastered making simple and complicated HTV vinyl shirts.
As an Amazon Associate, I earn from qualifying purchases. This post contains affiliate links. I may receive a commission if you purchase an item from one of my links. This will not change the price you pay.

How to Make an HTV Vinyl Shirt
What you need to make an HTV Shirt
I will try to keep this simple, as we are just learning the basics. The supplies you need to make an HTV Vinyl Shirt:
- Blank t-shirt – I typically use Gildan shirts, but you can use any shirt that is 100% cotton. You can use other types, but that comes with more experience. Let’s keep it simple.
- Vinyl – I have used this black and white vinyl. They work great and are super inexpensive.
- A cutting machine – I use my Cricut Explore Air 2. But any Cricut machine will work, as well as Silhouette machines and others.
- Design program – I like to create my own designs in Vectornator and Inkspace, but in this tutorial, we will use a simple design from Cricut Design Space.
- Heating Source – You can use either an iron or a heat press. I use my Co-Z Heat Press, but an iron works also. I talk about how to use both methods, just in case you need it.
- Teflon Paper – Optional – to protect your iron or heat press.
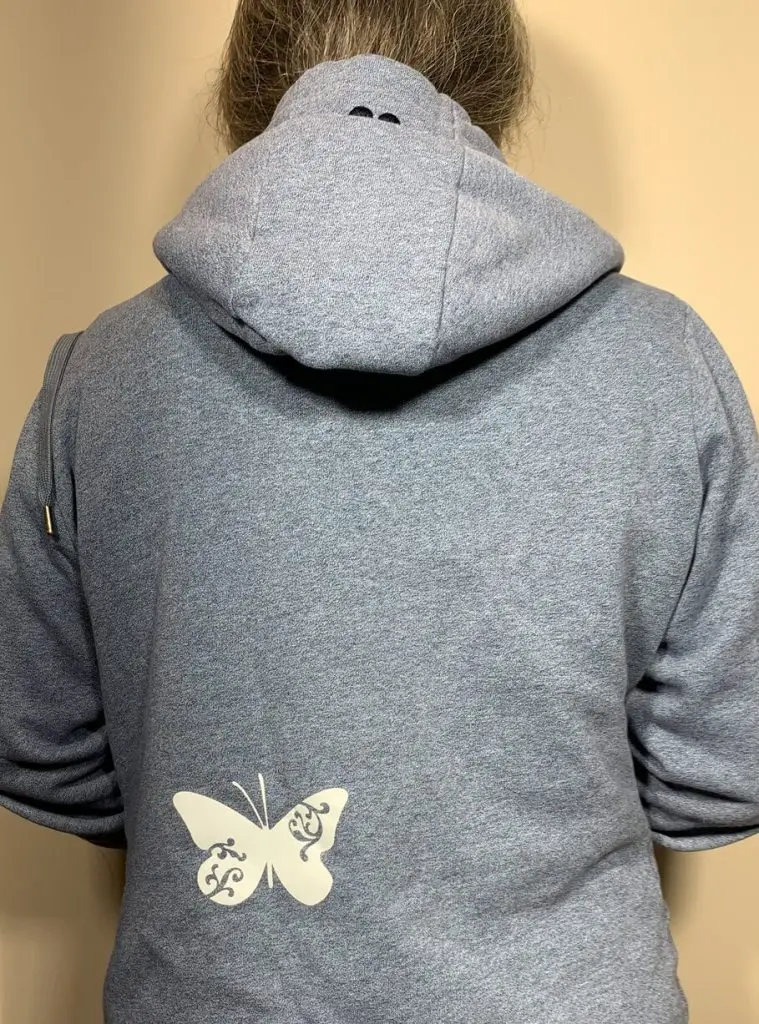
Pick a Design for your Shirt
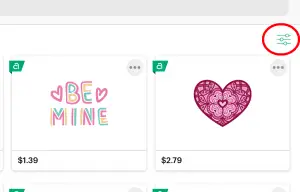
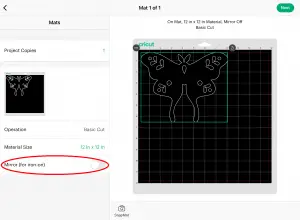
We will use a simple free design from Design Space (DS). By simple, I mean one color.
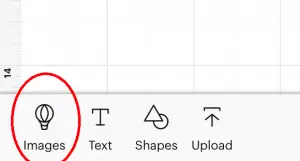
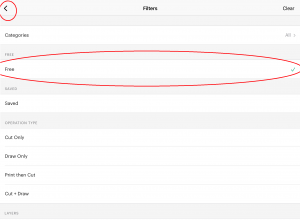
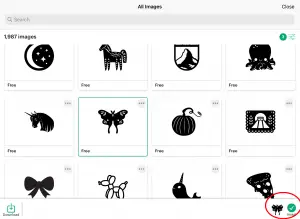
In DS, select the IMAGES icon. This will bring up all the free and paid images available to you. Select the filter button – this is the icon with 3 lines with circles on them. Select Free, and click the back arrow to return to the images library.
Once you have found what you want to make, select it. It will appear on the bottom ribbon of the screen. Click the green INSERT check circle. Now your image is in DS.
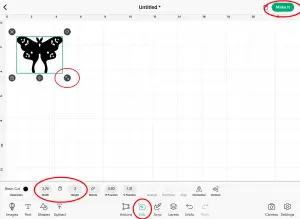
Adjust the design size to your liking. For my design, I picked 3-inches in height. To adjust the size, you can either click and drag the two-sided arrow or manually update the numbers in the EDIT menu.
If you are unsure what size to make your design, or if you are unsure if it will be too big or too small, check out this tutorial that explains how to size your designs.
Once you have selected the size, send the design to cut by clicking the Make It button.
Cutting and placing your HTV Vinyl Design onto the Shirt
If the design does not have words, you do not need to mirror it however if you do have words in your design, you need to mirror it. If you do not the image will be backwards.
Once the design is cut with your cutting machine, you get to weed it. This is the simple, relaxing task of pulling the extra vinyl away from your design. You can use your nails, a weeding tool, a needle or anything with a tip. I normally just use my nails.
Once the design is weeded, you can press it onto your shirt.
You want to apply the design to your shirt. You can place it anywhere you want, but if you want to learn how to center your design easily, check out this tutorial – scroll to the second half of the article.
Remember, the vinyl needs to be facing the shirt, and the carrier sheet is on top facing up.
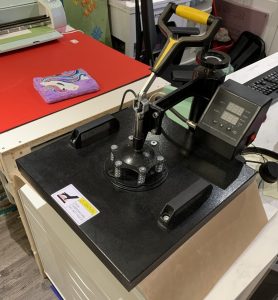
Applying your HTV Design to your shirt with a Heat Press
Every heat press is different, but they are based on the same concept. It will have a control module to input your heat settings, pressing time, and a manual pressure adjustment.
The nice thing about a heat press is that you only need to adjust the pressure setting once. Most types of vinyl need similar temperatures and times, in the area of 300F and 15 – 30 seconds. So once you have set them, you do not need to readjust all the time.
Make sure you read the instructions on the vinyl to meet your specific requirements.
Once the heat press reaches the required temperature, you are ready to start.
Place the shirt on the heat press.
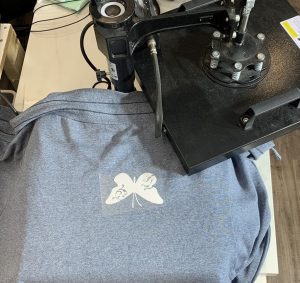
I use Teflon paper between the top of the heat press and the shirt. Sometimes the carrier sheet sticks to the top of the heat press and can ruin your shirt, but it can also mess up your heat press.
Once everything is in place, close the heat press top and press the Start button.
Once the timer goes off, open the top of the heat press and remove your shirt.
BE CAREFUL as it is HOT!
Depending on the type of vinyl, it will be either hot or cold peel. With hot peel, you will need to pull the carrier sheet off when it is hot (right away) and when with a cold peel, you need to wait for everything to cool (after a few moments). Make sure you know which way you are going, as cold peels will pull the vinyl off the shirt if you pull it off too early, likewise with the hot peel.
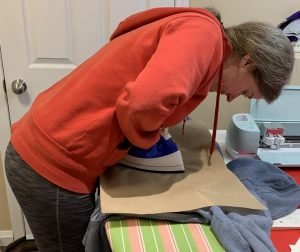
Applying your HTV Design with an Iron
Using an iron to apply HTV Vinyl is very easy. Set your iron to the temperature recommended on your vinyl. If you do not have temperate ranges on your iron, and just material types, check out this summary of temperature and fabrics:
- Synthetic – 135C/275F
- Silk – 148C/300F
- Wool – 148C/300F
- Cotton – 204C/400F
- Linen – 230C/445F
Either using an ironing board, the floor or your kitchen table, lay your shirt down flat with the design on the shirt.
I use my ironing board, but if you are using the floor or the kitchen table, make sure you place a thick folded towel or blanket on top of the surface so that you do not ruin them.
When using my iron I use Teflon paper to avoid ruining my iron.
It is important to remember that you are not ironing on the design. You need to press the vinyl with heat and pressure onto the shirt.
Doing one iron section at a time, place the iron on top of the shirt/Teflon paper, and apply heat. You will also need to apply pressure. A LOT of pressure. I balance my whole body on the iron to apply enough pressure. Systematically, apply heat and pressure to the entire design surface, as per the vinyl recommendations.
Once you have heated and pressed all parts, remove the carrier sheet. Depending on the type of vinyl, it will be either hot or cold peel. With hot peel, you will need to pull the carrier sheet off when it is hot (right away) and when with a cold peel, you need to wait for everything to cool (after a few moments). Make sure you know which way you are going, as cold peels will pull the vinyl off the shirt if you pull it off too early, likewise with the hot peel.
And that’s it! You’re done your HTV Vinyl Shirt
Frequently asked questions about making an HTV Vinyl Shirt
What is HTV Vinyl?
HTV Vinyl, or just called HTV, is heat transfer vinyl. This means you need to apply heat (and pressure) to apply the vinyl to the fabric.
What’s the difference between HTV Vinyl and Permanent Vinyl?
HTV Vinyl always needs to be used with heat and can be used for clothes, accessories, pillows, bags, basically anything fabric. The more advanced you become, you can also use it on wood.
Permanent vinyl is used on any solid surface, like paper, glass, walls, woods, canvas.
Can you use Permanent Vinyl on Shirts?
No, it will not stay on and will come off. If you are in a pinch and only have permanent vinyl and want to use it on a shirt, you can, but it will not last the day, and it definitely will not last the wash cycle.
Do I need a Heat Press Or an Iron for HTV Vinyl?
You do not need a heat press. It is a nice addition to your shirt-making endeavors but not required. You can use an iron and an ironing board or a kitchen table. I used my iron for a year before I upgraded to a heat press,
Do I need to do anything to the shirt before i Start?
If you use Gildan shirts, they have been pre-shrunk, so you do not need to wash and dry them. But not all shirts have done this. If you are not certain, you need to wash and dry your shirt.
Also, before you press it, it is a good idea to iron your shirt to make it wrinkle-free and moisture-free. If you are using a heat press, you can use it as an iron. If you are using an iron, just use your iron.
Make sure you do not have the design on the shirt when you are ironing it.
Also, use a lint brush to remove any fluff from the shirt before pressing it.
Things I have learned along the way making HTV Vinyl Shirts:
I love to make shirts, and I make them all the time. The more I make them, the more I learn, and the more I enjoy making them. So here are some tips and tricks that I have learned.
Tips about Designs
You do not need to make your own designs. You can buy almost anything. But learning how to create your own design can be fun but time-consuming.
Tips For using a Heat Press to apply HTV Vinyl
- If you do not have a heat press, I highly recommend it, especially if you like to make lots of shirts. This will significantly reduce the amount of time it takes to make a shirt.
- You have to do less thinking with a heat press. Which is nice, but if you’re not paying attention, you can quickly overheat a shirt.
- A heat press takes up lots of space, regardless of what type you have, or are looking to buy. Make sure you have enough space to work around the heat press so that you do not burn yourself or mess up your vinyl placement.
Tips For using an Iron to apply HTV Vinyl
- Keep in mind, when using an iron, if you heat the vinyl for too long, the vinyl will melt. So you want to make sure you keep track of where you have and have not pressed the design down.
- If you are using a metal ironing board, it will most likely be made of perforated metal. If you do not have a pad on top of it, you will lose a lot of heat in those holes and it will show up on the design as an uneven press.
- I learned a lot about applying HTV vinyl with my iron, it was a good starting point before getting a heat press.
- If you are only making a few shirts every now and then, an iron is more than enough.
Tips if you plan on selling shirts or Gifting Shirt
- If making shirts to sell, be sure you are not stealing designs or fonts. You need to get your base design building blocks the legal way.
- It is always good to have a large selection of fonts available to use. Check out this tutorial on how to upload fonts to DS.
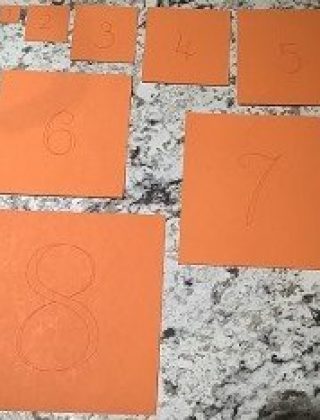
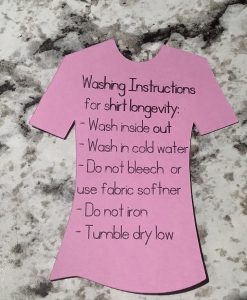
- If you are selling or gifting shirts, give instructions on washing the shirt. This is the card that I made for when I gift shirts. It is handy to have a bunch of these made up and ready to use at any time.
Did you find this tutorial Useful?
Did you find this How To Make an HTV Vinyl Shirt useful? Let me know in the comments below!
Also, if you like this tutorial, check out some of my other tutorials on working with HTV vinyl:
- How to Layer HTV Vinyl
- A cool technique to make amazing designs using scrap HTV in one cut
- How to size and center your HTV Design