If you are anything like me, your phone gets shoved into any coat pocket, purse, backpack… Or anywhere with keys, pens, and random objects that can scratch your phone. I know that phones are supposed to be scratch-proof and whatnot, and you can buy protective plastic covers and cases, but sometimes that is just not enough. Even if it is to protect your phone from all the crumbs hiding in those places because of little kids…. So, I had to make a DIY cell phone pouch, and then another, and have some extras for when these get dirty….So, let’s do some upcycling and make a DIY cell phone pouch to keep our phones safe.
As an Amazon Associate, I earn from qualifying purchases. This post contains affiliate links. I may receive a commission if you purchase an item from one of my links. This will not change the price you pay.
Supplies needed to make a DIY Cell Phone Pouch
In this craft, we will upcycle a bit, because that is how I like to sew, so let’s get our supplies ready! Here’s what we need:
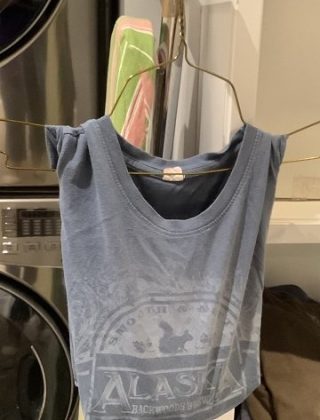
- Fabric – This pouch is made of fabric. For this project, I used some leftover blackout curtain pieces I had. I like this as the outside is thick, and the inside has a smooth-silky feel. This is one option, but you can use any fabric you want. I also opted to use dark fabric as this will hopefully hide any stains if it gets dirty.
- Sewing machine – I like to use my sewing machine, but you can always do this by hand. By hand will take longer.
- Thread – this is to sew the pouch together. I suggest using good sewing thread, like this stuff, and not using the cheap thread from a dollar store, as it will jam in your sewing machine and drive you crazy. Trust me, I know firsthand.
- Sewing pins – for holding the fabric together while sewing.
- Scissors or cutting wheel – I like to use my cutting wheel with a ruler, as I find the fabric moves less when I do this, but scissors work fine for cutting fabric as well.
- Cutting mat – optional – I like to use my cutting mat for cutting on, as it helps to keep the fabric straight and smooth, and then my cutting wheel doesn’t damage my work table or get dull too fast.
- Chalk pen – Optional – depending on how you like to cut your fabric, you can draw the shape required on the fabric with a chalk pen before cutting.
- About 15 or less, depending on your sewing skills.
Let’s Get started making our DIY Cell phone pouch
Measure your phone and cut the fabric
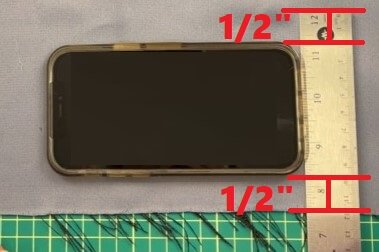
Ok, let’s get started! Most of the latest cell phones are very similar in size, but it is best to measure your phone. Especially if you have a protective case on it. These can add quite a bit of size to your phone, and we don’t want to make a pouch that is too small.
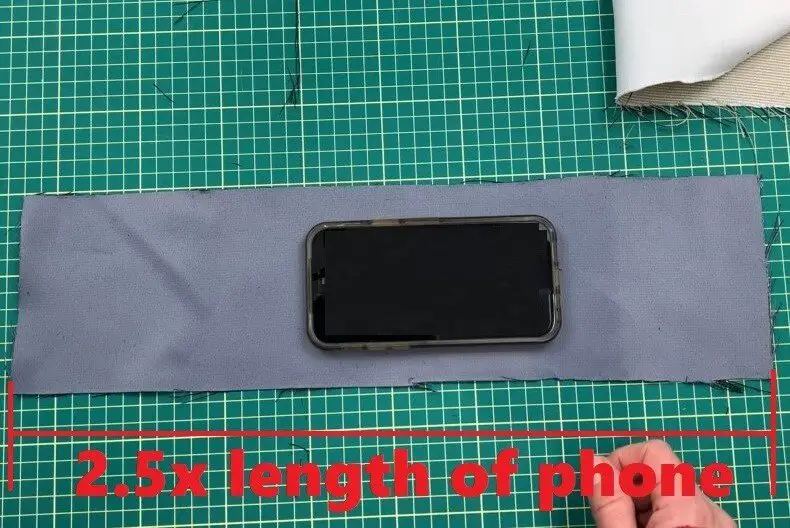
Get your fabric and lay it down flat on your work area. Lay your phone flat on top of the fabric. You need to have enough fabric to wrap around the phone 2.5 times, length-wise. This means you need to have enough fabric to cover the front of the phone, the back of the phone, and an extra 1/2 of the phone. You also need 0.25-0.5″ surplus fabric on both widths.
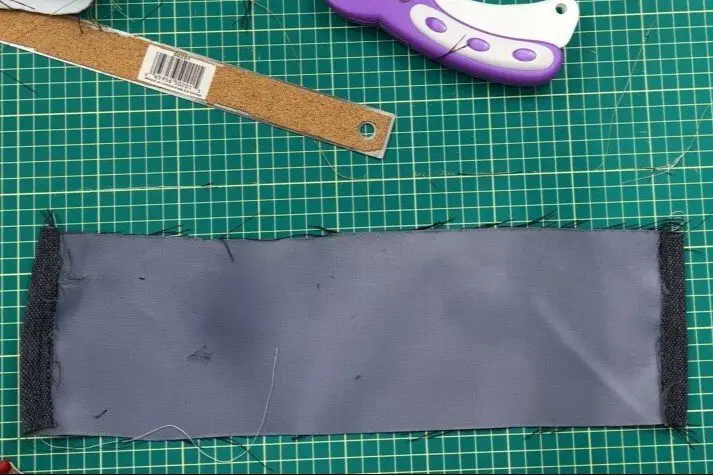
To measure this, I simply wrap the phone with the fabric and mark it with chalk. But you can measure your phone (don’t forget to include the thickness) and multiply it by 2.5. In my case, I need about 18″ x 5″ in size.
Once you are happy with the size you need, cut it out with either scissors or your cutting wheel.
Let’s start sewing our Cell Phone Pouch
The first thing we need to do is sew the top and bottom edges of the fabric. This is so they don’t fray, peel or come apart after we have finished the project.
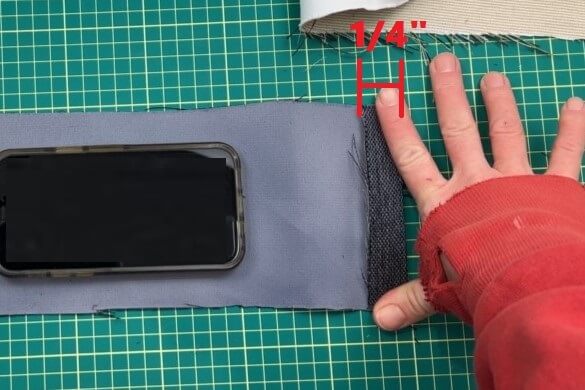
Fold the top 1 time to about 1/4″ in width. Now, run a straight line through this to hold it closed.
Repeat this for the bottom.
Now, for the fun part. We sew this inside out so the seams are all hidden inside. So, lay the material with the outside face facing up, and fold the fabric in 3. You want to have the top, shorter side, folded first, at about 1/3 of the way down the phone. Then, place the bottom side over it. Pin the sides together to keep their shape. There should be some overlap between the top and bottom layers.
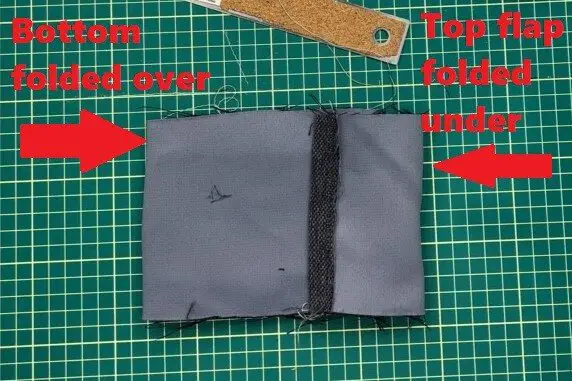
You want the shorter top piece to be folded first so you can flip it over the phone after the pouch is done. If you sew it in reverse, you won’t be able to access this part.
Once all your pins are in place, place your phone on top of the pouch to verify it will fit. You do not want too little fabric to put the phone in.
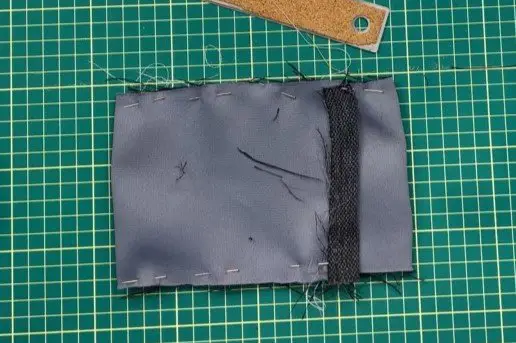
Now, back at your sewing machine, sew along the pin lines.
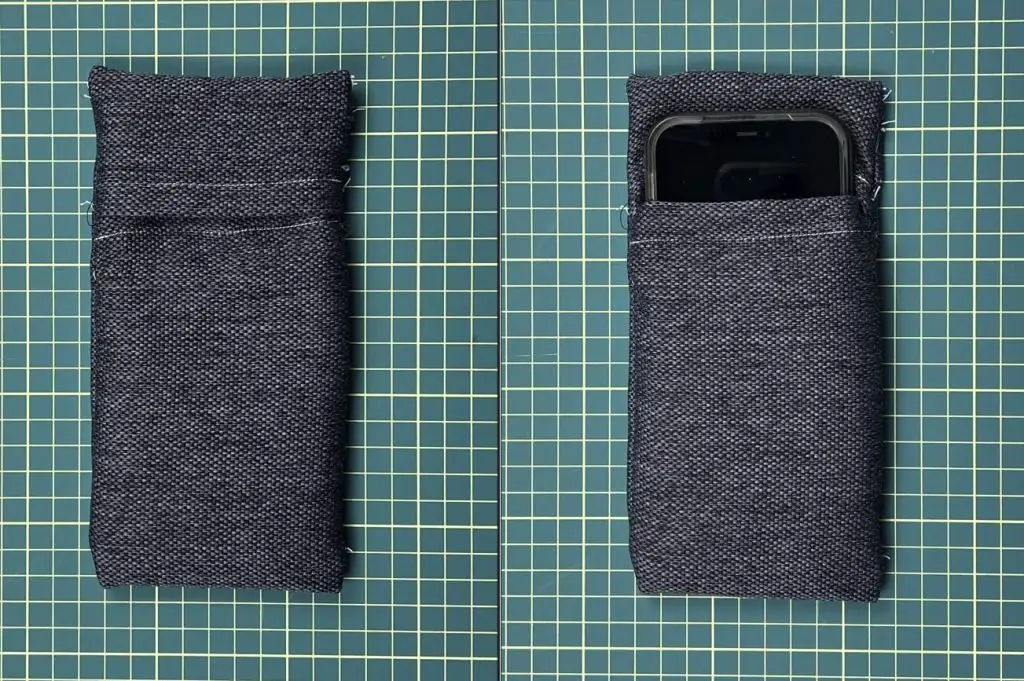
Once it is sewn together, flip it inside out, and it is ready for your phone!
And there you have it! Your DIY Cell Phone Pouch is complete!
Things I learned while making a DIY Cell Phone Pouch
I’m not always the greatest at sewing, but I am learning as I go, and with each project, I get a bit better. So, here are my latest takeaways from this sewing project:
- When making a flip-over pouch, you need to sew the top shorter portion under the main body flap. I messed this up the first time and had to tear the pouch apart. It wasn’t a big deal but added a few minutes to the total project time.
- The type of fabric you use for this plays a big part. If the fabric has no elasticity or give, it will not flip over the rigid phone. I was fortunate the curtains had some elasticity, but using a cotton fabric would have made opening and closing the pouch easier.
- The location of the top flap matters. Ideally, you want the top and bottom fabric of the pouch to overlap. This will keep the phone inside, secure and keep debris out. If the top is too far down, regardless of the type of material being used, you will not be able to flip the fabric over the phone.
- These are easy to customize by adding HTV decals if you want, but the curtain fabric I used is not ideal for this. But if using old cotton t-shirts, as I use with many of my projects, you could easily put a name or design on the pouch after it is complete to customize them.
Did you enjoy this Sewing tutorial?
Did you enjoy this tutorial on making a DIY Cell Phone Pouch? Let me know in the comments below! Did you try making it? Let me know how it turned out!
If you liked this sewing project, check out my other sewing projects here.