My creative juices aren’t always flowing. And I have always wanted to design some Paper Sunflowers but, I could never really figure out what I wanted them to look like or how to put them together. Then, one day, my daughter came home with a paper sunflower she designed. It was beautiful. And it was what I was thinking, but better. So, I asked her if I could recreate her sunflower so that it could be made on my Cricut. And she gladly agreed. So, now I have DIY Paper Sunflowers to add to my collection of flowers.
Supplies needed to make DIY Paper Sunflowers
As I have been making all these paper flowers, I am glad the supplies list is very similar, so I don’t need to buy more supplies. Here is the supplies list for my DIY paper sunflowers:
- Cardstock – I used Recollections brand cardstock. I find that the 8.5″x11″ works best for me. You will need 5 colors – these colors are all available in the one multi-pack found here.
- Dark Red – 1 sheet of 8.5”x11”, for the petals.
- Bright Orange – 1 sheet of 8.5”x11”, for the petals
- Bright Yellow – 1 sheet of 8.5”x11”, for the petals
- Brown – one sheet of 8.5” x 11” for the flower center
- Green – one sheet of 8.5” x 11” for the leaves
- Metal flower stem – I often buy my flower stems from the local dollar store, but this time when I needed more, the dollar store had none in stock. So, instead, I bought these ones on Amazon. I would have preferred thicker stems for these flowers as they have very thick stems in real life.
- Glue – There is a fair amount of gluing required here. You will need:
- Crafting glue – I used my Bearly Art Crafting glue. This is for the flower petals and center.
- Hot glue with a glue gun – for working with the stems.
- SVG cut file – You can get a copy of my SVG cut file here.
- Cutting Machine – I used my Cricut Explore Air 2, but any cutting machine will work.
Now that our supplies are ready, it is time to start making our DIY Paper Sunflowers.
Using the Paper sunflower SVG file
You will want my paper Sunflower SVG file, which you can get here.
Once you have downloaded the file, several steps need to be taken when working with this file. I’ll do a quick walk-through of what we do.
- Download the file to your computer or tablet.
- Unzip the file.
- Upload the file to Cricut Design Space.
- Select the Upload Icon on the left side of your screen.
- Select the Upload Image button.
- Select the Sunflower File from the location where the unzipped file was saved.
- Select the Sunflower file from your DS Recently Uploaded documents. There should be a green rectangle around it.
- Hit the Add to Canvas button.
- Once the sunflower is on your DS canvas, select the image and hit the Ungroup Icon on the top right side of your screen.
- Select the largest petals. You can either select these on your canvas or on the layers panel on the right side of your screen. The largest petals should be around 4.5”-5” in size. If not, or if you want them to be bigger or smaller, select all the design elements and increase or decrease the size to your liking.
- Duplicate the flower as many times as you wish.
Once happy with the number of flowers, hit the Make button and send the flower to your Cricut to cut.
You may need to rearrange the flower elements on your cutting mat within DS to make the best use of paper.
Assembly of DIY Paper Sunflower
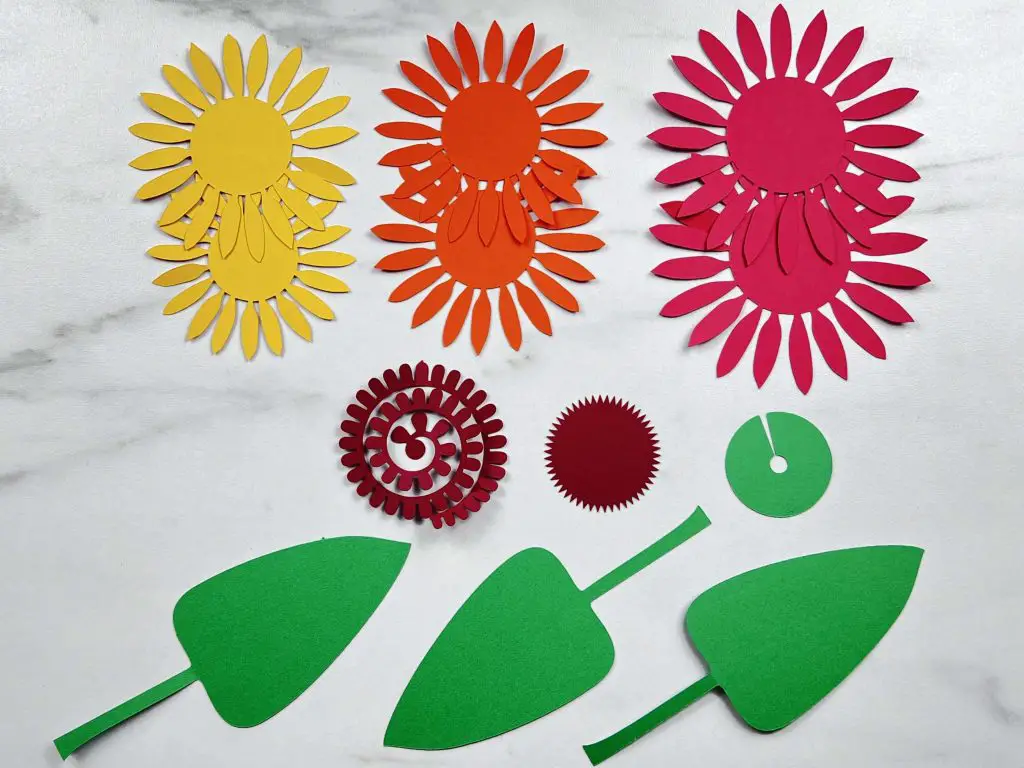
Paper Sunflower pieces
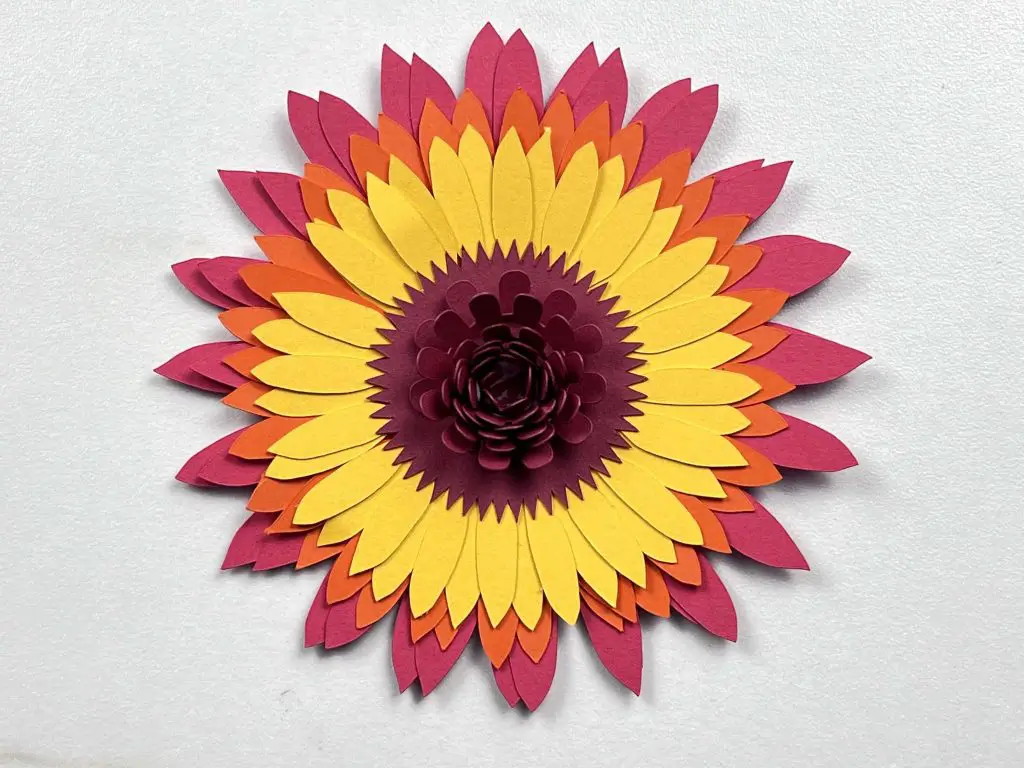
After we have cut out our paper sunflower pieces, we should have the following:
- 2 large red sunflower petal sections
- 2 medium orange sunflower petal sections
- 2 small yellow sunflower petal sections
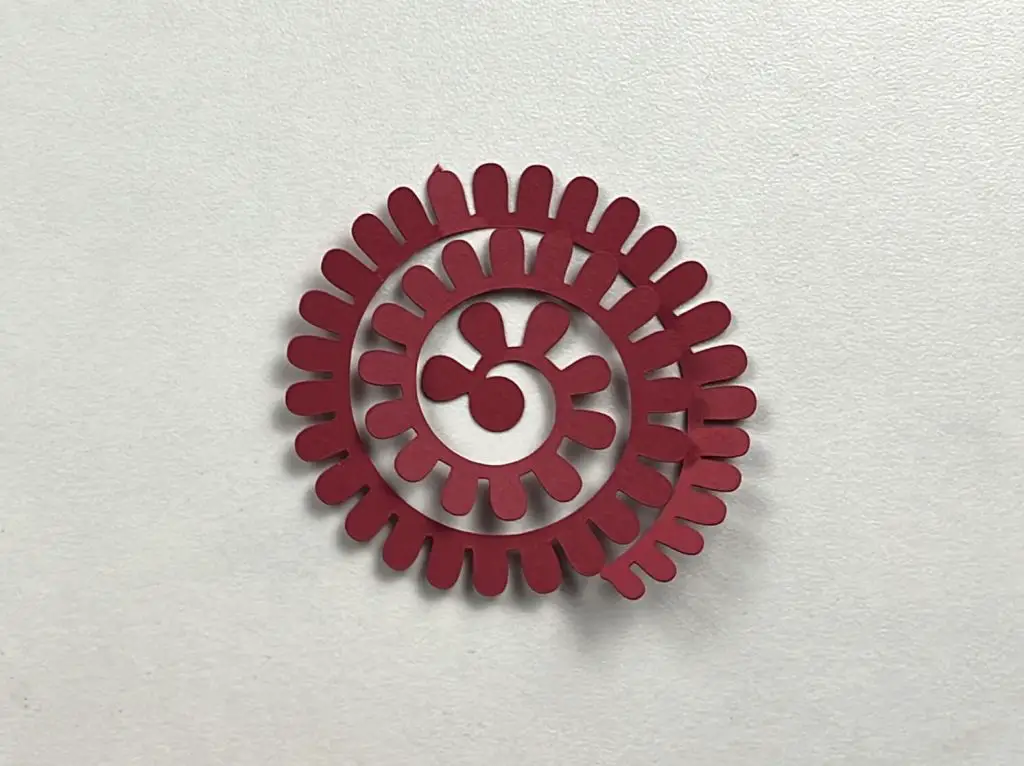
- 1 brown flower jagged circle center
- 1 brown spiral flower
- 1 green circle with a cut through it
- 3 green leaves
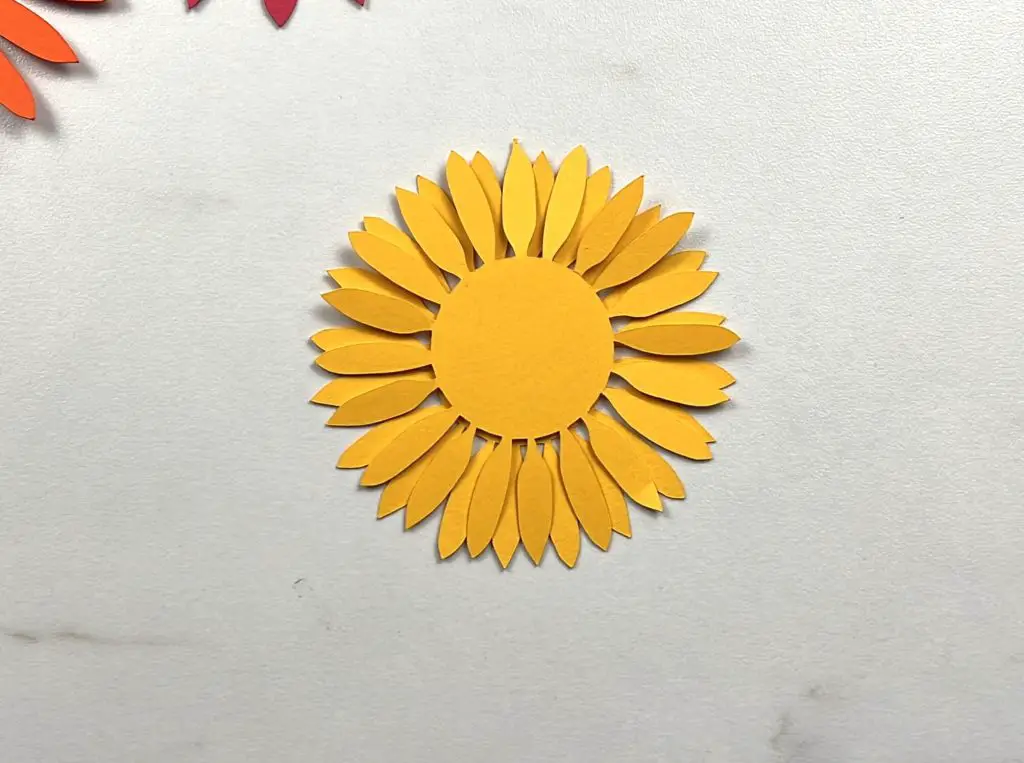
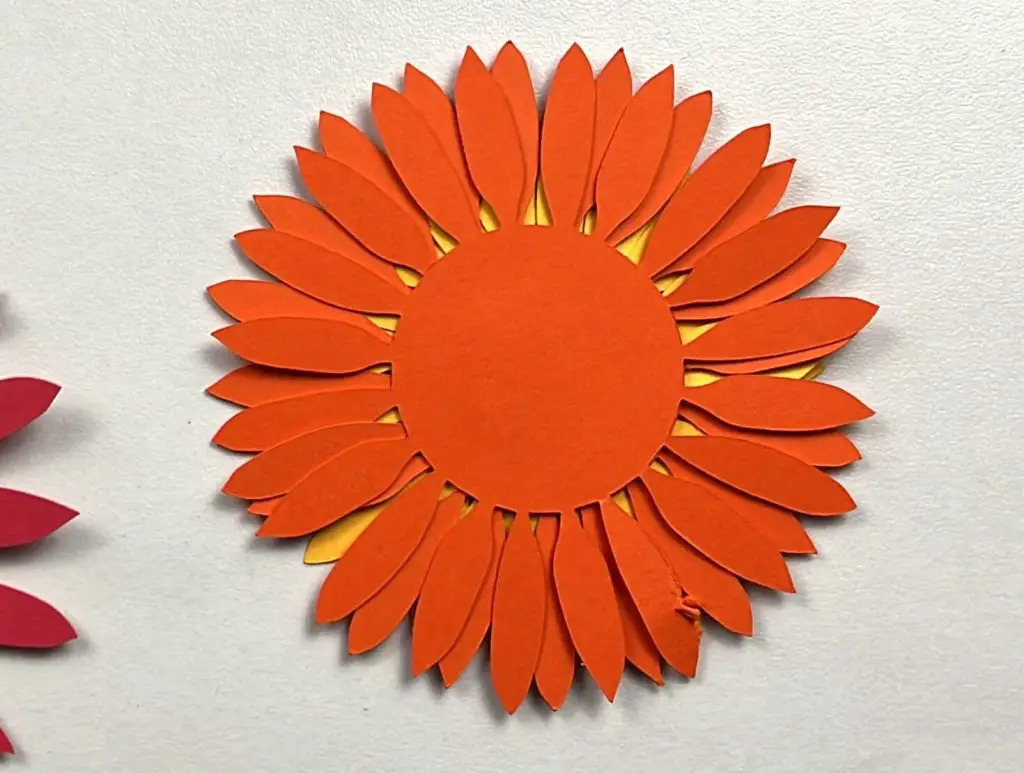
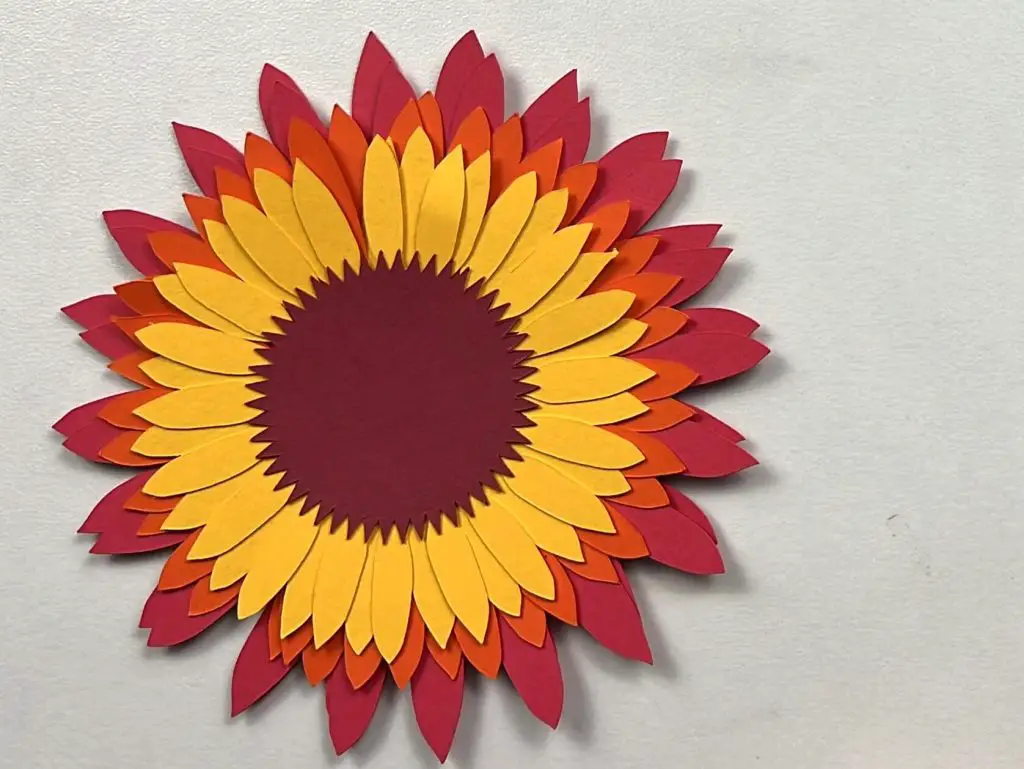
Assemble the paper sunflower petals
When assembling the paper sunflower petals, you can start with the large petals or small petals. I found that starting with the small ones worked better.
Apply glue to one side of the circle center of the petals, and place the same size and color on top. You want to rotate the petals slightly to fill in the gaps of the bottom petals. Then, you will glue on the medium petals the same way. Continue this until all 6 petal pieces are assembled.
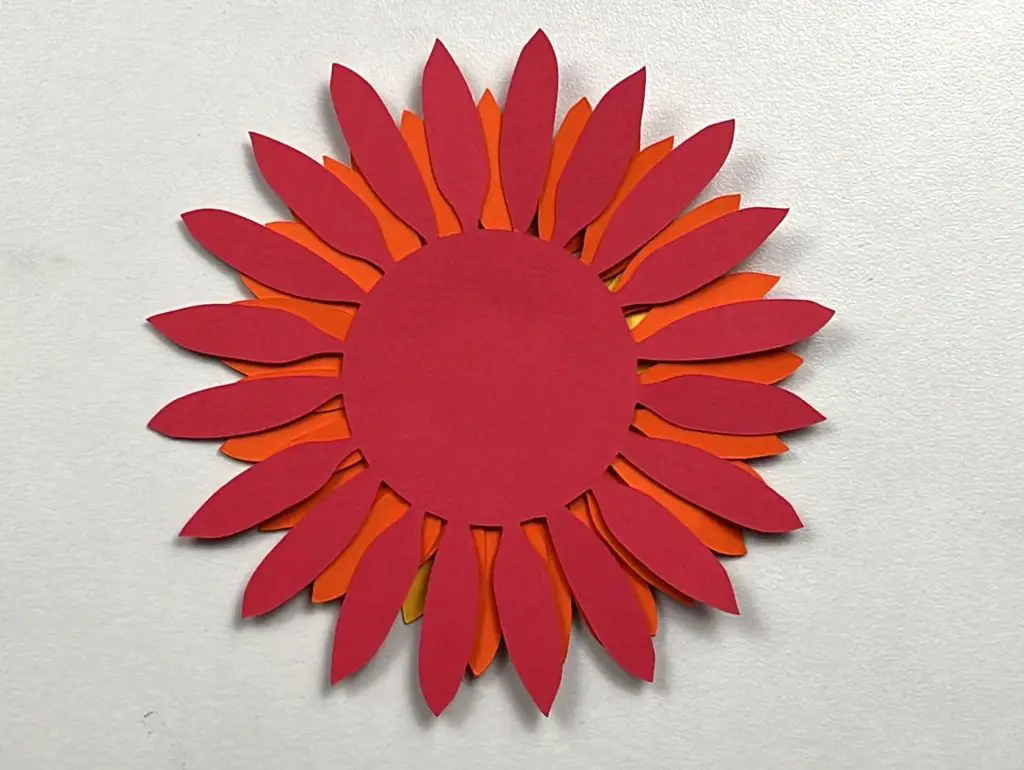
Next, you will want to glue the brown jagged circle center onto the smallest sunflower petal.
Roll the Sunflower center
I find rolling flowers challenging, so bear with me. When rolling the center of the paper sunflower, you need to start with the outside of the brown spiral. Slowly, start to roll it into a small circle. I find squishing the paper with my fingers and making it more pliable helps with rolling. Keep rolling until the entire spiral is rolled.
This is IMPORTANT – you do not need to roll this center tightly. You want it to be loose. When rolling start with a tight roll if you can, but at the end, you want to release it a bit so it has more volume.
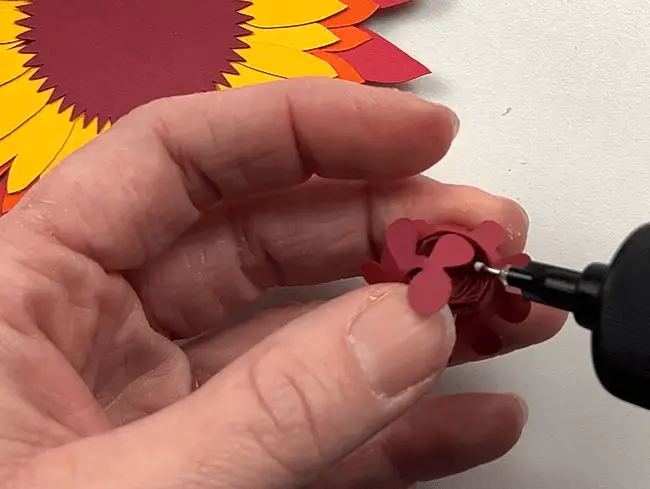
Once you have rolled the center entirely, there is a little circle at the end. This is used to help glue it in place. However, all of the rolled center will not fit on this center circle. Carefully apply glue to the inside portion of the center circle, as well as the bottom edge of the rolled flower. Now, place it in the brown center of the flower, which was glued down before. Hold it in place for a few seconds while the glue dries. Remember, you want the center to be loose, not tight, so it is ok if it falls apart while being glued into place.
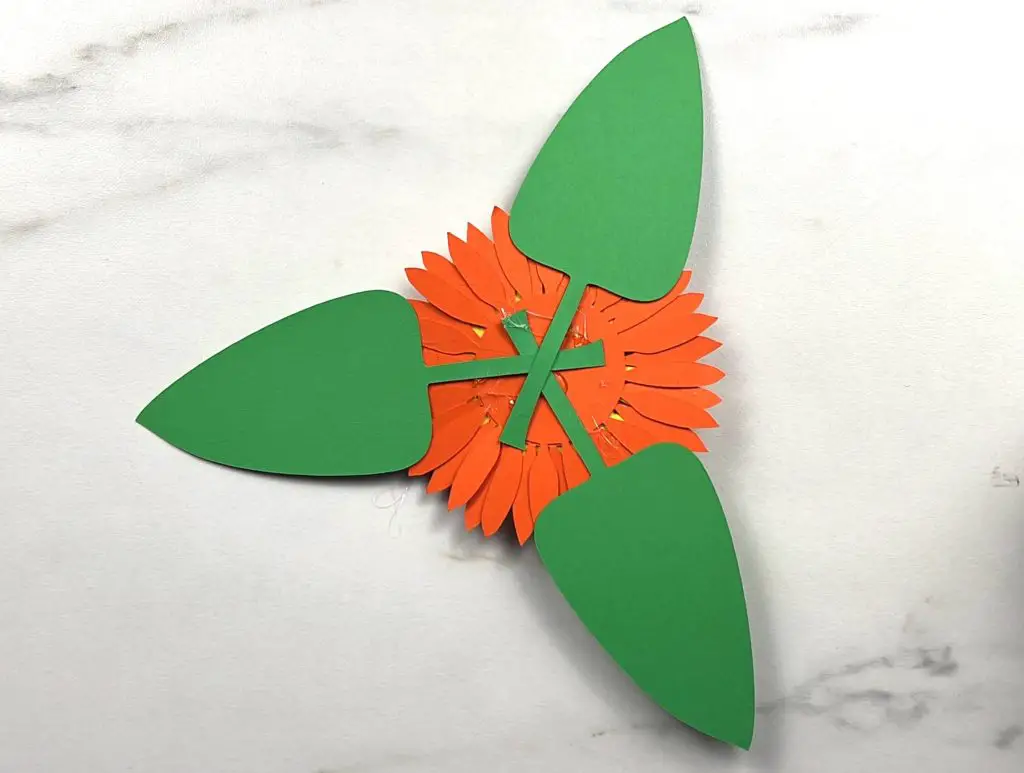
Attach the leaves to the sunflower
I have always seen sunflowers with big leaves, very close to the flower itself. And when I think of them, that’s how I envision them. But that is not always how they look. I’m going to talk you through two different methods to attach the leaves to the paper sunflowers.
Also, before we attach the leaves to the sunflower, we can use a scoring pen to score a line in the middle of the leaves. This gives them a bit more shape and makes them look more life-like.
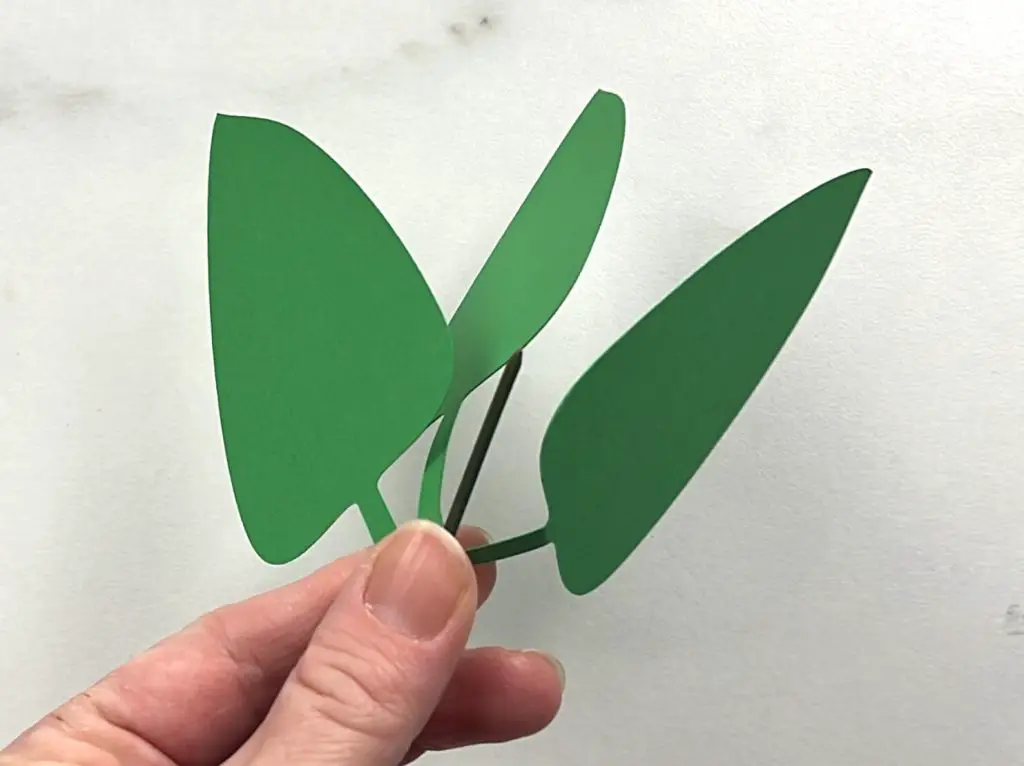
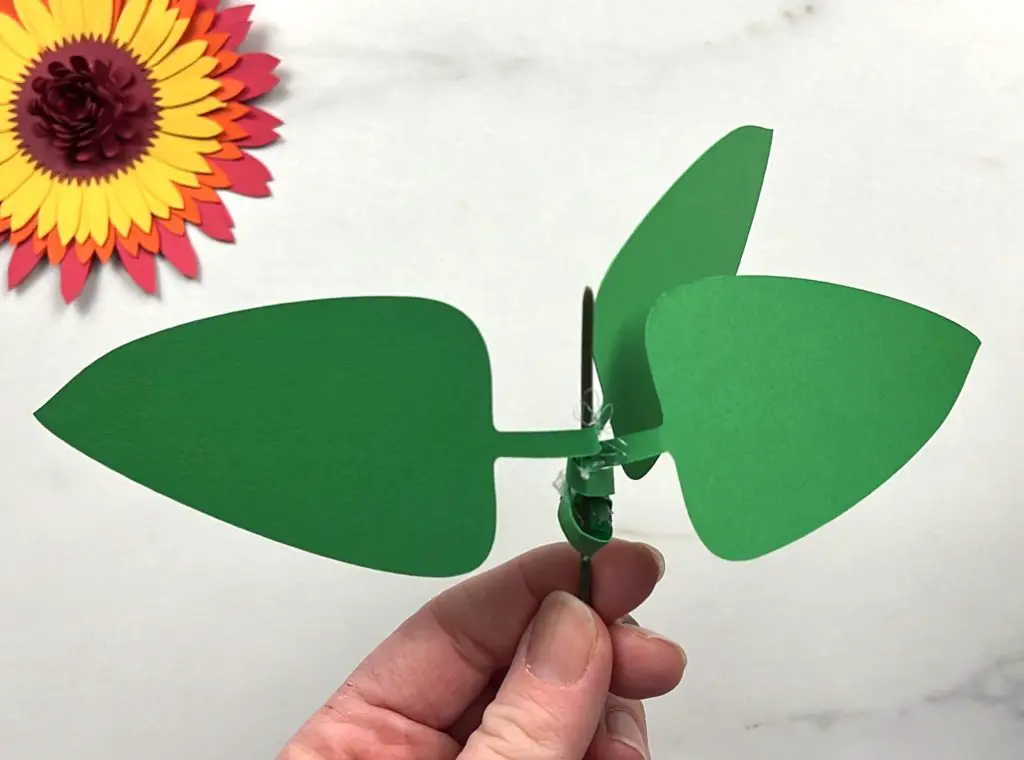
Attaching the Leaves to the sunflower
The first method I’m going to walk through is attaching the leaves right to the flower itself. Simply apply a small dab of craft glue to the top of each of the three leaves. Then, glue them to the back of the sunflower. You want to arrange the leaves so they are equidistance to each other. Then, wrap the stems of the leaves around the stem and glue them onto the stem.
Attaching the leaves to sunflower stem
The other method is basically the above backwards. We start by dropping a dab of glue at the base of each of the leaf stems. Then, we roll all 3 leaves onto the stem at the same time. They should start rolling at slightly different locations on the outside of the stem so that they finish at different spots. They want to be at the same height.
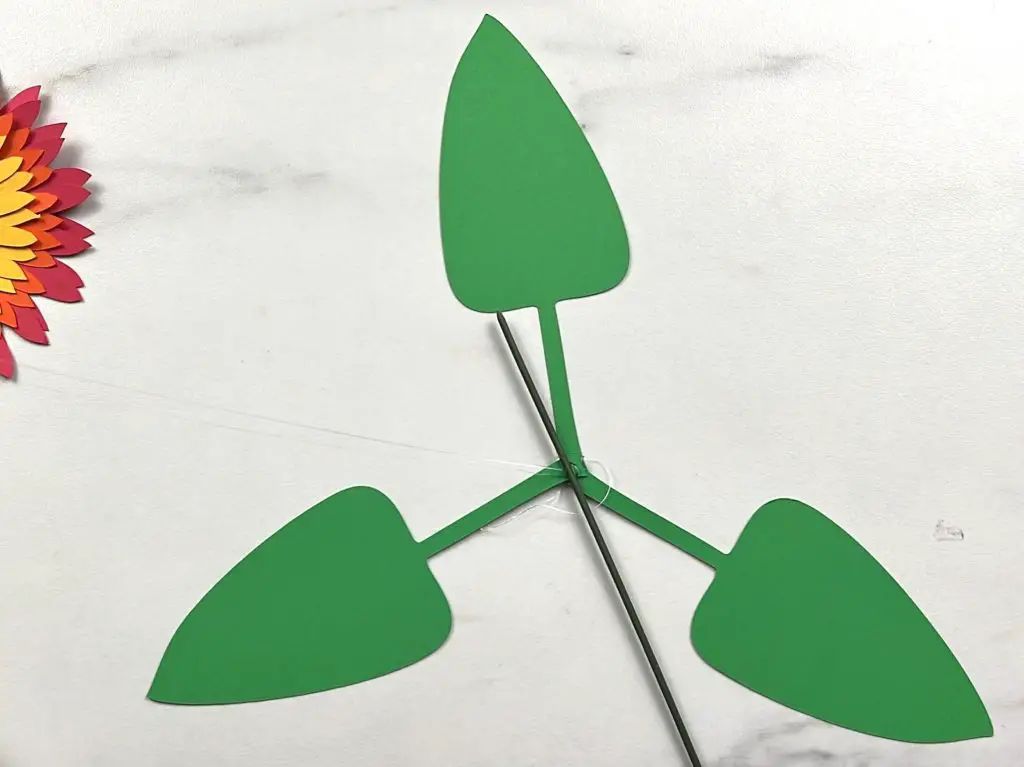
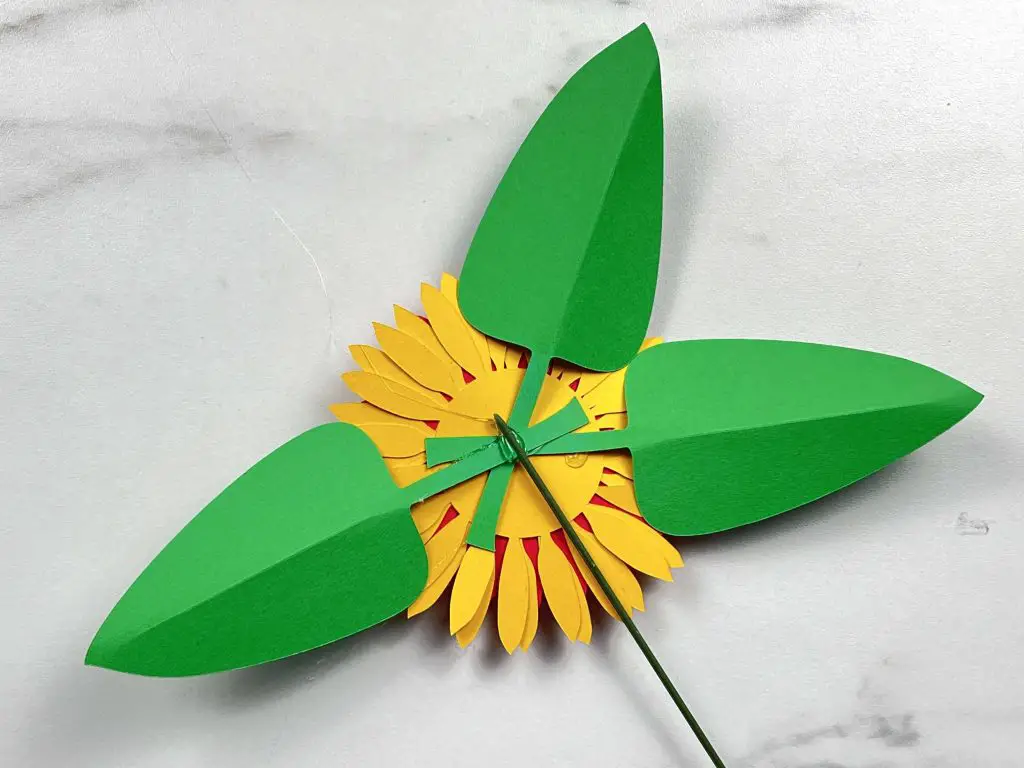
Attach the Stem to the Sunflower
Sunflowers typically stand off the stem, so I like to give the tip of the stem a bend. Using hot glue, dab some glue onto the back of the sunflower and place the stem onto the glue.
You may need to hold the sunflower and the stem together while the glue dries, but fortunately, hot glue dries quickly, so you do not need to wait long.
I like to have the stem attached to the sunflower before I attach the leaves.
Cover the back of the sunflower – Optional
Once you have your paper sunflower assembled, you can attach the optional final piece. I have designed a medium green circle with a slice through it. When the glue is still hot on the back of the sunflower and the stem, you can place this green cover over the stem attachment point to hide the glue.
All that’s left is to arrange your DIY Paper Sunflowers into a vase or give it as a gift.
And there you have it! Your DIY Paper Sunflowers are complete!

Things I Learned while Making DIY Paper Sunflowers
Making these DIY Paper Sunflowers was fun. But, as you guessed it, there was something I learned, or could have done better, or changed along the way, so let’s talk about this:
- I wanted the leaves of the sunflower to be off of the flower. However, I found keeping the big leaves on the stem only made them flop and fall quickly. So, I opted to keep them attached to the sunflower itself. This helps them stay elevated and close to the sunflower.
- For these flowers, I used very thin stems because that was all I was able to find. I would have liked to have used large flower stems like what real sunflowers have. However, I was not able to find anything that fit my needs. If you ever come across thick stems (that don’t break the bank), please let me know!
- Typically, sunflowers are yellow. But I have found really beautiful ones that are multi-colored in real life, so that is why I made my flowers tri-colored. You could just as easily have picked only yellow, or 3 different shades of yellow to make these paper sunflowers.
- Arranging large flowers can be a challenge. I only have a small vase, so having 5 large flowers in one vase is a bit tough. So, arranging these larger flowers requires a larger mouth vase. I think I might look into some foam floral blocks to put them into to give them more room.
Frequently asked questions about making DIY paper Sunflowers
If I did not answer all your questions in my notes and comments above, I have a few more points below that may answer your questions about making paper flowers in general.
What materials can you make sunflower out of?
These sunflowers are made out of paper, but some other material options for making sunflowers are:
- Foam paper
- Faux Leather – either reinforced with vinyl, HTV or just left plain
- Leather,
- Felt – if being cut with your Cricut, reinforcing it with interfacing is helpful
- Scrap cardstock, leftover paper from previous projects
How big should paper sunflower be?
I made these sunflowers about 5” wide. In real life, sunflowers can be big and small. I have personally grown sunflowers that are 8”-10” in diameter, but I have also seen them as small as 2”-3”. So the choice of size is yours.
I would suggest that the larger you make the flowers, the thicker the stem and the stronger the vase you have for holding it all together.
How to you care for Paper sunflowers
Some tips that I use for keeping my paper flowers looking fresh and alive longer are:
- Keep the paper flowers out of direct sunlight – even inside, the paper will be bleached over time. They can be in a sunny room but not in direct sunlight.
- Do not spray the flowers with water when cleaning them.
- Dust the flower regularly. Simply shake the dust off with a dry dust rag or shake them outside. These are more sturdy than you think!
How long do DIY Paper Sunflowers Last
If you care for your flowers, as I detailed above, paper flowers can last years. Their biggest enemy is sunlight and dust. So, keep them out of the sun and dust them regularly, and they will last for years.
Did you enjoy this tutorial on DIY Paper Sunflower?
Did you enjoy this tutorial on making DIY paper sunflowers? Let me know in the comments below! Did you try making these flowers? Let’s me know how they turned out or if you have any suggestions on how to make them better next time!
If you liked this paper craft, be sure to check out my other paper crafts here.
If you enjoyed making this paper flower and want to make more, be sure to check out these other paper flowers that I have create:
- How To Make Paper Lavender Flowers
- Black-Eyed Susan Paper Flowers
- How To Make Beautiful Paper Hydrangeas
- How To DIY Mini Chrysanthemums
- How to make paper Gerbera Daisy Flowers