It is that time of year again! It is time to get our countdown calendars made and ready for the countdown until the holiday season! This year, I have made a few new ones, and this is the first to be shared. I call it the Christmas bulb holiday countdown calendar. So, let’s jump in and make this season awesome!
As an Amazon Associate, I earn from qualifying purchases. This post contains affiliate links. I may receive a commission if you purchase an item from one of my links. This will not change the price you pay.
Supplies needed to make Christmas bulb holiday countdown calendar
Most of my countdown calendars used scraps from previous projects or up-cycled materials, but this one is all fresh pieces. So, here is what we need:
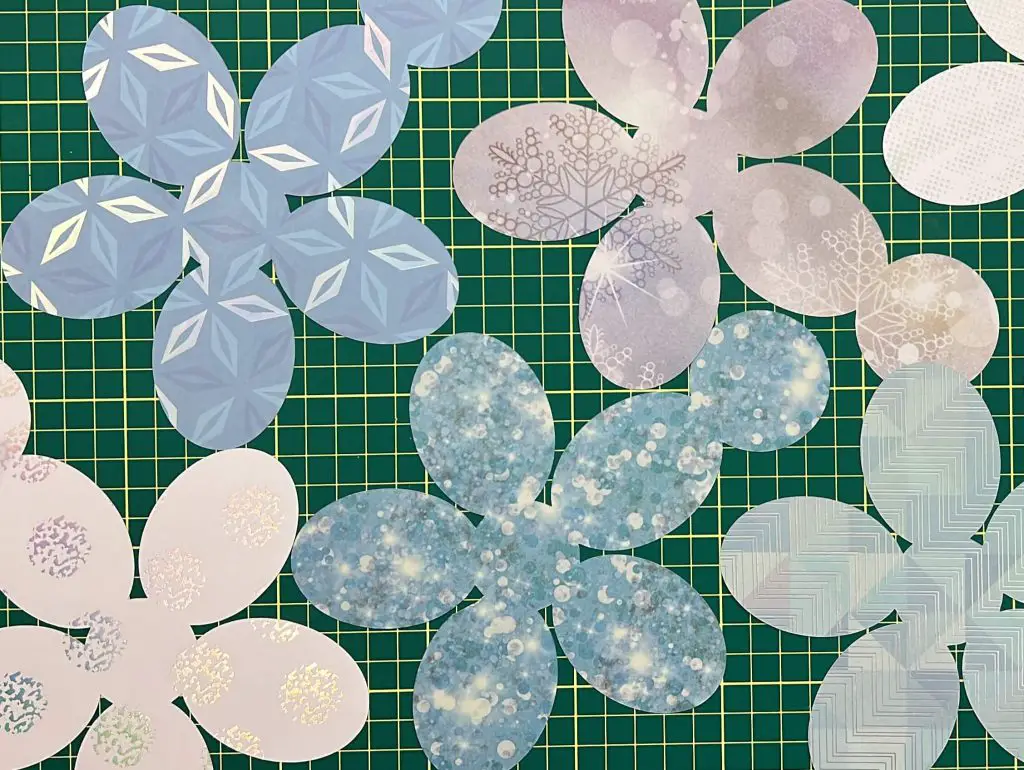
- Cardstock paper – You can use any type you want. I used 12” x 12” cardstock that is holiday-themed with all pieces in the same colour scheme. If you follow my size selection, you will need 8-9 sheets of cardstock. If you want the Christmas bulbs larger you will need more, and less with smaller bulbs.
- Ribbon – each bulb will need a piece of ribbon. You will need 4 different lengths. This will allow the bulbs to hang below each other and take up less space. You will need:
- Short – 8″
- Medium -12″
- Long – 16″
- Extra long – 20″
- Dowel attachment piece – 36″
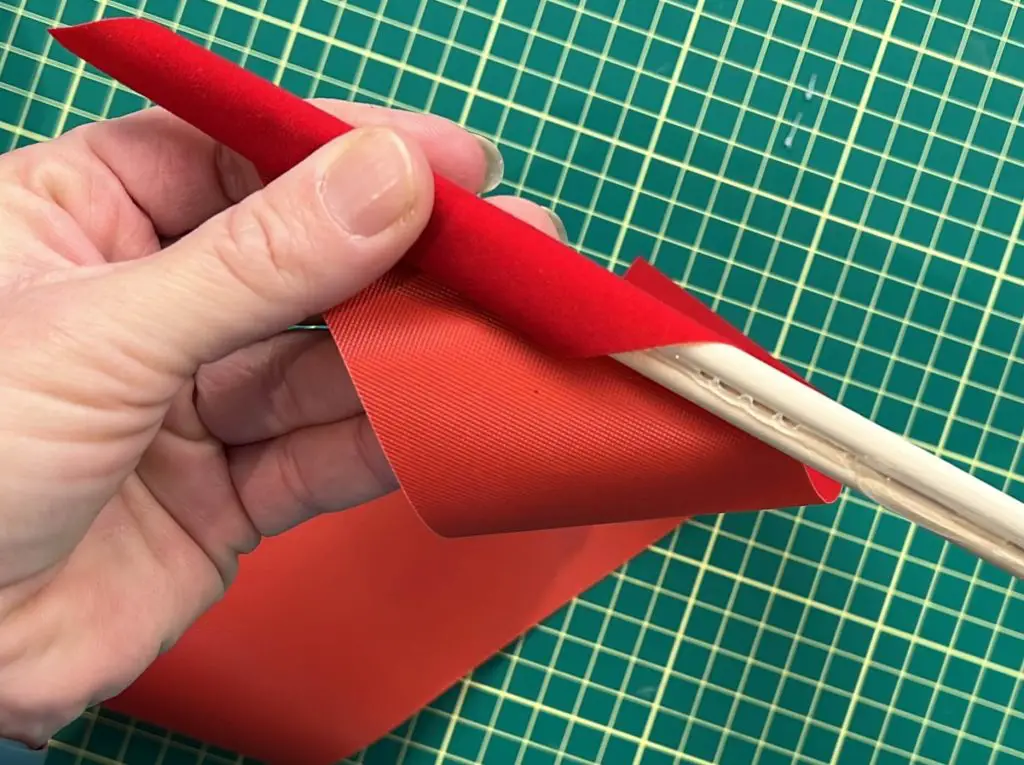
- Dowel Cover piece – I used a 2″ red felt ribbon.
- Wooden dowel – I used 4 pieces of wooden dowels that were 1/4″ diameter and 12” long each.
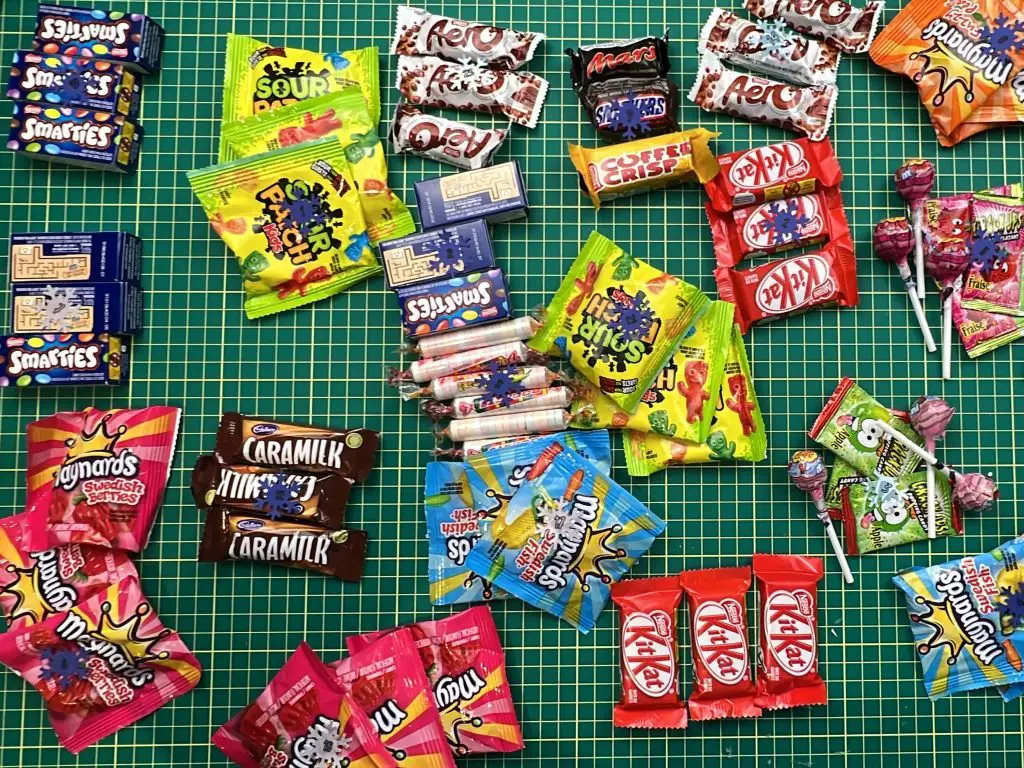
- Filling for the countdown calendar – after Halloween each year, I pull aside candies for the countdown calendar so that I do not need to buy more.
- Tissue paper -I used some tissue paper inside each bulb to hide the content of what is inside. There are small holes at the top and bottom, and if you have curious eyes poking around at the house, this is a quick and easy way to hide what is inside. This one is optional.
- Glue – you need glue to close the Christmas bulbs. You can use craft glue, or you can use a glue gun with hot glue. I suggest using a glue gun with hot glue as it dries faster.
- Christmas bulb file – I have created an SVG file for this Christmas bulb. You can get it from my resource library by signing up for my newsletter.
Let’s make a Christmas bulb holiday countdown calendar
Select your countdown calendar treats
Every year after Halloween, I pull aside 25 candies from my kids’ takings. This gets put aside until I make the countdown calendars so they have something for each day.
This also helps limit how much they get to eat in the month of November, and I do not need to spend extra money buying things to put into the calendar.
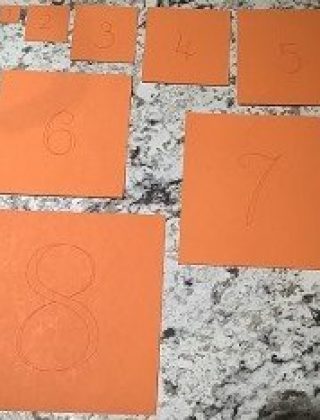
Just some pointers – if you are making more than one calendar for your kids, for example, it is a good idea to give the same treat to each child on any given day. I like to sort my candies and place them with numbers next to them, and then I take a picture to make sure I remember what goes where.
Make the Christmas Bulbs
I have designed a Christmas bulb SVG file. You can download this from my resource library. You can sign up for my newsletter below and get access to it.

This file needs to be imported into Cricut Design Space or other cutting software for a Silhouette or Bother machine.
Once the file is in Design Space, adjust the design size to fit your desired bulb size. You need a size that will fit the treats you have selected. I used Halloween candies, and I made the design 6” wide. This was sufficient for Halloween candies. But I recommend you make 1 test copy to make sure.
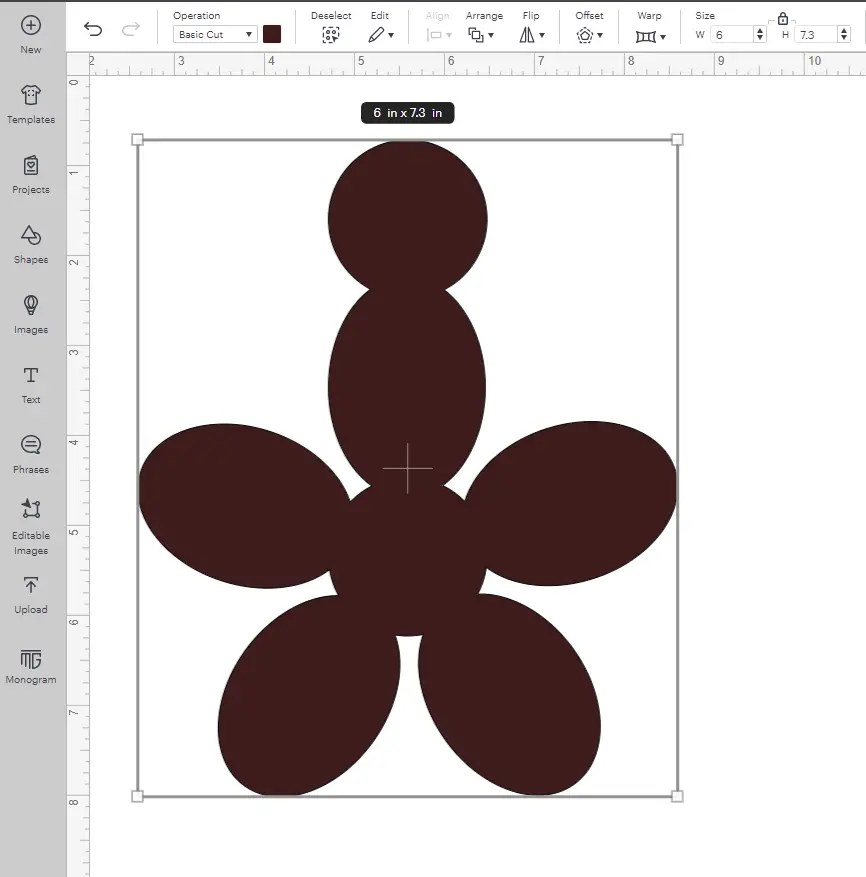
You will need to make 23 or 24 duplicates of this design. Depending on if you want to count down to the 24th or the 25th. We do our last day on the 24th, so we only need 24 pieces in total.
With a 6” wide bulb design, you can fit 3 pieces onto one 12” x 12” cardstock.
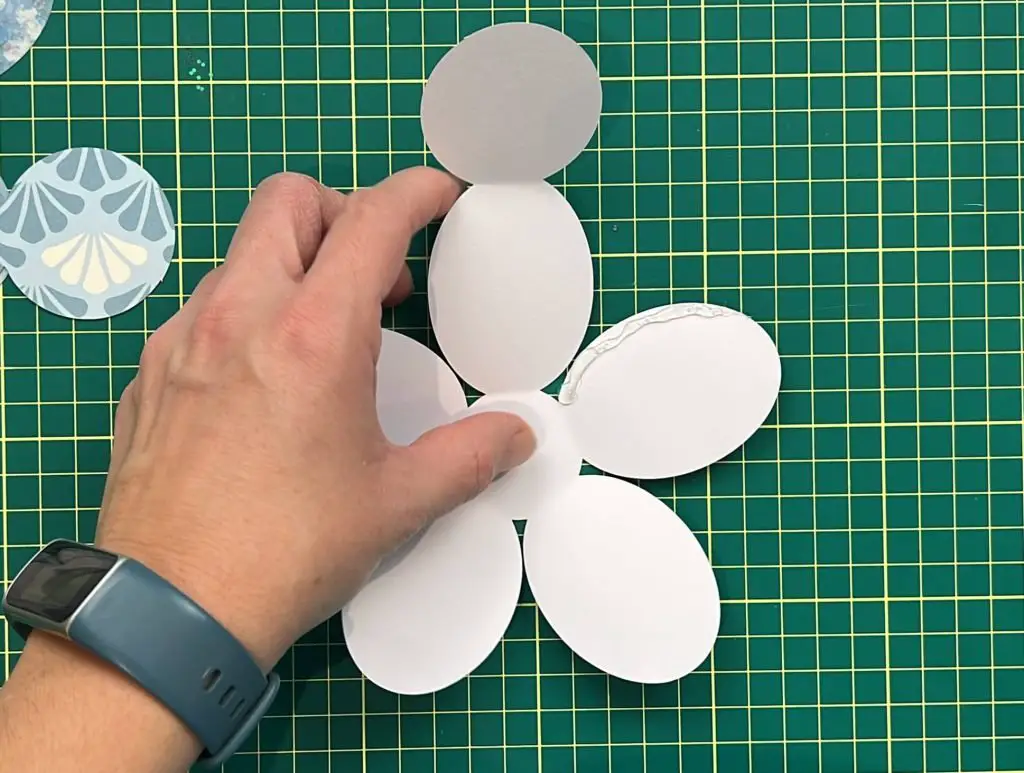
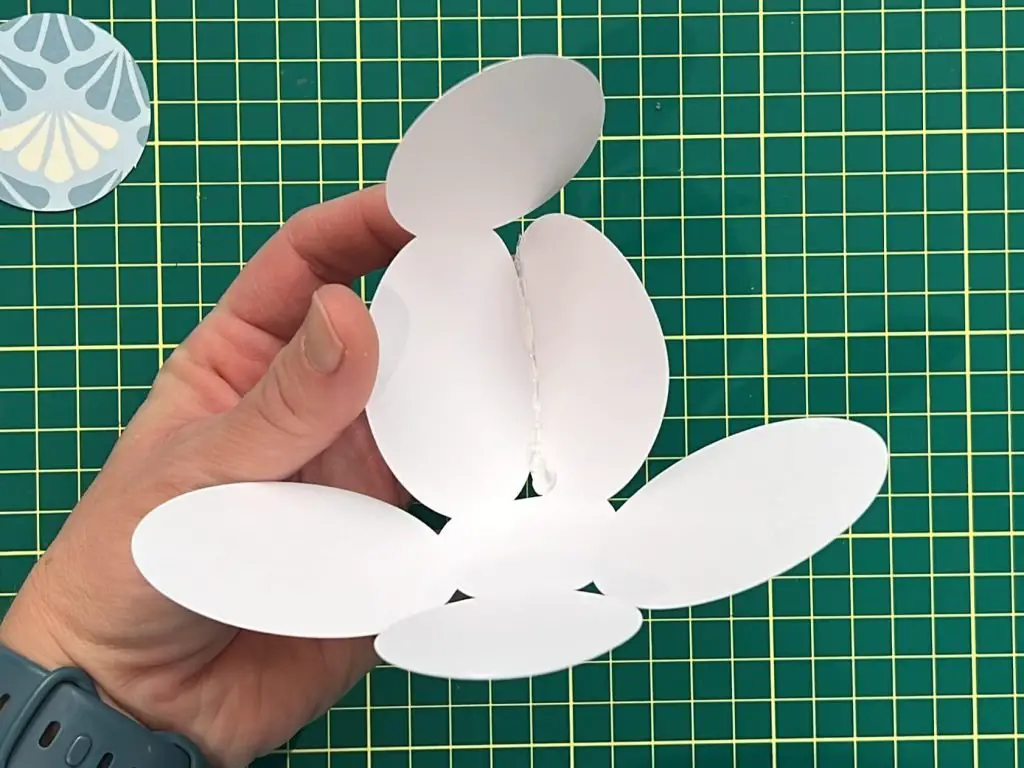
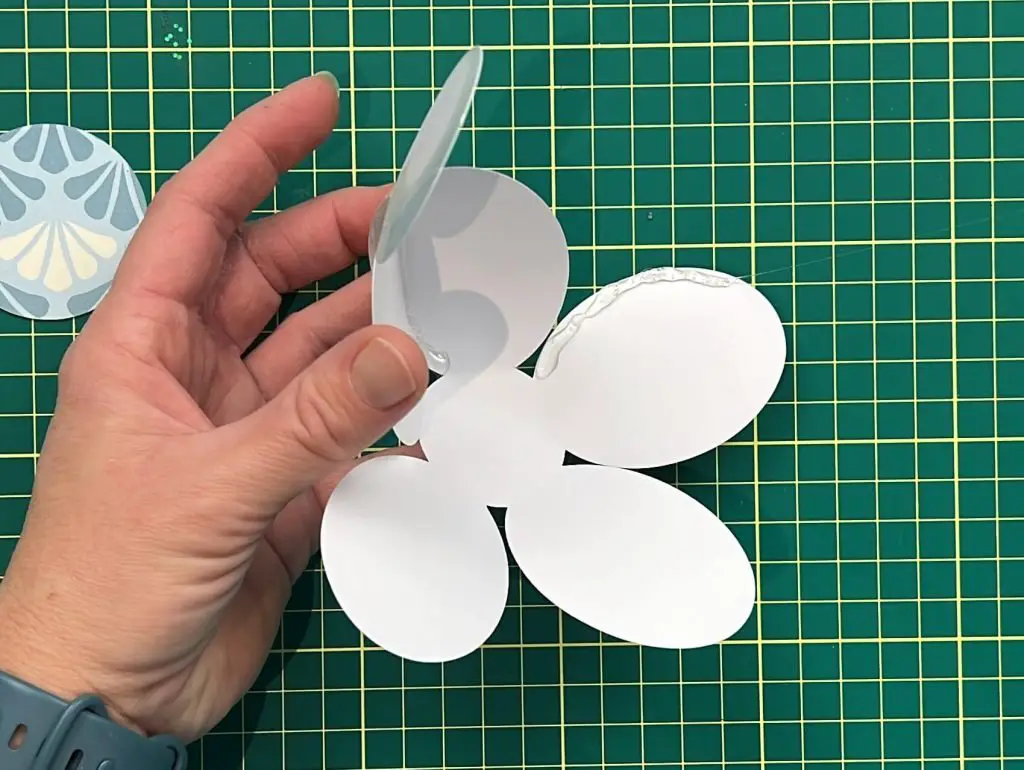
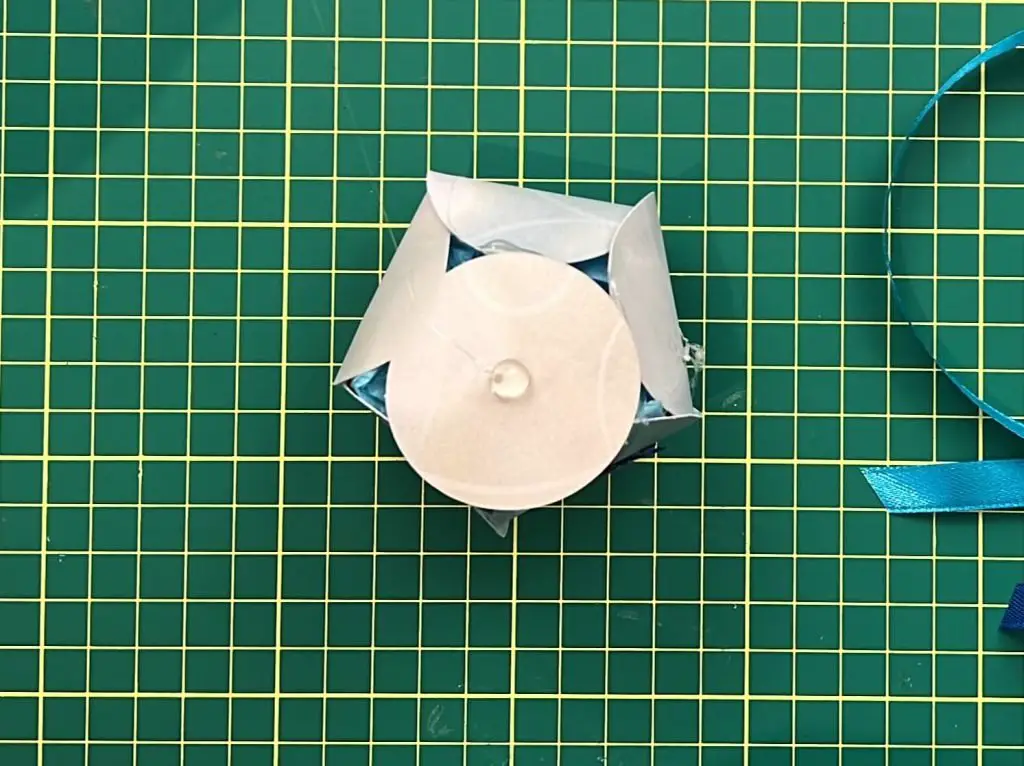
Once you have your bulbs cut out, it is time to glue them together.
I used my glue gun as the glue dries faster, but you can use crafting glue. However, if using crafting glue, you must hold the bulb in your hand until it is dry.
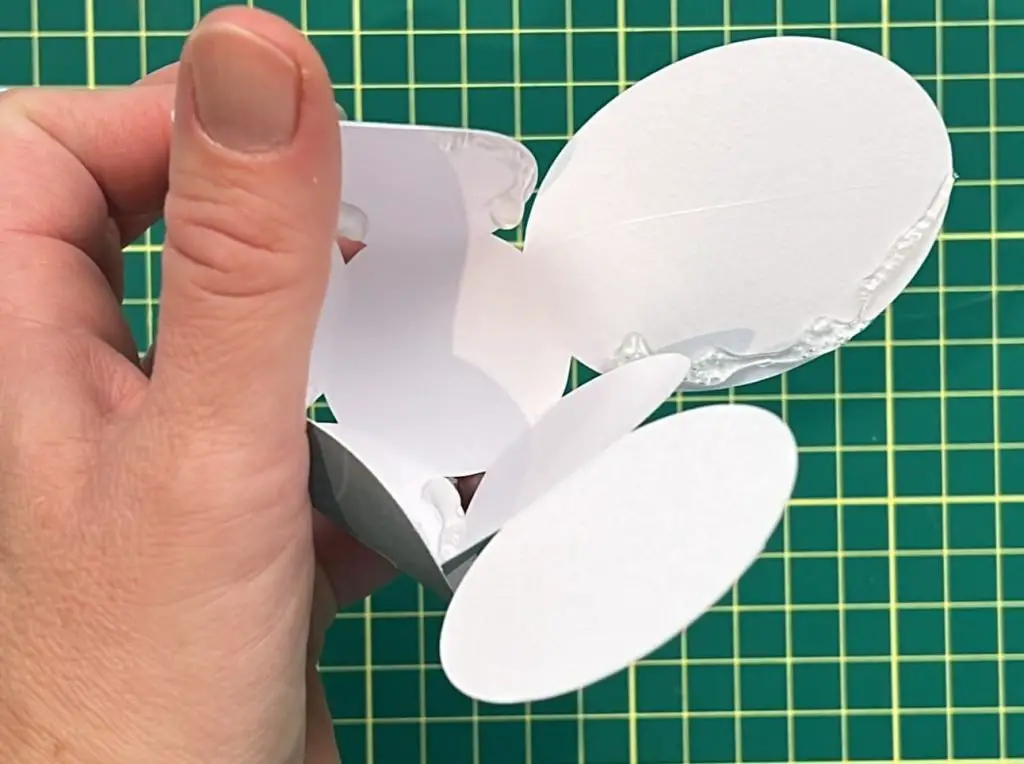
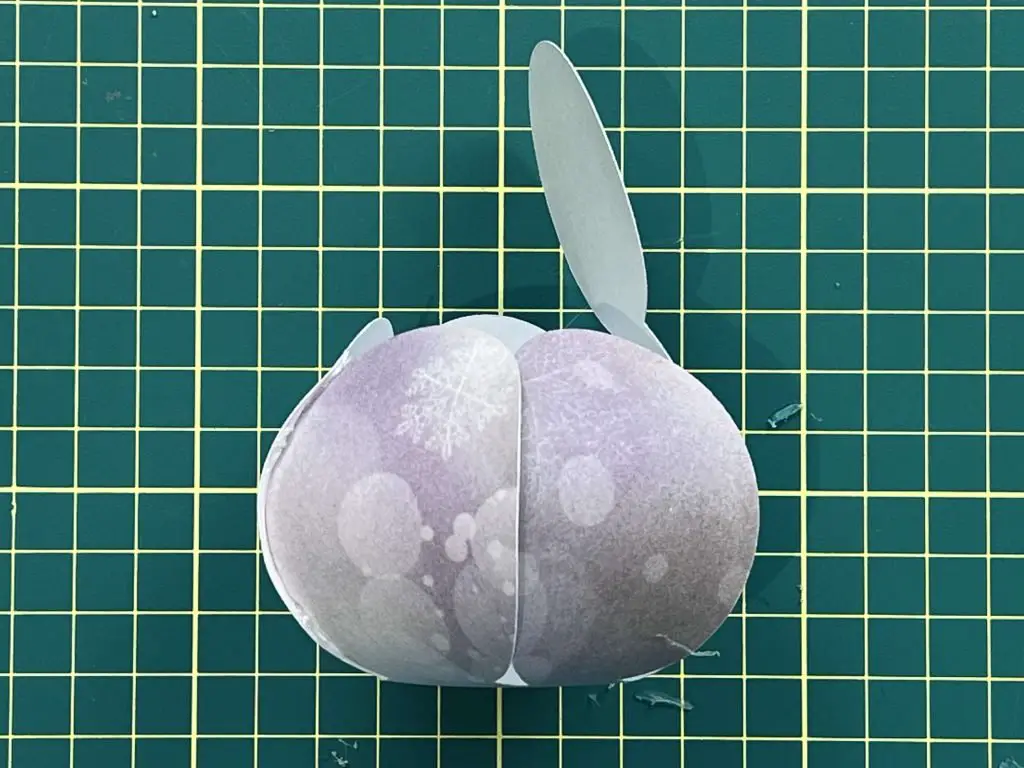
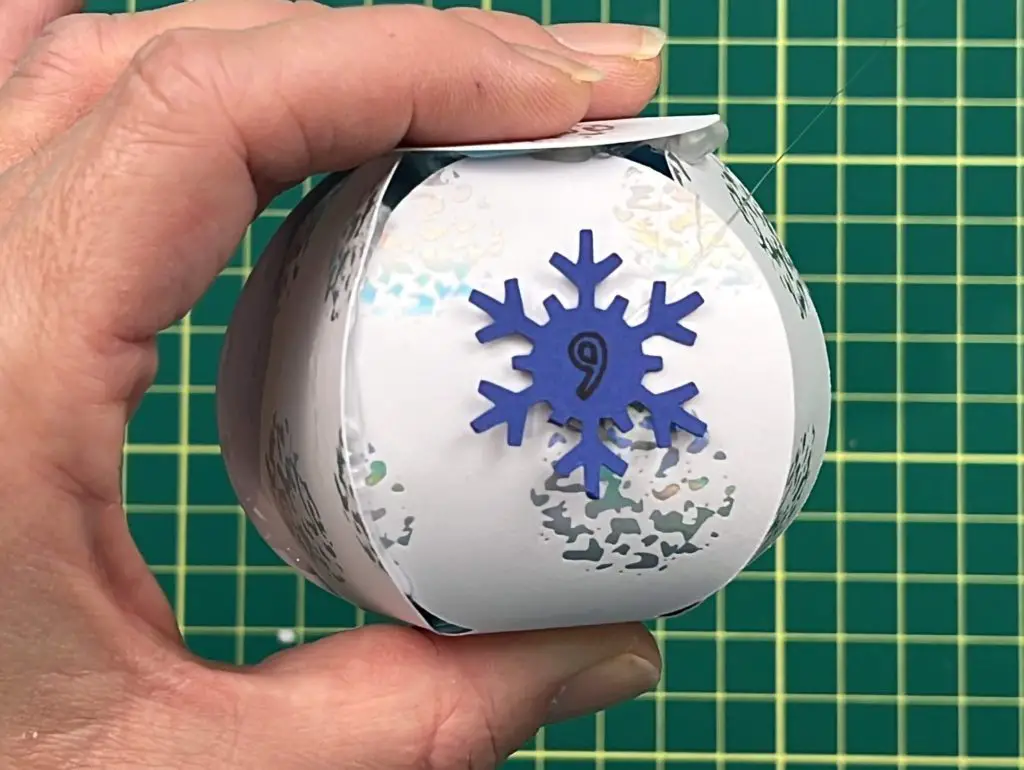
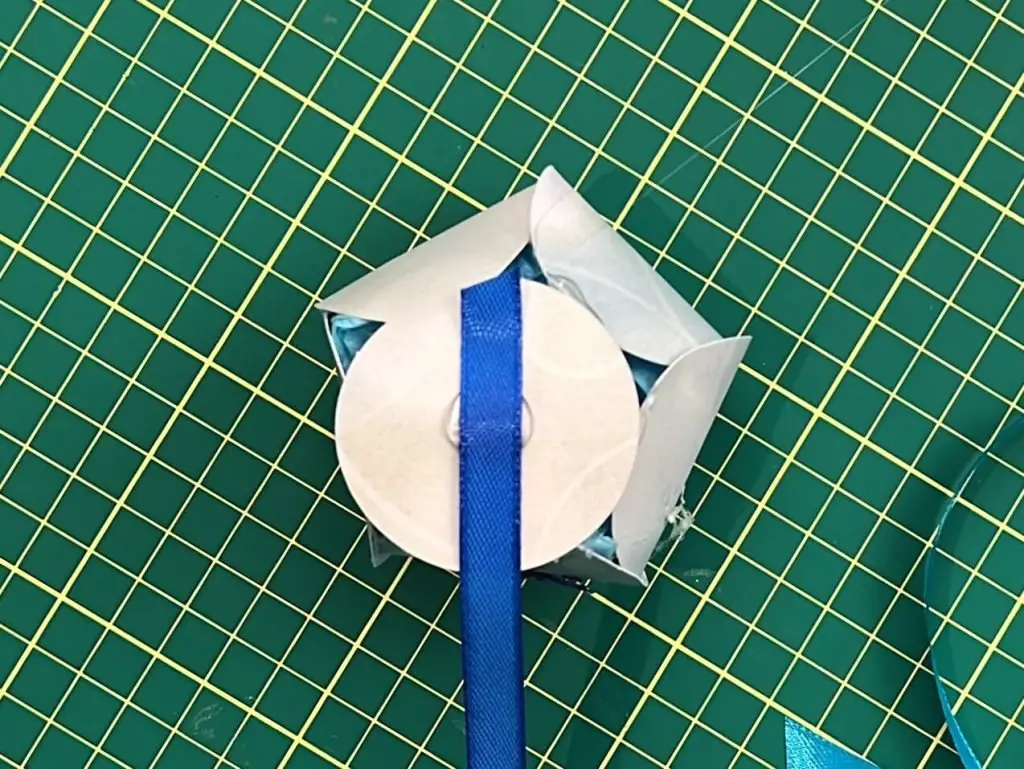
Start by drawing a bead of glue on one side of one of the circle leaves. Then, bring the up tip of the leaf next to it and place it onto the glue. Continue this method until only one leaf is left, not including the top. If you glue on the same side of each leaf, the bulb will have a nice symmetrical look. Once at the last leaf, apply glue to two leaves at once, the last leaf and the second side of the first leaf. Gently and carefully close the sides of the bulb by attaching them to the glue. Make sure to leave the top open.
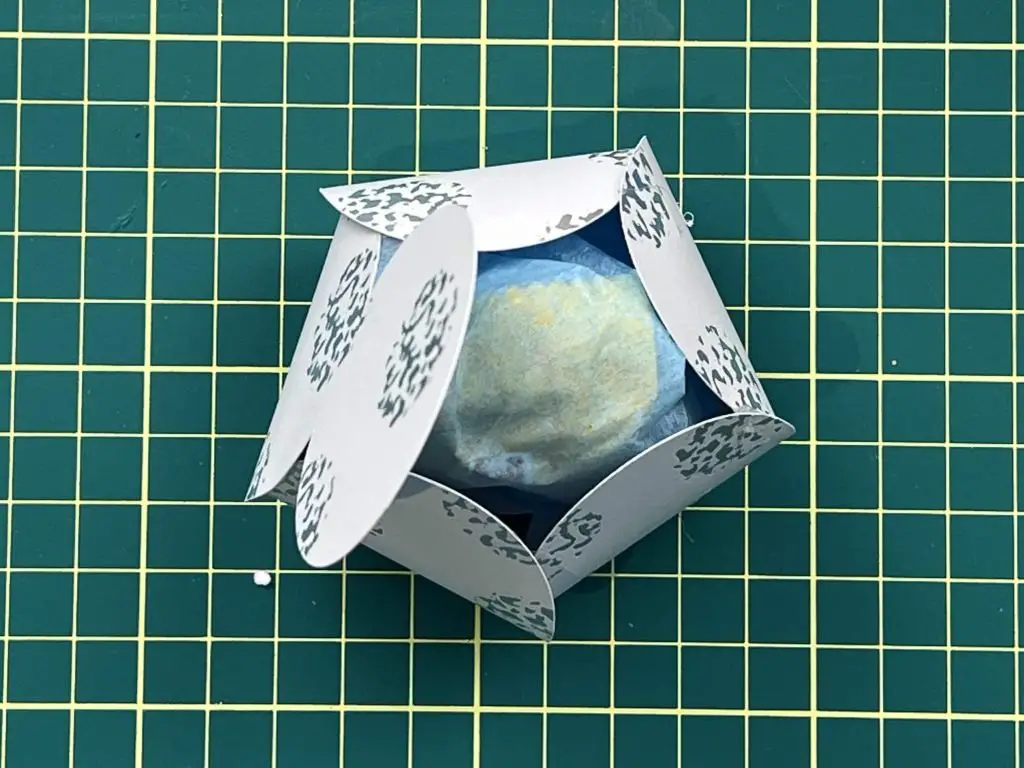
Insert your Countdown Treat into the Christmas Bulbs
The Christmas bulbs I have designed have small gaps at the top and bottom between the bulb leaves. If you have impatient, snooping children using this calendar, I recommend using some tissue paper to wrap the treat. This way the insides will not be easily visible.
( If you are doing multiple calendars at a time, read the next section on numbers before you close the bulbs.)
Either wrapped or not, insert the treats into the Christmas bulb. Once happy with the placement, apply a dab of glue on top of the 4 leaves and close the bulbs.
Countdown calendar need numbers
Each bulb in the countdown calendar needs a number. I have previously designed some numbers that can be used for this. You can sign up for my newsletter below and get access to it.
When adding your treat to the bulb, it is easiest to place a drop of glue on the side of the bulb and glue the number on.
This is very handy when doing multiple calendars at once so that the bulbs do not get mixed up.
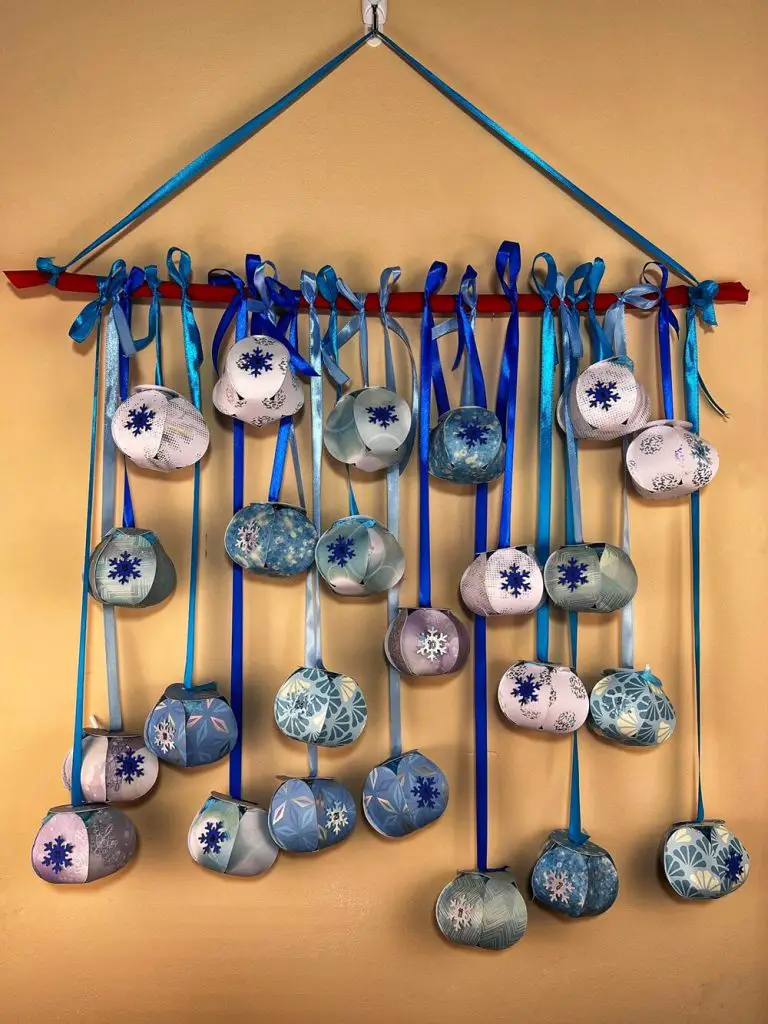
Prepare your Wooden Down for Hanging
The bulbs that we are making will need to hang on something. I have selected to hang them on the wall on a wooden dowel. You can hang them anywhere.
I took 4 wooden dowels that were 1/4″ thick and 12″ long. I glued them together overlapping so they would be the thickness of 2 dowels. Use hot glue to hold them together.
Once the glue cooled, I grabbed some 2″ thick red felt ribbon and wrapped it around the dowel. This way, there will be a nice finish on the hanger. We do not want the glued wood exposed. I applied glue at both ends to keep the ribbon in place.
Add Ribbon for Hanging your Christmas Bulb
Once the glue has dried on your Christmas bulb, it is time to attach the ribbon so that you can tie it to the wooden dowel.
I opted to cut 4 different lengths of ribbon:
- Short – 8″
- Medium -12″
- Long – 16″
- Extra long – 20″
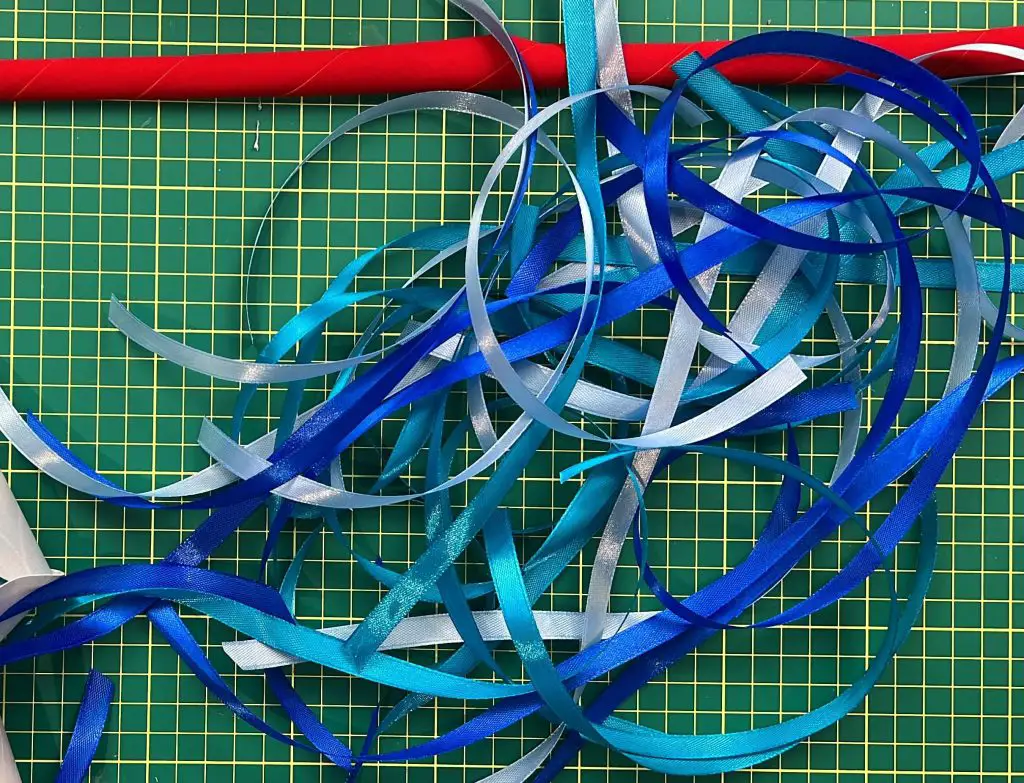
You can cut 6 pieces of each length or random numbers of each.
Apply a dab of glue to the top of the Christmas bulb. Place one end of the ribbon onto the bulb. Try to have all of the ribbons facing the same way. I had all of my ribbon ends pointing away from the number and the long part of the ribbon pointing toward the number. This was to allow my bulbs to all hang in the same direction.
Once all the bulbs have ribbons attached, it is time to tie them to the hanger. I used a simple bow to tie them onto the hanger. This way, when the bulbs are pulled, they will easily release from the hanger.
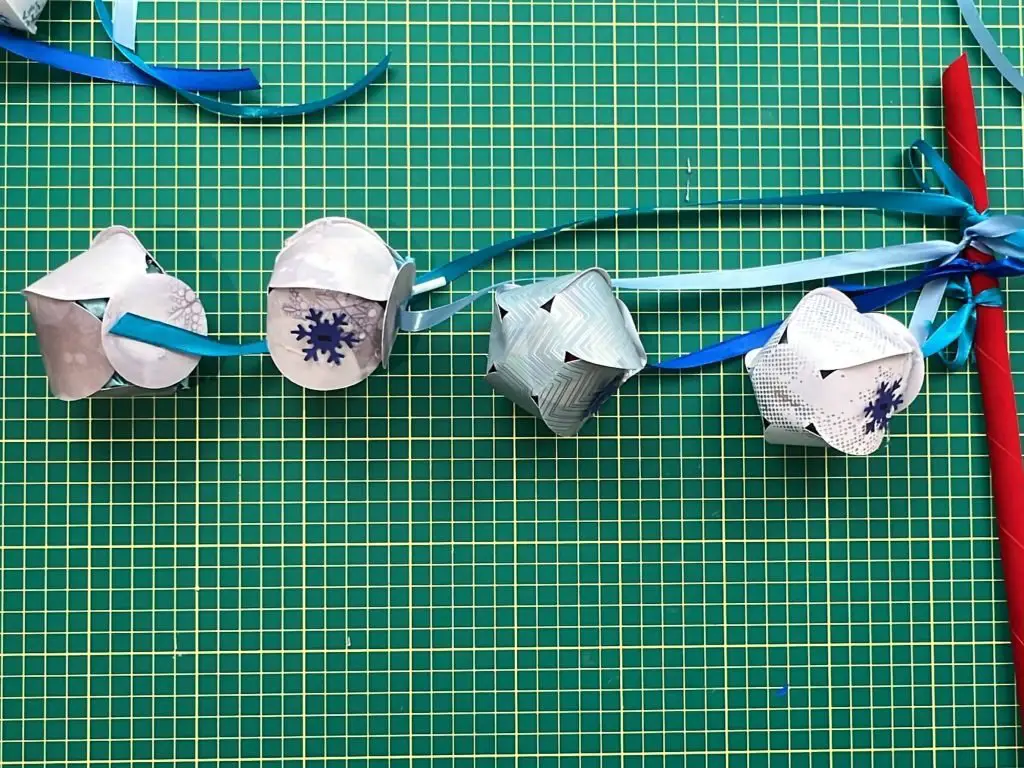
I tried to alternate lengths of ribbon when tying them to the hanger, but you can arrange them however you like. Also, you can adjust the length of each one individually so they sit nicely together.
Add a hanging ribbon
Once all of the bulbs are attached to the hanger, cut one long piece of ribbon and tie it to both ends of the hanger. My ribbon was cut at 36″ of length. This way, you can hang the calendar on a wall.
Find somewhere to place your countdown calendar
I have an area in my house where we hang the countdown calendars every year. I use 3M command strips to hold them up and then remove them after the holiday season.
So, hang up your calendar, and you are ready to countdown to the holidays!
And there you have it! Your Christmas Bulb Holiday Countdown Calendar is complete!
Things I learned while making this Christmas Bulb Countdown Calendar
I was hopeful to get 3 countdown calendars done this year, and so far, I think I am doing okay. But this one was harder than I thought it would be! So, here is what I learned:
- Gluing the bulbs closed was harder than I had hoped. Getting all 5 leaves closed nicely took some practice, but eventually, I got the hang of it and was able to get them all to look nice.
- My initial plan was to have the ribbon loop around the hanger. I thought this was a good idea, but then I realized it would be difficult to remove the bulb from the hanger. So, I opted to tie simple bows.
- Tying simple bows onto the hanger is harder than it seems. It took much longer than I wanted. Also, I found that the bows would come undone very easily, so moving the calendar around would loosen some of the bows. You need to be careful with this.
- Attaching the ribbon to the hanger – I was trying to add a knot in the middle of the hanger ribbon so that the calendar would stay stable on the wall and not slide from side to side as the weight distribution of the treats underneath changed during the holiday season. But, I was not able to find the center of balance on the hanger, so I just gave up. I will have to adjust and center the calendar as we go along.
- This calendar took longer to make than I had hoped. It took me about 5 hours to make from start to finish. But it was well worth it!
Did you enjoy this Christmas bulb holiday countdown calendar?
Did you enjoy making this Christmas bulb holiday countdown calendar? Let me know in the comments below!
If you enjoy Christmas Crafts, check out my other Christmas Crafts here:
If you enjoy Countdown Calendars, check out my other designs:
- Hanging Star Holiday Countdown Calendar
- Toilet Paper Roll Countdown Calendar Christmas Tree
- Snowman Christmas Countdown Calendar
- Christmas Tree Countdown Calendar – DIY
- Wine Advent Calendar
- Beer Advent Calendar
Don’t forget to sign up for my newsletters! You’ll get inside tips on upcoming posts and additional behind the scenes details about what’s happening on the site!