We are not a religious family, but we still enjoy the holiday season, and nothing makes the holiday season more exciting than counting down the days until Christmas! This year there were a lot of demands for a new design, and of course, no one could agree on one design. So, I have had my work cut out for me. The first countdown calendar that we have is the Snowman Christmas Countdown Calendar.
As an Amazon Associate, I earn from qualifying purchases. This post contains affiliate links. I may receive a commission if you purchase an item from one of my links. This will not change the price you pay.
Supplies needed to make a snowman Christmas Countdown Calendar
I like to use odds and ends that I already have at the house for my crafts. Countdown calendars are always a good source for using up leftover supplies, so here’s the list:
- Cardboard – I like to use old cereal boxes, but cardboard boxes are good to use as well.
- Wrapping paper – I used the back side of wrapping paper to make the snowman’s body and sides white.
- Cardstock – This is of the numbers and snowman accent pieces (eyes, nose, etc). For this snowman Christmas Countdown Calendar, I am using just standard colors of recollections brand cardstock.
- Glue – You will need LOTS of glue to hold the main structure together. I like to use my glue gun with
- .
- Stuffing/prizes/treats – Each compartment in the countdown calendar needs to be filled with something. I like to keep extra candies from Halloween on the side so that they can be repurposed for this event. But you can fill it with toys, candy, or little gifts. Whatever your heart desires.
- Scissors/Cutting blades/Cutting machine – for cutting the cardboard. Whenever possible, I like to use my Cricut, as it is great at making straight lines and saves my hands from having to cut the cardboard. But for simple straight sections, I like to use my paper cutter. But you can use any cutting tool you have available.
Let’s begin making our snowman Christmas Countdown Calendar
Create the design for your snowman Christmas Countdown Calendar
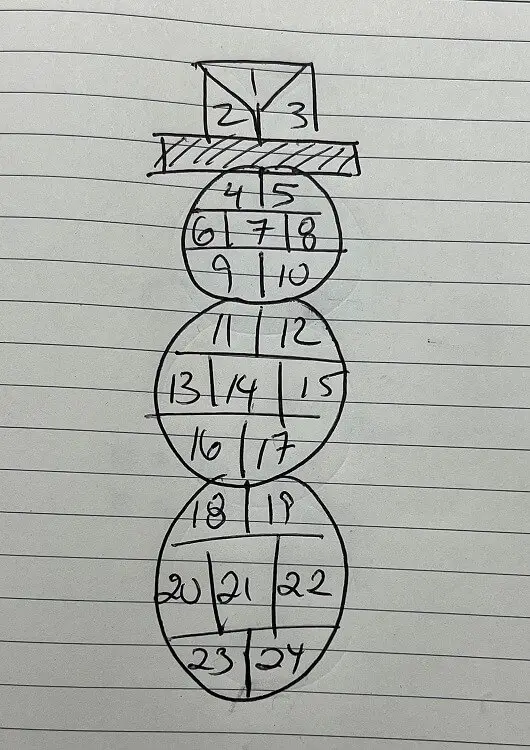
As with many of my designs, I need to sketch out the concept first. I like to do this by hand, but you can go all out and do it in a program.
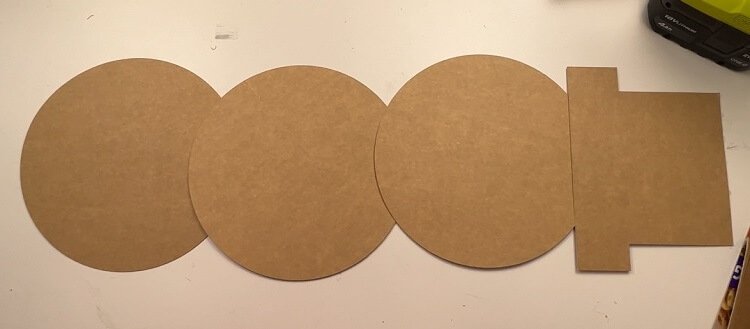
My snowman has 3 body circles and one top hat. Each section has been cut up into smaller sections to allow for 24 compartments. Depending on the day you want your calendar completed, you can have 25 compartments or even 31 if you want it to countdown until New Year’s Eve.
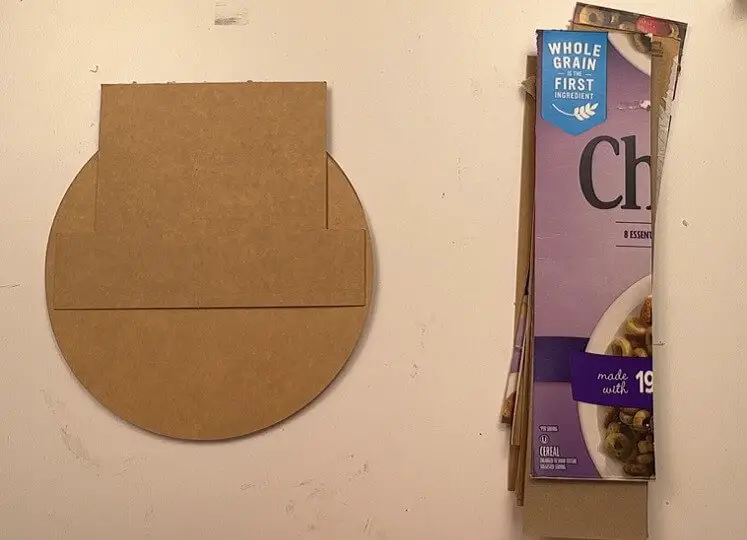
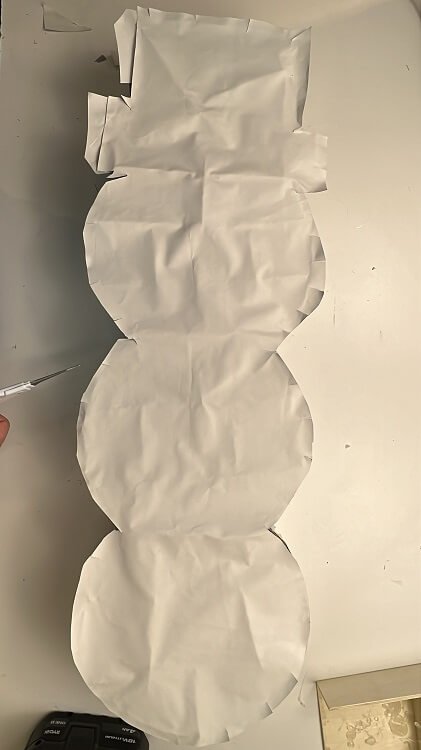
Cut out the back of the Snowman
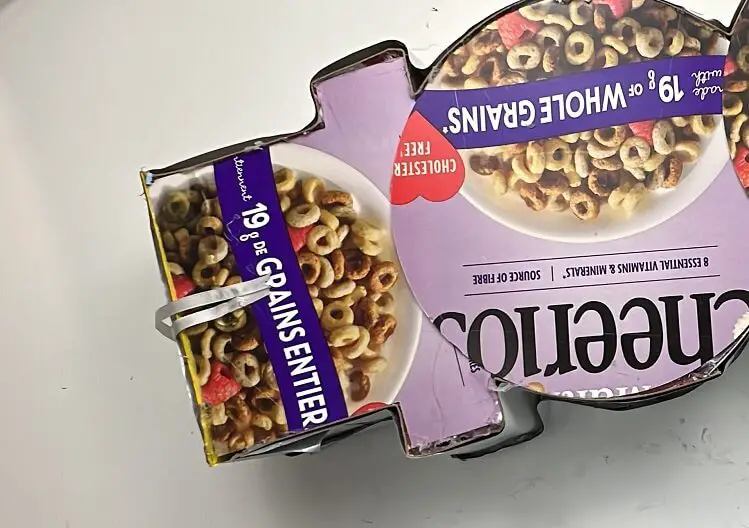
For this snowman Christmas countdown calendar, I am using old cereal boxes. I used my Cricut to cut three 8-inch diameter circles for the body, and the top hat was 2 rectangles, one 2″ x 8″ and one 4″ x 6″, welded together.
walls of the snowman
Using more cereal boxes, cut out 3-inch wide strips of cardboard that are the full length of the cereal box. These are for the outer walls of the snowman. You will need quite a few of these, as they need to go around the snowman. I used 10 strips for the outer walls.
I like to use 3-inch walls, to allow larger gifts to be included on random days. But you can make it smaller.
Each level of the snowman will also need a floor/ceiling to separate the different levels of treats. I use the surplus wall pieces and trim them to size when installing them.
Each compartment will also require a wall to separate it from the compartment next to it. Based on my design above, I need 19 walls that are 3 inches deep with various widths.
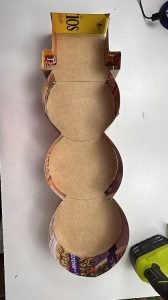
Assemble the frame of the snowman Christmas Countdown Calendar
Once you have the shell of the snowman, it is time to start gluing. Make sure you have a lot of hot glue handy, as this gluing activity will use up several 12-inch sticks.
Start by gluing the outer walls around the shape of the snowman. This will allow the structure to hold and make installing the floors and walls easier. Have the brown face of the cardboard facing out and the printed design side facing in. This is so that the design does not show through any holes paper.
When the outer walls are glued into place and you are ready to glue the floors in, double-check you have enough space for your treats.
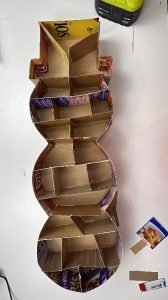
Once you are satisfied that the treats will fit, it is time to move onto the floors. You will need to cut your floors so they fit snuggly at each level. This requires measuring each section individually and cutting as you go.
After the floors are installed, glue in the compartment dividers. Each section will need to be measured individually. Apply the glue to the divider piece side and bottom walls and insert it into the required spot.
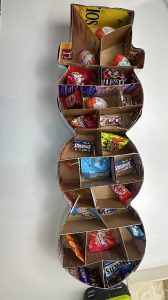
Fill the Snowman Countdown Calendar
Now that all the walls are up, it is time to fill the compartments with your treats, toys or whatever you have chosen.
If you plan to have a special treat on the last day, remember which slot this is so that you can mark it and put the last number on it. I like to take a picture of the frame with treats inside for reference.
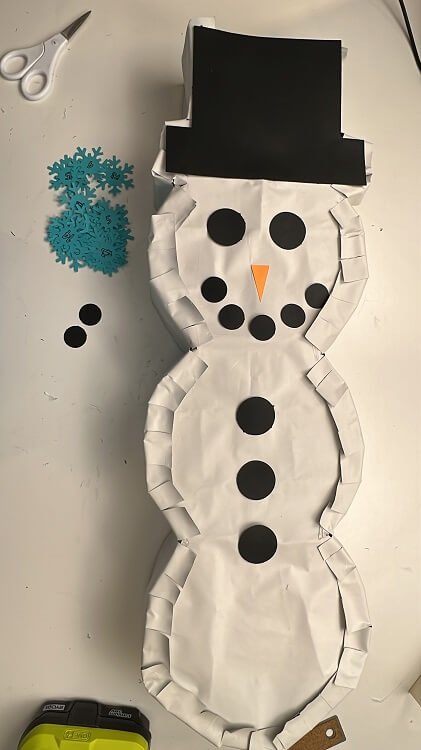
Decorate the Snowman Christmas Countdown Calendar
It is time to decorate the sides. Use wrapping paper to cut out strips that are 3 inches wide and glue this onto the side of the snowman. Glue the design side facing inwards as you want the snowman to be white. You can use a glue gun or regular craft glue.

For the front face of the snowman, again using wrapping paper, unroll and traced the snowman’s body with my countdown calendar frame. When cutting out the wrapping paper, cut extra around the edge of the snowman. This is to account for poor measurements and will be needed later. Applying glue onto the edges of all of the compartment walls, and floors, I place the paper onto the frame and then cut some notches onto the edges to allow the surplus to be glued onto the outside walls.

Once the sides and front of the snowman are white, you can cut notches into the front face of the snowman and glue them down to the sides. I found this did not create great results and instead cut 2-inch strips of wrapping paper, and glued them to the top of the side, leaving half of the paper unglued. Then, I cut notches into these strips and glued them down onto the snowman front.

Using my Cricut, I cut some black circles for the eyes, mouth, buttons, and top hat, and orange for the carrot nose. The eyes and buttons were 1.5″ circles, and the mouth was 1-inch circles. The nose was a 0.75×1.25 inch triangle, and the top hat was the same one I cut for the cardboard – one 4″x6″ and one 2″ x 8″ rectangles welded together.
Pre-punch holes / Make small perforations at each compartment – optional
Wrapping paper and cardstock can be hard to puncture in a small area, so you can pre-punch holes in the locations where the number will be. This can be done by punching a needle or paper clip into a few spots to help the paper rip. This is optional. I did it as my kids are still little enough that they need help with this.
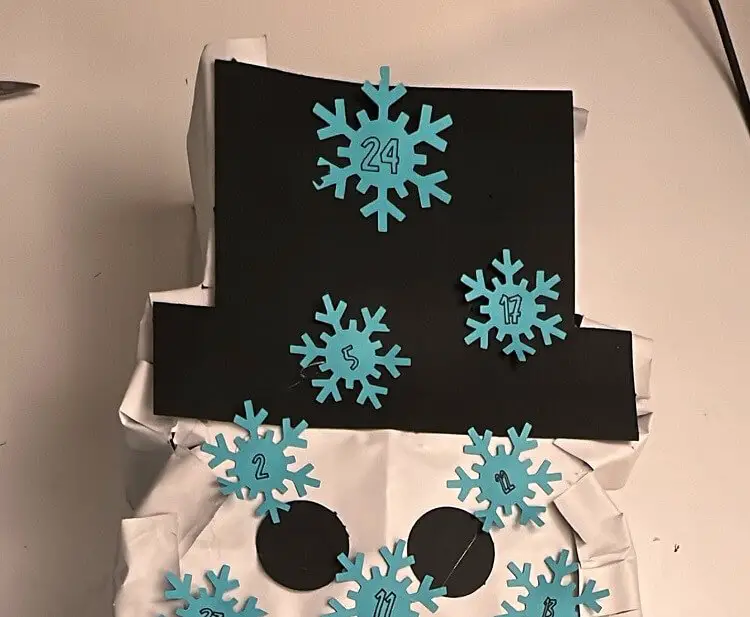
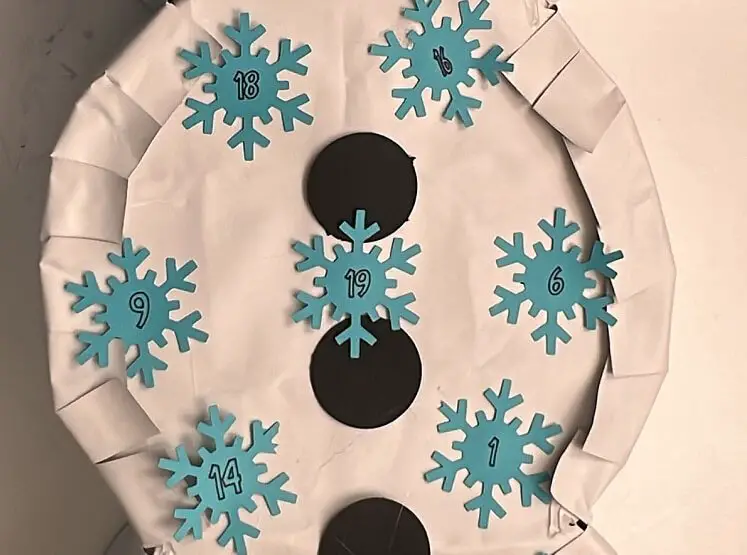
Apply the numbers to the countdown calendar
Your snowman countdown calendar is almost done! Now all that is left is for you to apply the numbers to the snowman.
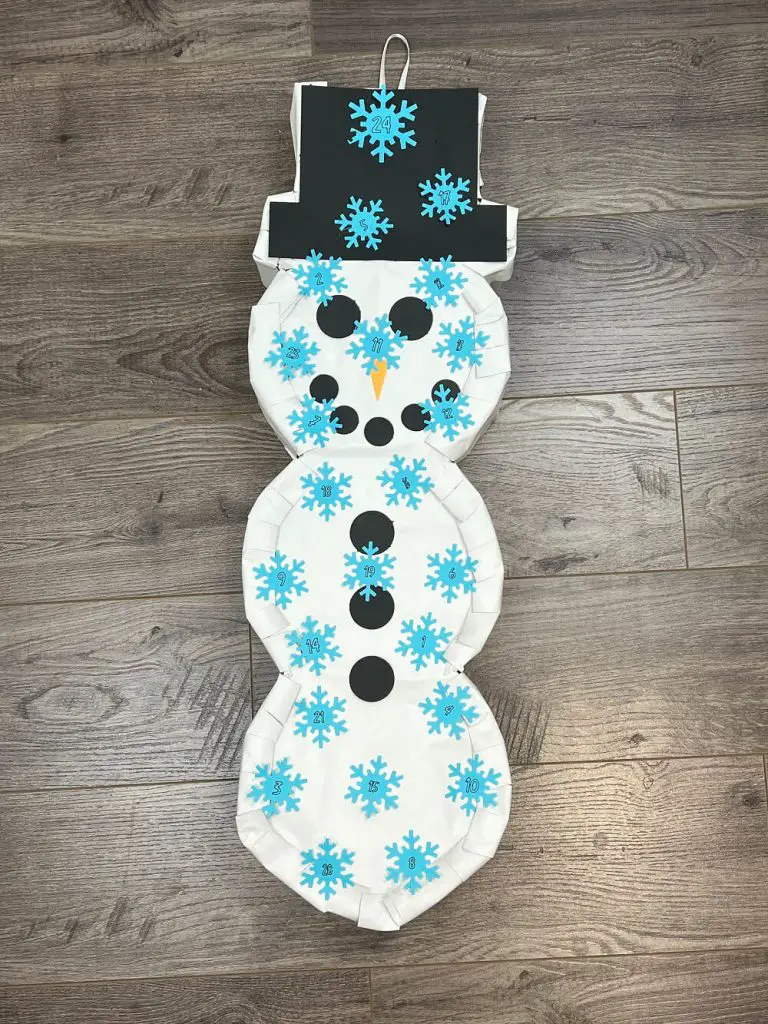
You can write numbers directly onto the snowman or make decorative numbers. For this project, I used free snowflakes from Design Space, attached numbers to them, then cut them out with my Cricut.
Once all the numbers are ready, they can be glued on if you did not write them by hand.
Just remember when you put the last day!
Install a Hanging Ribbon – optional
I like to hang my countdown calendars on the wall, so I glue ribbon at the back and hook it onto the wall in our house.
And that’s it! Your Snowman Christmas Countdown Calendar is done!
Frequently Asked Questions about Countdown Calendars
How many compartments does a Holiday Countdown Calendar need?
Most holiday countdown calendars have 25 slots. One for each day of December counting until December 25th, Christmas day.
My countdown calendars have 24 slots because we do not count the 25th, as that is day zero. So, we make the final day of the countdown calendar 24th of December, allowing the 25th to be just about Christmas. It is, after all, a countdown calendar, and we do not need to count the day.
Best place to get stuffing for a holiday countdown calendar?
I like to use leftover candy from Halloween for holiday countdown calendars. I will purposely go through their candy when it comes home on Halloween night and pull aside 20 or so candies for each kid. But as you may be reading this just before December and not have much or any candy left, I find that the bulk barn is a great place to buy candy for this event. Then you can call it a bulk bark countdown calendar. Also, the dollar store will have great little gifts that can be added to the mix.
How wide should the countdown calendar be? How thick should a holiday countdown calendar be?
I like to use 3-inch walls, to allow for bigger gifts to be included on random days. But you can make it smaller. Just keep in mind that you need to be able to fit the gift/candy/stuffing in there. You can also go wider than 3 inches, but this will increase the number of cereal boxes you will need.
Did you enjoy this tutorial?
Did you enjoy this tutorial? Let me know in the comments below! Let me know if you tried it out!
If you enjoy this, make sure to check out my other advent calendars below:
- Christmas Tree Holiday Countdown Calendar
- Wine Advent Calendar
- Craft Beer Holiday Countdown Calendar