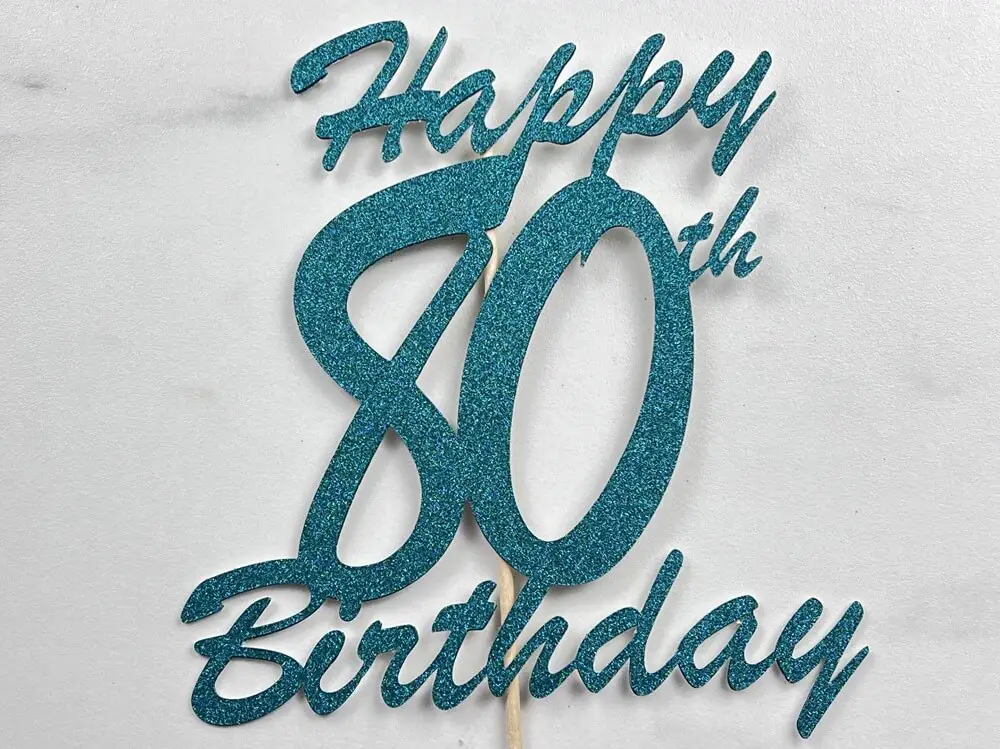
It seems that birthdays are always happening at my house. If it’s not my kids, it’s someone we know. And I like to help out, in my crafty way, when I can. We had an 80th Birthday happen in our family, so I decided to design and make a quick 80th Birthday Cake topper. I didn’t want this one to be flashy, as this person likes the simple things in life. And that is how I came to the DIY 80th Birthday Cake Topper with my Cricut. Since this is a simple birthday cake topper, I will also walk you through how to design it.
As an Amazon Associate, I earn from qualifying purchases. This post contains affiliate links. I may receive a commission if you purchase an item from one of my links. This will not change the price you pay.
Supplies needed to make and design an 80th Birthday cake topper
Ok, let’s talk about what we need to design and make this cute and simple DIY 80th Birthday Cake Topper:
- Design Program – Since we are using our Cricuts for this, I am using Cricut Design Space. But if you prefer to use a different program such as Inkscape (which is also free), you can do that also.
- Cutting machine – I’m using my Cricut Explore Air 2, but a Cricut Maker will work, as well.
- Cutting Mats – You will need cutting mats for this project.
- Glitter Cardstock – I love glitter card stock. I would use it for every project I can. And it’s rigid enough to work great on cake toppers.
- Cake Topper Stick – You can buy plastic, paper or wooden ones. I like to use the wood ones.
- Craft Glue – Optional
- Hot Glue and Glue Gun – to attach the cake topper and stick.
- 15-20 minutes
With all our supplies in hand, let’s get this project started!
How to Design an 80th Birthday Cake Topper for Free in Cricut Design Space
This cake topper is quick and easy to design. So, let’s get designing.
This cake topper uses several different font sizes, so I like to break this into font sections, each based on size.
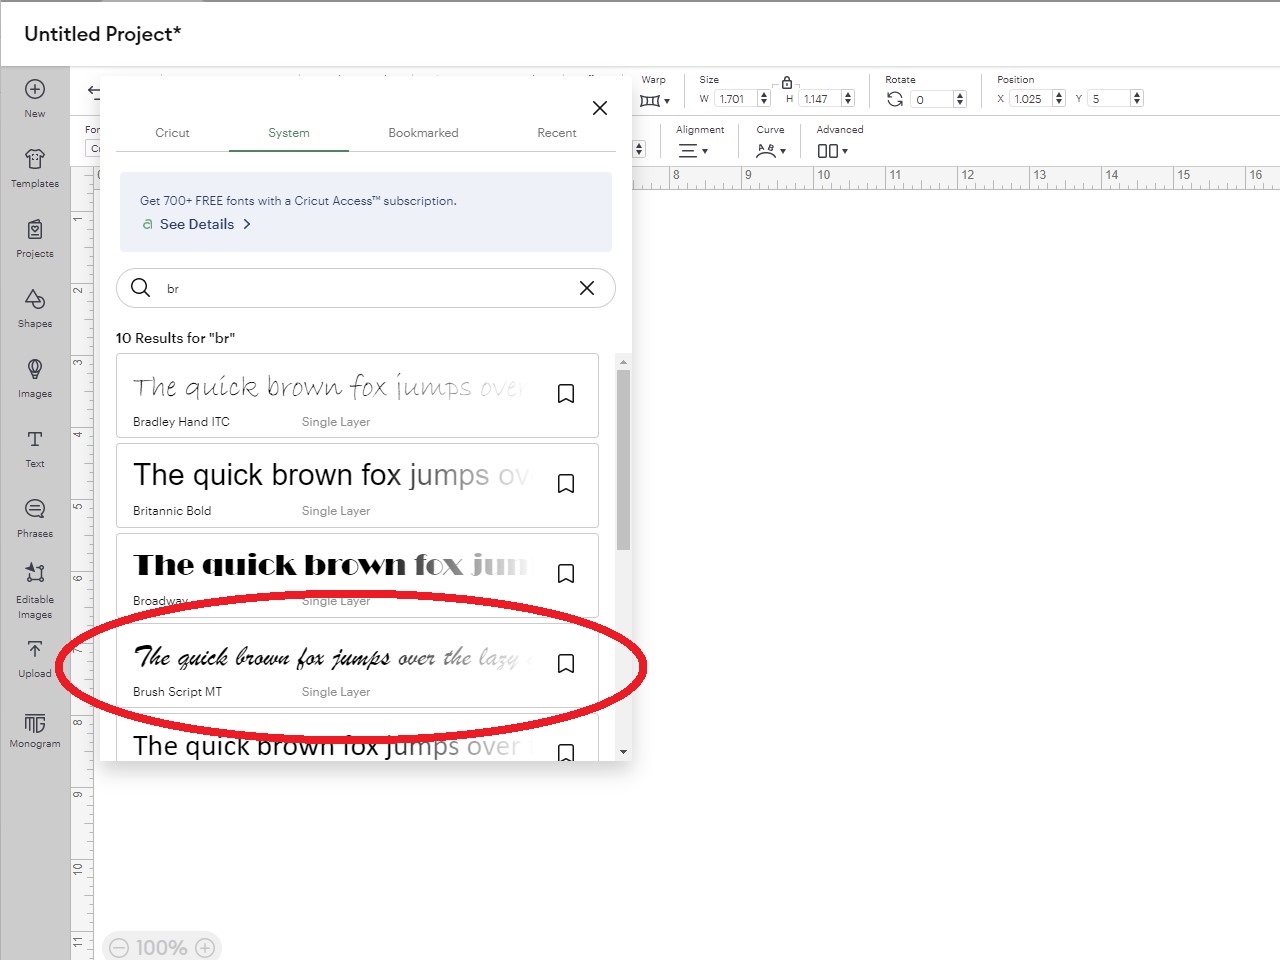
In the Font Drop Down Menu, select a Font that you like. I like to use my System Fonts as they are always free. I have selected Brush Script MT. This is a free Windows font. I like it because it is FREE and cursive.
Once I have the font selected, type in the number – 80 in my case. I don’t particularly like the way the numbers are aligned, so I have selected the Ungroup button to break the two numbers apart. Now, I can select the Rotate button and shift the 8 and 0 to give me the shape I like.
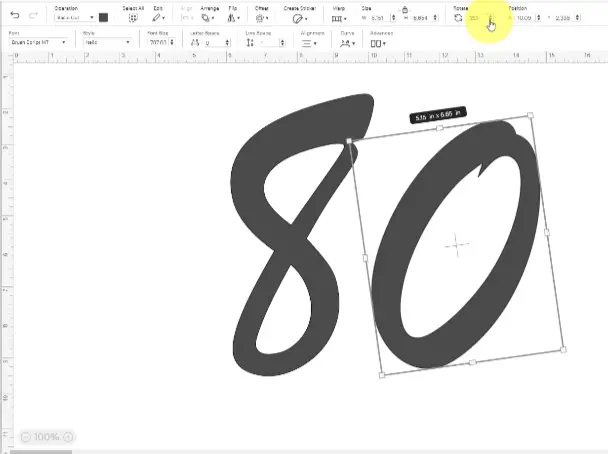
Once happy with the layout, I have to shift the number numbers closer together so that they are touching in at least 1-spot. Then, select both the 8 and the 0, select the Combine Menu and select Weld.
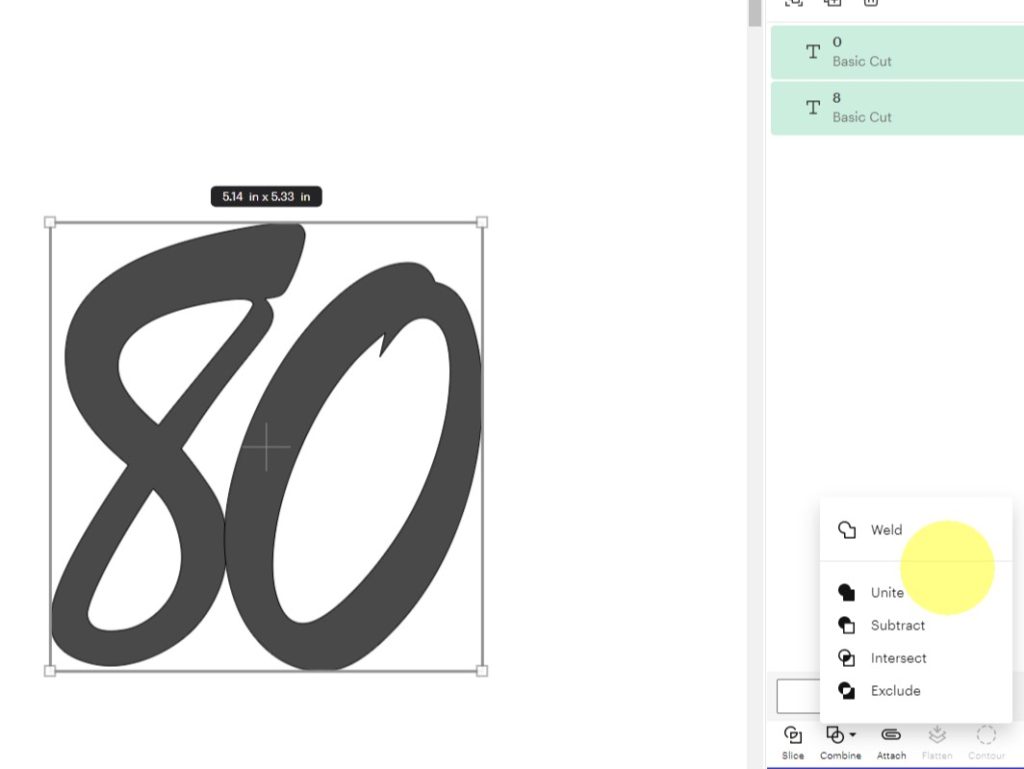
Next, we will work on the “th” for the cake topper. Select the same font as you did for the 80. You can adjust the spacing of the letters by using the Letter Space adjustment, or you can Ungroup and move them closer together. The t and h should have a section of overlap so that they are touching. Place them at the top-right side of the 0. Select all 3 items (the 80, the t and the h), select the Combine Menu and select Weld.
The words Happy and Birthday will be done as separate items as well. Happy will be above the 80, and Birthday will be below. Using the same method as above with the th, select the font, adjust the size of the font, move the letters closer so they are touching, and align them with the 80 so they can be combined as one item.
I tried to keep all items centered. To do this, select all the items, then in the Align drop-down menu and select Center Horizontal. Once happy with the placement, select the Combine Menu and select Weld.
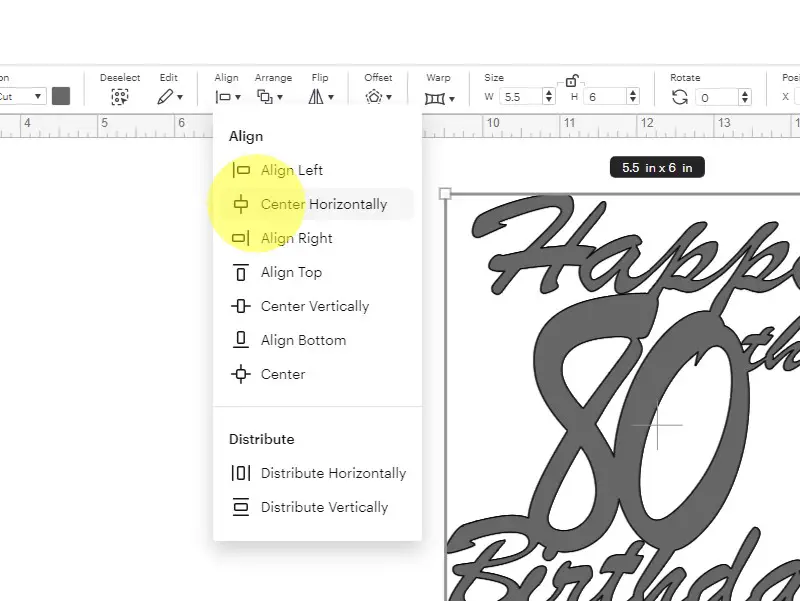
Once all of your pieces are combined, you can adjust the size to your liking. I found that setting the width to 5.5″ and height to 6″ worked well.
Now your design is complete!
Using my 80th Birthday Cake Topper SVG File
If you aren’t feeling up to designing your own 80th Birthday Cake Topper, you can get a copy of this exact design at my shop.
When using my file, there are just a few things that need to be done:
- Unzip the file –
- Right-click on the file with your mouse and select Unzip
- Select a location where you want the file to be saved.
- Hit Enter and your file will be unzipped and saved.
- Upload the file to Cricut Design Space.
- Select the Upload Icon on the left side of your screen.
- Select the Upload Image button.
- Select the File from the location where the file was saved from above.
- Select the file from your DS Recently Uploaded documents. There should be a green rectangle around it.
- Hit the Add to Canvas button.
Once the file is on your DS canvas you can adjust the size. I found that setting the width to 5.5″ and height to 6″ worked well.
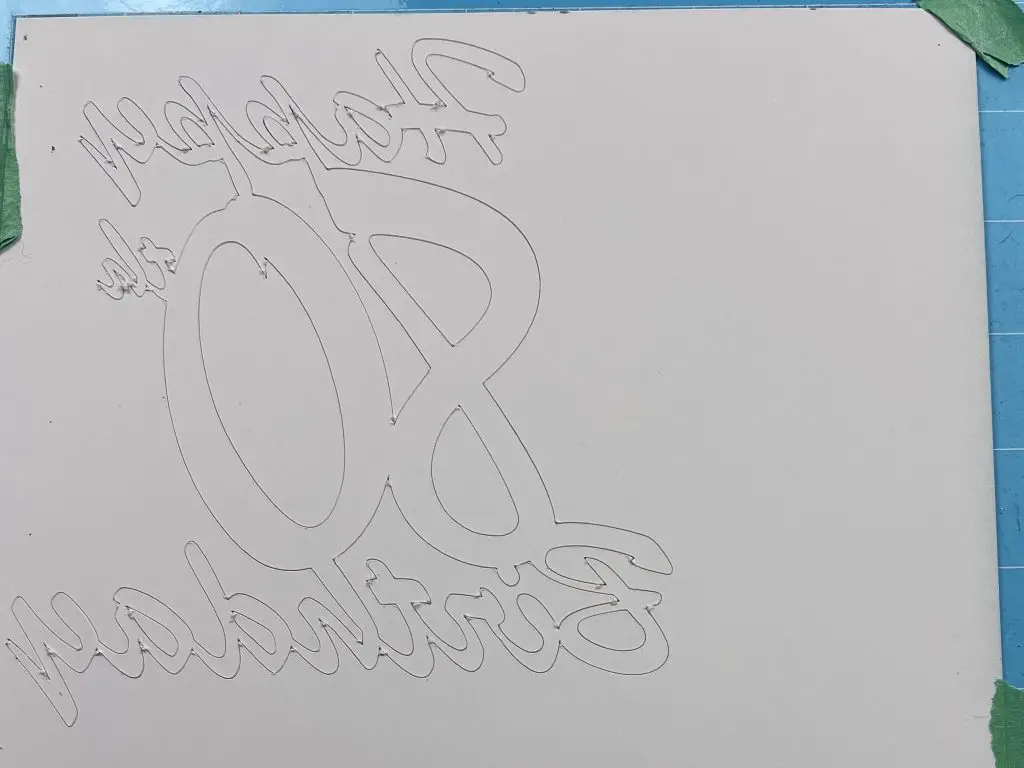
Cutting out the Cake Topper
Now that the design is done, it is time to cut the cake topper. I am using glitter card stock as I really like glitter. When cutting glitter on your Cricut, select the Glitter Card Stock Material Setting with your Material Selection Wheel set to Custom.
If you have trouble cutting Glitter card stock, check out this post, where I walk you through some tips on cutting glitter card stock.
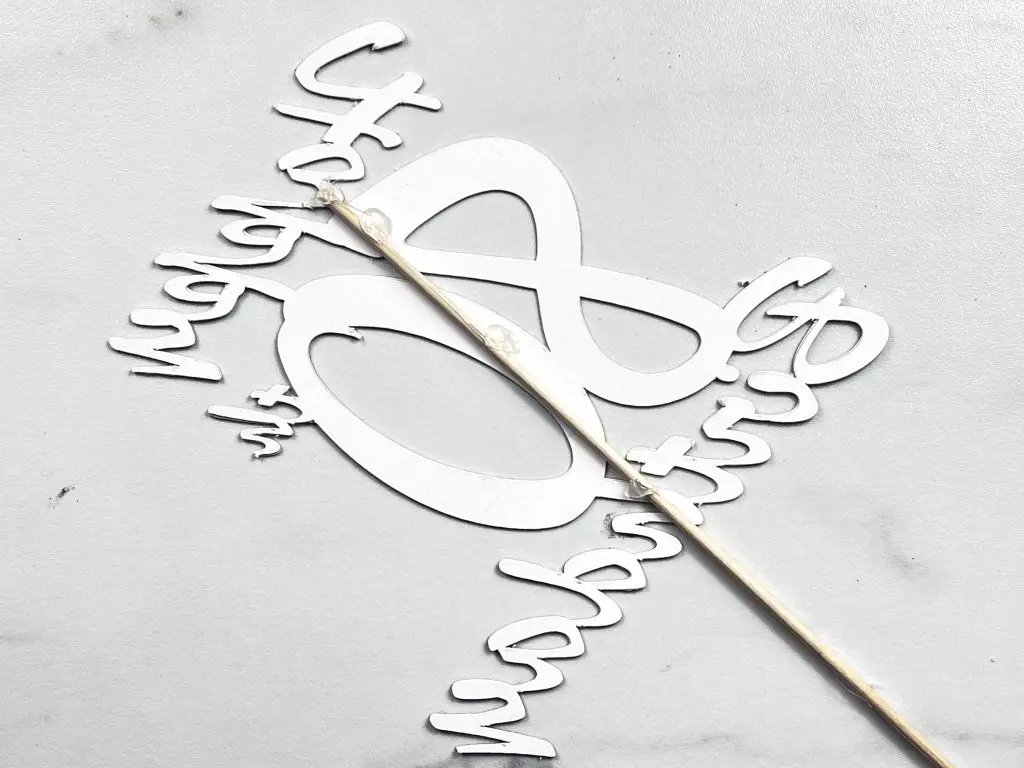
Assembling your 80th Birthday Cake Topper
Now, it is time to assemble this cute cake topper.
You should have the following pieces:
- 1 cut-out design,
- 1 cake stick (either plastic or wood) and,
- glue gun and hot glue
If your glitter card stock is not as rigid as you thought, you can cut out two pieces and glue them together.
If you find that your glitter card stock is not as rigid as you thought, you can cut out 2 pieces and glue them together.
You want to try to align the cake stick so that as little as possible is visible at the front. This is where a clear cake stick works well.
Now, wait for the glue to dry, and your DIY 80th Birthday Cake Topper is ready to use!
And that’s it! Your DIY 80th Birthday Cake Topper is complete!
Things I learned while making this Cake Topper
Even though this project is simple, there is always something to learn. Here are the takeaways I learned from this DIY 80th Birthday Cake Topper:
- When combining elements in Design Space, trying to combine more than one at a time can cause an issue for DS. Not always, but sometimes. So when I was trying to weld the “Happy” and “80” and “th” together at once, the program wouldn’t cooperate. I ended up having to weld the pieces together individually. I find this funny because I have had designs in the past that had no issues with multiple welds.
- When designing this project I didn’t think about where the cake topper stick would go. I focused on having all the elements of the design centered. I forgot that the cake topper stick will be behind the whole design to hold it up on the topper. So, in my design, you can see the stick behind the topper. Using a clear plastic cake stick would look more aesthetically pleasing. So, when designing a cake topper, keeping the stick placement in mind during the design would have been best.
- Typically, I find that glitter card stock is very rigid. So it holds up well when on a cake topper. But, if you have thin glitter cardstock or the design is too thin in spots, you can cut the design out twice and glue it together to hold it all in place and make it more rigid.
- No matter what, if I am doing a project last-minute, there will be issues. Either DS will crash, my Cricut won’t cut properly, or the glue won’t stick.. so last-minute projects aren’t for me.
Did you enjoy this project?
Did you enjoy this DIY 80th Birthday Cake Topper post?
If you are looking for more birthday projects, you can check those out here.
If you enjoyed designing along with me, you can find other projects where I walk you through the full design process, here.