If you are like me and have kids, then you are inevitably stuck doing last-minute Valentine’s Cards for the kids in their class. I like to change it up every year to keep the kids and their friends entertained. This year, I thought it would be fun to make a lollipop valentine card, as I have never done them before. And I wanted it to be quick and simple, because, let’s be honest, we don’t have time for compilated valentines cards! So, let’s jump in!
As an Amazon Associate, I earn from qualifying purchases. This post contains affiliate links. I may receive a commission if you purchase an item from one of my links. This will not change the price you pay.
Supplies Needed to Design and Make a Lollipop Valentine Card
So, this is a very simple lollipop valentine card, so our supply list should also be simple.
- Design Space – I am designing this in Design Space, as it has hearts in their pre-designed free shape, but you can use any design program to sketch up the design.
- Cutting machine – I use my Cricut Explore Air 2. Any model of Cricut will work, as well as any Silhouette machine.
- Card Stock – I like Recollections Brand, but any cardstock that is red, pink, white, or any color you associate with Valentine’s day.
- A pen/marker – any pen or marker that fits your Cricut will work. If you want to know about other pens and markers that fit in your Cricut machines, check out this post here.
- You need about 5 minutes to design it, and then depending on how many cards you need, you might need 30+ minutes to cut this out. Assembly will vary on who is doing it, you or the kids…
Ok, let’s start designing up our super simple lollipop valentine card
Ok, for this project, we are working in Design Space, so let’s go ahead and open up the program.
Designing the Card
In a blank canvas, select the SHAPES menu, and select a heart.
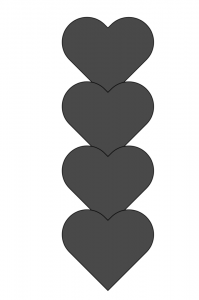
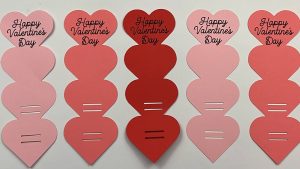
Adjust the size of the heart to 2.15” by 1.9” wide. Now duplicate it so that you have 4 hearts in total.
Line up the 4 hearts, so they are connected top to bottom. Make sure there is a bit of overlap between each heart. Once you have 4 hearts lined up, select them all, and WELD them together, using the COMBINE feature.
You want the total high of the card to be one heart larger than a lollipop. In my case, the lollipops I’m using are slightly under 4” in height, so my full 4 welded hearts is 6.16” high.
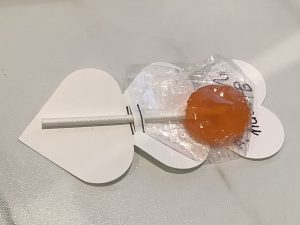
Adding Lollipop Holding Notches to the card
Back in our shapes menu, select the square. I used the one with sharp corners, but you can use the rounded one if you prefer. Reduce the size to 0.75” wide, by 0.05” high. Duplicate it. Place it about 0.25” above the first one, and make sure it is centered. Group these two pieces, then duplicate them so that you have 4 small rectangles.
Place the first set of 2 rectangles in the center of the bottom heart, and place the second set of 2 rectangles just above the bottom of the second from the bottom heart.
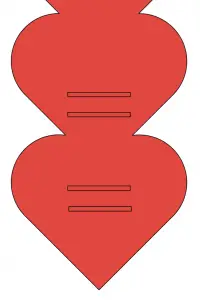
You will need to ungroup each set of rectangles, and then, one by one, select a rectangle and the welded hearts and slice them apart. Delete all the rectangles once you are done slicing.
There are several ways to do this, but I found that this worked best when putting the lollipops into the cards.
Add a sentiment to your lollipop valentine card
Finally, we should add a simple sentiment to our lollipop valentine card.
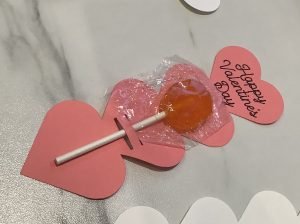
Select the Text function and type in your sentiment. I used the simple “Happy Valentine’s Day”.
It is best to select a font with a written style so that it can be written with pens or markers with your Cricut. I used Alyssa-Script which was free from Design Space when I made the card. If you can’t find a font you like in Design Space or on your system fonts, you can always download a font from another website. I explain how to do that here if you have not done it before.
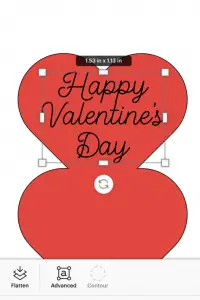
Once you are happy with the sentiment and the font, place it near the top of the card and attach it to that location.
Optional – To and From
You can also add the To and From labels on the card with your Cricut by using the text function again, or you can leave it for your kids to complete by hand. My kids are filling this all out by hand on the back side of the card to give them some busy work.
Ok, the design of your lollipop valentine card is done
Now that your design is done, all that remains is to duplicate it to have the quantity you need, hit MAKE IT, and cut it out.
Assemble your lollipop valentine card
Assembling this card is really easy.
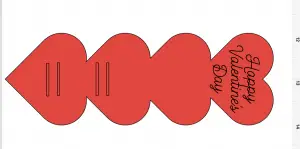
Take the card off the cutting mat. Pull the paper between the top 2 rectangles and bottom 2 rectangles forwards a bit and side in the lollipop.
It’s that easy!
And you’re done! Your lollipop valentine card is done!

Things I learned along the way while making this lollipop valentine card
As usual, I like to leave some learning points on my crafts, so here goes:
- Simple Lollipops vs Big Round Ones – I will design other lollipop holders. For the sake of simplicity and cost, I went with more standard lollipops that cost less in bulk, and as I needed a lot of these, the smaller flat lollipops were the winners.
- When cutting a lot of these cards, I found it was best to make enough duplicates to fill one sheet and then make multiple cuts of that one sheet. I spent a lot of time rearranging the pages to get as many cuts on the sheet as possible only to have Design Space crash on me after doing 1/3 of the first page, wasting paper….
- Before you finalize your design, do a test print to check that the size of your card will fit the lollipop. Not all candies are made equal, and you don’t want to print out 50 of these cards, only to have the wrong size.
- The lollipop notches –
- At first, I tried using 2 score lines that I changed to cut lines about 0.25″ apart. I found that although the lollipop made it through the holes and the card held the lollipop, it was hard to get the stick through and made assembly slow.
- I then tried using 2 small rectangles instead. This worked well, but the lollipop had more wiggle room and flopped around. Again, it did hold the lollipop, but I wanted better.
Did you enjoy this Valentines Craft?
Did you enjoy making this lollipop Valentine Card? Let me know in the comments below. Also, let me know if you tried it and how it turned out!
If you need more Valentine’s Day Ideas, check out:
If you liked this craft, be sure to check out my other paper crafts here.

Hello, Txs for this teaching, I have had the Cricut Maker for 3 years now and love learning more tricks. I made a sample one and it turned out. I like these styles as some are time intensive and uses alot of cardstock. When you make for a classroom and more than one child it can add up.
I find sometimes that when it says to use the slice feature it is sometimes grey so you cant use it. Do you know why this is?
I’m glad you like this! I had to make about 100 of these so it was quick and (mostly) painless.
Using the slice feature can be tricky – you have to make sure that you have only selected two items. And both items have to be set to a Basic Cut (it doesn’t always work with Print then Cut). Hopefully that helps you out! And Happy Crafting!