As a crafter and a maker, I keep accumulating crafty toys. One of these items is a 3D printer. It’s a fun toy that I use for random odds and ends. I mostly make toys for my kids, but I do make practical things too. One of the things that it can be used for is making necklaces or accessories, especially for Halloween. If you recall, I like sparkles and shiny things. And what better way to add to 3D prints than to add bling to make it sparkle and shine. So, in this blog post, I review several different glues and adhesives for attaching rhinestones to 3D prints, as well as go over some tips and tricks on applying rhinestones to 3D prints.
So, let’s get started.
As an Amazon Associate, I earn from qualifying purchases. This post contains affiliate links. I may receive a commission if you purchase an item from one of my links. This will not change the price you pay.
Supplies needed for attaching rhinestones to 3D Prints
This isn’t my normal type of post, so my supplies list will be a bit wonky, but don’t worry, it’s nothing that we can’t handle.
- Bling – you need some rhinestones, gems, or sequins. I purchased mine at the dollar store in packs of 500. They come in many colors and sizes. These come on clear tape that allows you to stick them directly to a surface. I removed the backing tape on a bunch for this test. I also left a few strands with tape to test the tape. You can buy loose gems on Amazon here. These are the same as the ones I have, just loose. You can also get varying sizes, but for this project, I used 1/4″ in size.
- Glue – As we are experimenting with different types of glue, here are the types of glue I used:
- A 3D print – You need a 3D print of any shape or size. It can be a necklace or an accessory for a costume, eyes for a lizard you printed, or whatever you like. I used a flat piece of 3D Printed PLA for this experiment.

Now that we have everything ready, let’s jump in!
Which Glue works Best with PLA? Experiment Details
I tried to be somewhat scientific for this experiment. Each glue and adhesive was tested the same way. So, here is what I did:
- Each glue uses 10 rhinestones adhered onto PLA,
- The rhinestones are placed close together to look nice, sparkly and shiny.
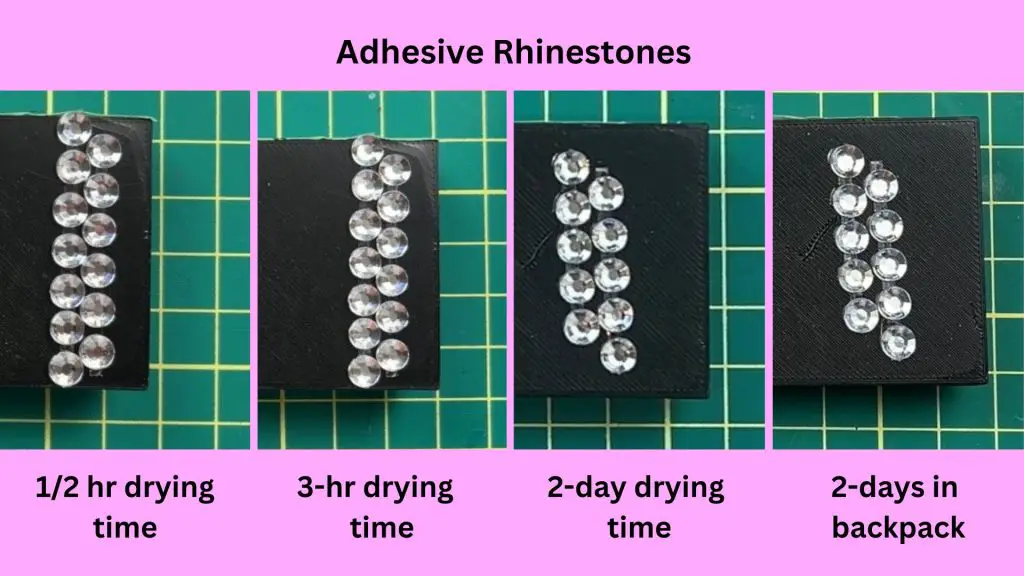
- Each adhesive is then tested and checked after the following:
- After a 1/2 hour,
- After 3 hours,
- After 2 days,
- 2-days of sitting in my kids’ backpacks (a total of 4 days drying)
The results on day 2 of the test were based on a completely new set of rhinestones as many fell off during the previous checks. The 2-day tests were untouched until day 2.
Five adhesives were tested. I used the 4 glues listed above in the supplies list and the clear tape initially on the rhinestones.
So, let’s take a look at how each adhesive worked out.
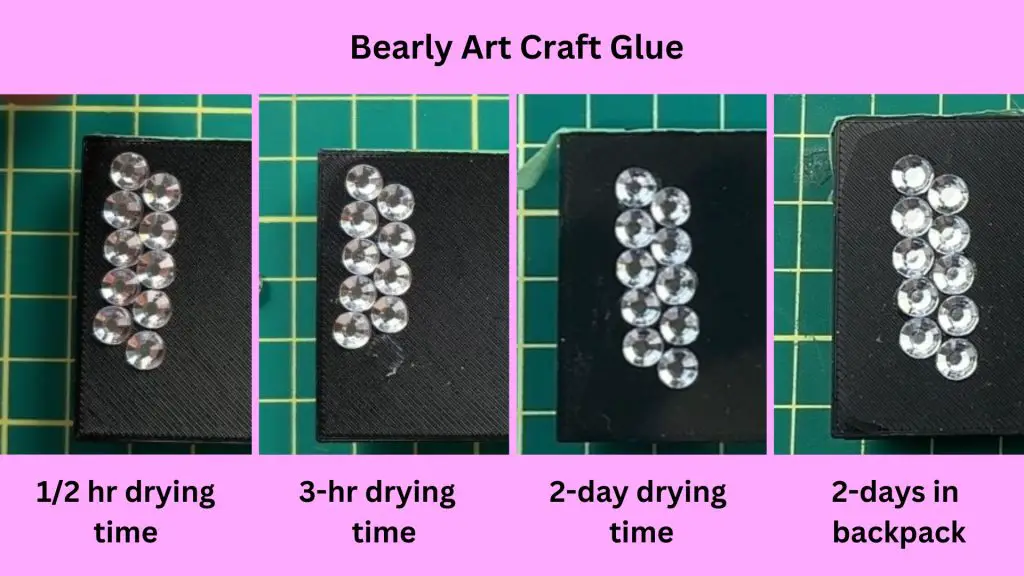
Attaching Rhinestones to 3D Prints with Bearly Art Craft Glue
The first glue on my sample piece is Bearly Art Craft Glue. This glue has a fine-point tip attachment used to apply a small amount of glue to the back of each rhinestone.
Once applied to the PLA, the rhinestones slid all over the PLA and were hard to keep in place.
- 1/2 hour drying results – The glue was dry at the 1/2 hour mark. One rhinestone feel off when minimal pressure was applied.
- 3-hour drying results -When significant pressure was applied to the rhinestones, several fell off the PLA.
- 2-day drying results – The Rhinestones did not budge, even with a significant amount of force being applied.
- 2-days in backpack results – None of the rhinestones fell off.
Notes on the application and appearance of Bearly Art Craft Glue on a PLA 3D Print
When gluing the rhinestones on the 3D print, the rhinestones would slip and slide all over the 3D print as a result of the glue. This made it hard to put the rhinestones into place at the first attempt. But as they slid all over, they could be slid into place easily.
Once the glue dried, there was very little to no residue left on the 3D print.
Attaching Rhinestones to 3D Prints with Elmer’s School Glue
The second glue on my sample piece is Elmer’s School Glue. This is a generic glue that I use a lot for kids’ crafts. This glue has a large tip attached to the bottle making application of the glue to the rhinestones challenging. I did not buy a new tip for this, or transfer it into a bottle with a smaller tip.
- 1/2 hour drying results – The glue was still very wet and the rhinestones could be moved around the 3D print.
- 3-hour drying results – 3-hour drying results – The glue was dried after 3 hours. When minimal pressure was applied to the rhinestones, several fell off the 3D Print.
- 2-day drying results – The Rhinestones did not budge. Even with a significant amount of force being applied.
- 2-days in backpack results – Several of the rhinestones fell off.

Notes on the application and appearance of Elmer’s School Glue
Once applied to the PLA, the rhinestones would slip and slide all over the PLA 3D print and were hard to keep in place. The application might have worked better with a smaller tip. I did try to apply glue onto the PLA instead of the rhinestones to allow less glue usage, but it was still a mess.
Once the glue dried, there was a little residue left on the 3D-printed PLA.
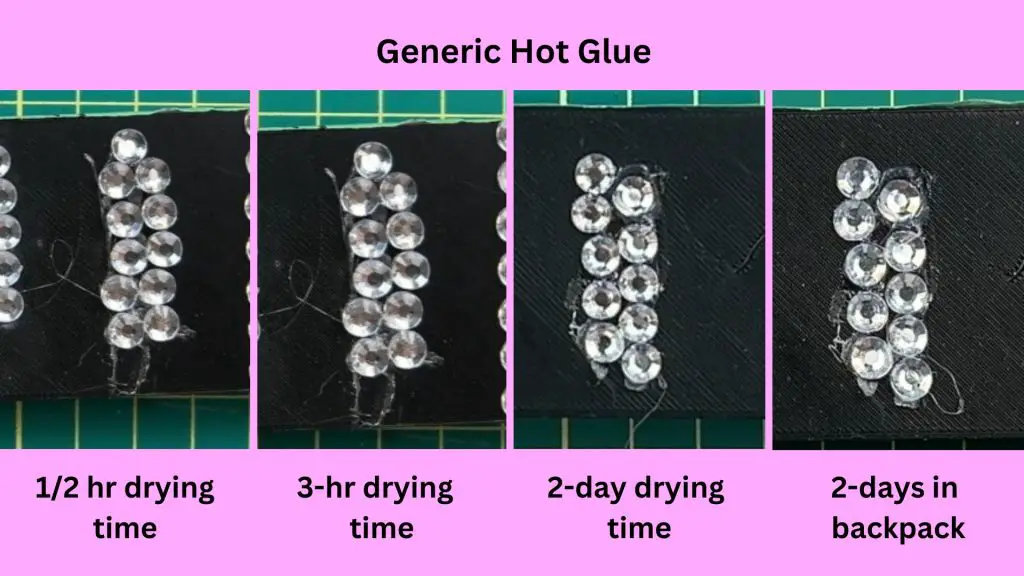
Attaching Rhinestones to 3D Prints with Generic Hot Glue
In my initial tests, I forgot about using hot glue. This is funny because I have used hot glue for many 3D print gluing applications. So, I added it last minute.
I have a generic brand of hot glue. It was on sale for a lot of pieces. I have no specs on it other than it was the cheapest stuff on the shelf at the store one day.
I used my standard Ryobi hot glue gun. This is a large glue gun that has a large tip.
- 1/2 hour drying results – The glue was dry and the rhinestones did not move on the PLA 3D print.
- 3-hour drying results – When significant pressure was applied to the rhinestones, all the rhinestones stayed in place on the PLA 3D print.
- 2-day drying results – The Rhinestones did not budge. Even with a significant amount of force being applied.
- 2-days in backpack results – No rhinestones fell off.
Notes on The application and appearance of Generic Hot Glue
The Ryobi hot glue gun I have has a large tip. This results in a large amount of glue coming out when the trigger is pulled.
Applying glue directly to the back of the rhinestones was not easy and not recommended as you can easily burn your fingers.
Applying glue directly to the PLA was easier, but I could not apply the glue evenly to the 3D-printed PLA. I had globs of glue in some spots.
This uneven distribution was extremely visible after the glue dried, especially between the rhinestones.
When initially placing the rhinestones on the PLA, the rhinestones would slip and slide all over the 3D-printed PLA. Additionally, they were hard to set in place.
The application might have worked better with a smaller tip.
Also, as I was using a generic brand of glue, it was stringy and left a mess all over the PLA.
Attaching Rhinestones to 3D Prints with Gorilla Glue-Super Glue
I did some research online and found that when trying to glue PLA together, you should use a glue with Cyanoacrylate in it. So I found this Gorilla Super Glue, it has ethyl cyanoacrylate in it. I’m not a chemist, but it was close enough for me, so I tried it.
This glue comes in a fancy bottle that allows for minimal glue usage, which is nice.
- 1/2 hour drying results – The glue was dry and the rhinestones did not move on the PLA.
- 3-hour drying results – When significant pressure was applied to the rhinestones, all the rhinestones stayed in place on the PLA 3D print.
- 2-day drying results – The Rhinestones did not budge. Even with a significant amount of force being applied.
- 2-days in backpack results – No rhinestones fell off.

Notes on the application and appearance of Gorilla Super Glue
This glue was funny, and not in a good way. Even though it had a tip that allowed for little glue to come out, this glue goes a long way, so even a small amount can be too much.
At first, I tried applying the glue to the back of the rhinestones. After my first application, it was visible that too much glue was being used. A hazy white residue was appearing all over the 3D print. This glue also took away the shine from the rhinestones.
So, when I did my second application, I tried to use even less glue and apply it directly to the PLA instead of the rhinestones. This worked a bit better. The residue was smaller, and the rhinestones didn’t lose as much shine.
When I managed to figure out the right amount of glue, it worked well.
I removed the hazy residue with isopropyl alcohol and a Q-tip. It was mostly gone, but I knew where it was originally, so I could still see it, although no one else could.
Attaching Rhinestones to 3D Prints using Rhinestone Stickers
As mentioned above, I purchased rhinestone stickers at the local dollar store. These come in many colors and sizes, and they are connected with adhesive tape underneath. This keeps the rhinestones equidistant from each other and makes them easy to peel and stick.
- 1/2 hour drying results – The rhinestones were stuck to the PLA, but if you pushed them from the side, they would move, but not come off the PLA. You can pull the whole strip of rhinestone stickers off if you pull one up with force.
- 3-hour drying results – The rhinestones were stuck to the PLA, but if you pushed them from the side, they would move, but not come off the PLA. You can pull the whole strip of rhinestone stickers off if you pull one up with force.
- 2-day drying results – The rhinestones were stuck to the PLA, but if you pushed them from the side, they would move, but not come off the PLA. You can pull the whole strip of rhinestone stickers off if you pull one up with force.
- 2-days in backpack results – The rhinestones were stuck to the PLA, but if you pushed them from the side, they would move, but not come off the PLA. You can pull the whole strip of rhinestone stickers off if you pull one up with force.
Notes on the application and appearance of Rhinestone Stickers
The application of the rhinestone stickers was quick and easy. However, I really did not like the spacing between stones. I found they were too far apart for my liking. And I wasn’t interested in cutting the little bit of adhesive off between stones.
Also, even though the rhinestones were on for the duration of the test, I didn’t like that you could still pull them up and off and they would move if you pushed them. Even after being applied for numerous days.
The Best Glue for applying rhinestones to 3D prints – The Winner is….
Sadly, I don’t think there is a winner. 4 of the 5 glues/adhesives did keep the rhinestones on the PLA. Each had its pluses and minuses, and my own personal biases… so, here are my final thoughts:
- Bearly Art Craft Glue and PLA – The glue worked nicely even though it lost a gems after 3 hours, but held most the rhinestones in place, didn’t leave residue and didn’t fade the shine on the stones. I fear that this glue will let loose after a longer period of time. But for the time being, is a clear top choice.
- Elmer’s School Glue and PLA – This glue did not make the mark. It lost stones all along the way, so I would not recommend this.
- Generic Hot Glue – If I had a fine-point tip on my glue gun and I wasn’t so sloppy applying the glue and attaching the rhinestones, this would be a viable option. Having said that, I have used hot glue on any 3D-printed projects. And although the glue holds in this experiment, after prolonged use, (I’m talking months), the glue gives way (or my kids are too violent with their 3D prints).
- Gorilla Super Glue – This glue was super strong and held the rhinestones on the 3D-printed PLA. At first, I liked this glue but with the amount of residue left on the PLA and the reduced shine in the rhinestones, I was unimpressed with the final result.
- Rhinestone stickers – I was surprised that these held for the whole test. But personally, the look of the sticker adhesive and spacing on the stones turns me off, and I do not like it.
So, there you have it, if you read my notes above, I guess Gorilla Super-Glue is the winner. But I’m not sold on it yet.
How to Apply Rhinestones to 3D-Printed PLA
Ok, so let’s talk about how to apply rhinestones to PLA.
Tweezers do not work well. It is too hard to hold the rhinestones, at least the small circular ones.
I use Diamond Painting Art Drill Pens which come with many different tip sizes. You simply apply the wax to help hold the gem and then place it where you want. I have a small tip pen and for the most part, it worked.
You can use your fingers to place the rhinestones. However, if you are using the Gorilla Super Glue, you have to be careful not to touch it with your fingers and then touch something else, because you will get stuck. And if you’re using a hot glue gun, you run the risk of burning yourself.
Applying a lot of stones takes time, so get into a comfortable position, turn on a movie and enjoy.
And there you have it! You have successfully attached rhinestones to 3D prints
Did you enjoy this review on Best Glues for attaching Rhinestones to 3D Prints?
Did you enjoy this review of Best Glues for attaching Rhinestone to 3D Prints? Let me know in the comments below. If you use PLA and rhinestones, let me know which glue you like best?
If you want to check out some of my 3D prints, be sure to check out my 3D Printing YouTube Page 3D Printing with Katherine found here.
Also, be sure to check out my other tips and tricks here.