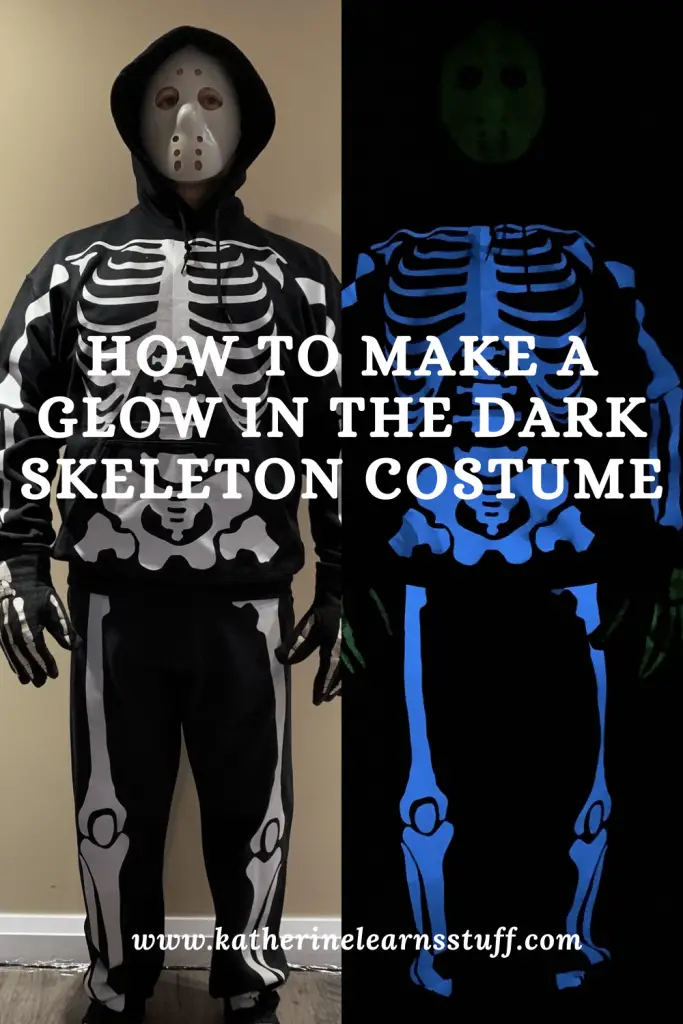
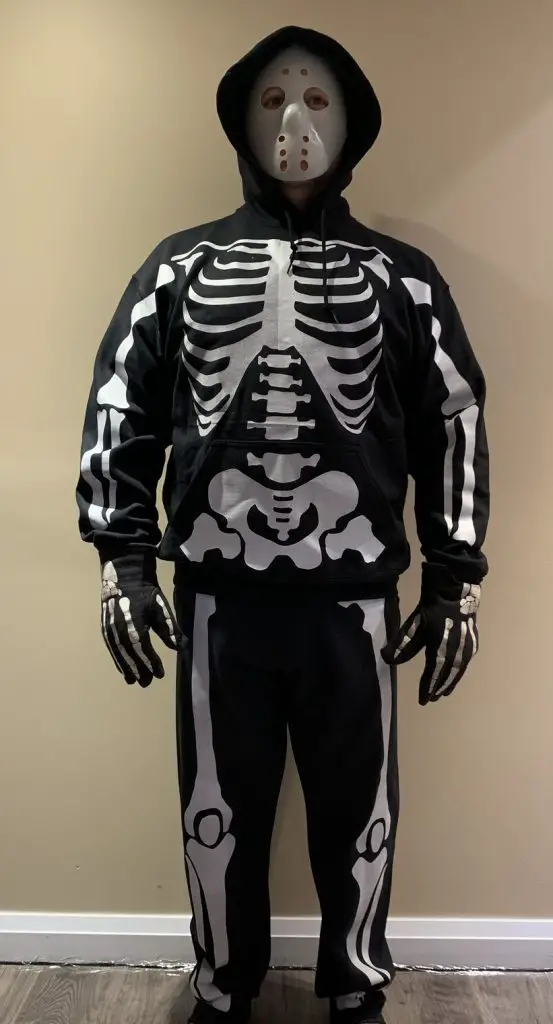
Skeleton costumes never go out of style, and I know that you can buy them online or in most Halloween stores. However, with the colder Halloween nights, they just don’t cut it for keeping us warm. So, we went on an adventure to make a skeleton costume.
As an Amazon Associate, I earn from qualifying purchases. This post contains affiliate links. I may receive a commission if you purchase an item from one of my links. This will not change the price you pay.
What you need to make a skeleton costume
Like with all costumes, there is a list of materials that we need. I have to be honest, this costume did cost more to make than to buy online, but we were going for warmth and comfort.
- Black Sweater (or Hoodie) – We used a hoodie so that we could keep our heads warm
- Black sweat pants – the same idea, to keep warm.
- Gloves – to keep your hands warm.
- Glow-in-the-dark-vinyl – As we were going for a full-body skeleton suit, we needed a long length, so I used this stuff.
- A cutting machine to cut your vinyl – I used my Cricut.
- Heat Press to apply vinyl – I used my CO-Z heat-press, but an iron will also work if you don’t have a heat press.
- Skeleton SVG File
Let’s Get Starting! Let’s Make a Skeleton Costume
The first thing I needed to do was make a skeleton SVG. I wasn’t in the mood to buy one, so I drew one using Vectornator. I had some free time, so I drew one up in an evening. But if you’re tight on time, you can get a copy of my file by signing up for my newsletter below. You need an SVG to cut it with your Cricut.
Sign Up for my Newsletter
and
Get my Free Skelton SVG
Import Your SVG File
I used my Cricut for all of this. But I gather the process is similar on other cutting machines.
Download the file to your computer and upload it to Cricut Design Space.
In Design Space, you are looking for the Upload icon.
From here, you have to select Browse Files. You will need to find the location and the file that you saved. Give the file a name in Design Space and save it as a cut file.
Once the file is in Design Space, you will need to insert it into your project.
Sadly, I am unable to properly size the file when creating it, so you will need to increase the size of the skeleton to suit your costume needs.
Understanding the Skeleton SVG File
This Skeleton File is grouped into several sections for easy scaling as a group. The whole thing is grouped as one object when it is uploaded. But if you ungroup the first section, you will have the following groupings:
- Feet – All bones in each foot – Each Foot is one group.
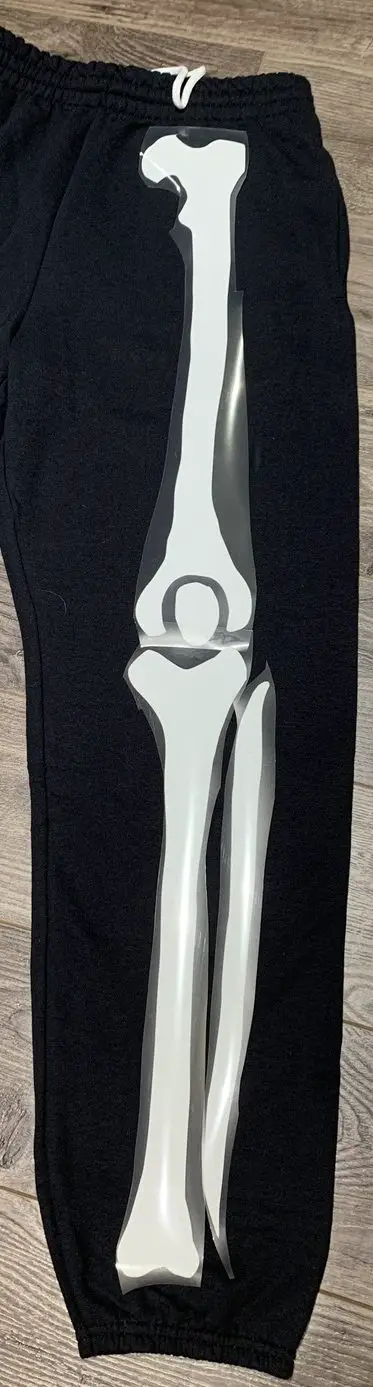
- Lower Leg – Tibia, and fibula are grouped together – one per leg.
- Upper Leg – Femur and knee cap – one per leg.
- Hands – All bones in each hand – Each hand is one group.
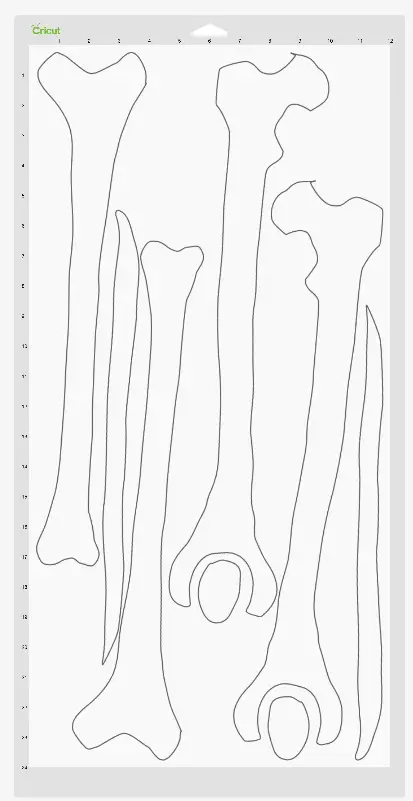
- Forearm – Ulna, and radius – one per arm.
- Upper Arm – Humerus – Single bone per arm.
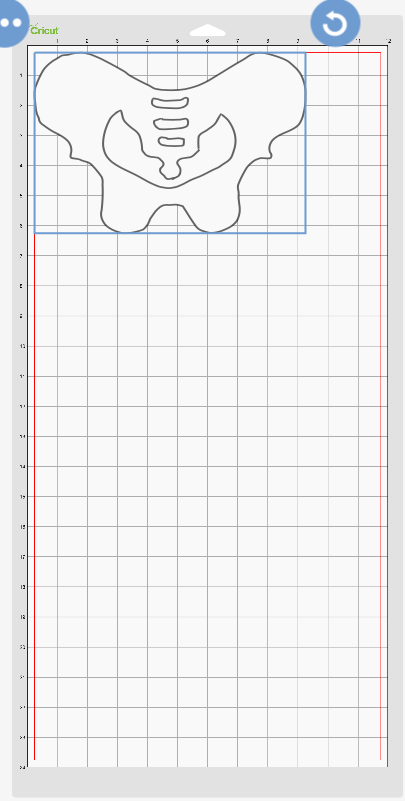
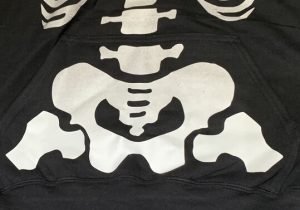
- Pelvis – Single Item.
- Lower Spine – Spinal cord between the pelvis and rib cage.
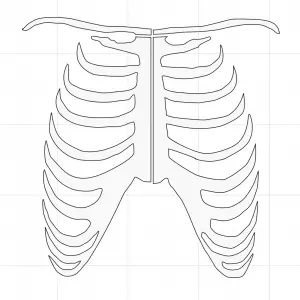
- Rib Cage – Includes ribs, clavicle, and scapula.
- Upper Spine – Spine between head and rib cage.
- Head
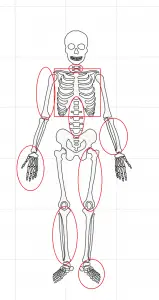
- I created these groupings as I thought they would work well when making shirts/pants to have the flexibility to make bigger and smaller pieces. However, if you want every piece individually to re-size, you can ungroup them all.
Sizing The Skeleton Costume
Now that you understand the thought process of the file, you can start to size your SVG file.
Sizing the Lower Skeleton
Measure the leg length of the pants. This will be the length you can use for the Lower and Upper Leg Groups. You may need to rotate the pieces in DS to align the length for the pants and SVG design. In my case, I used 34 inches.
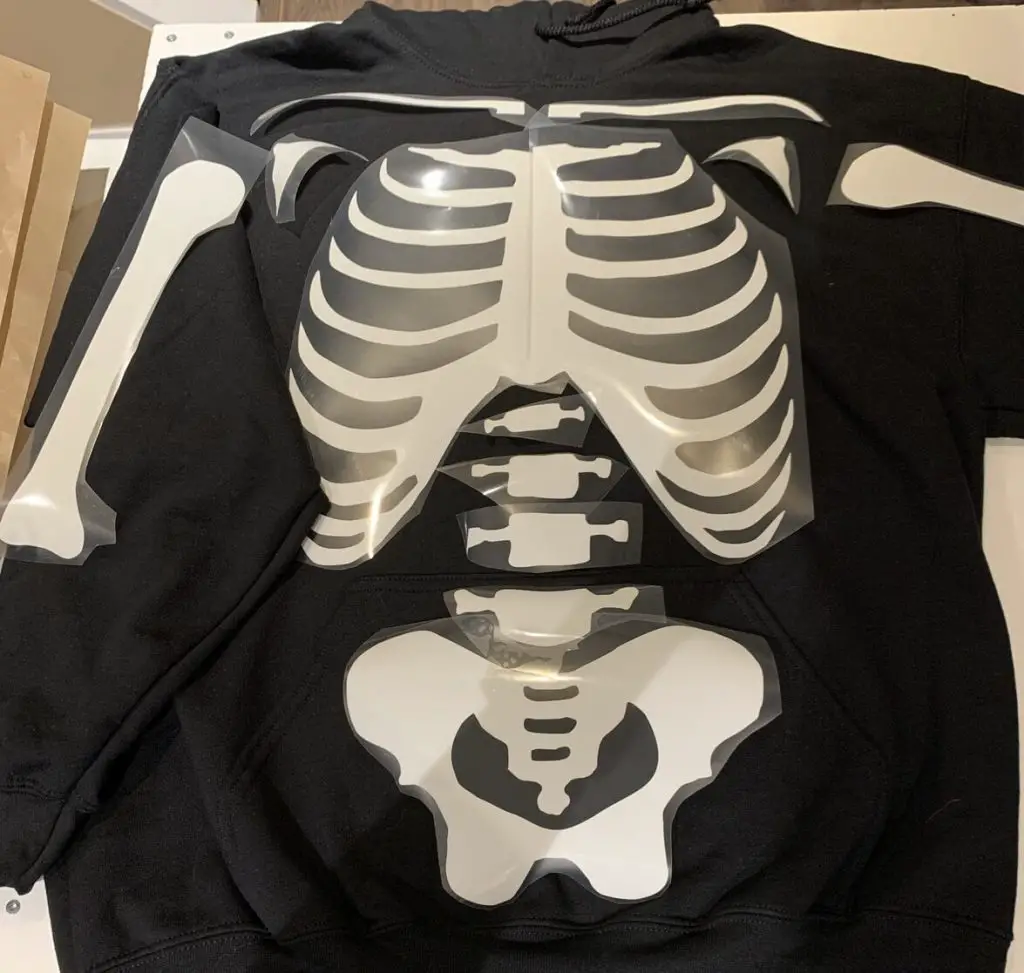
Depending on the design you want, you can either have the pelvis on the pants or the sweater. In my case, I put it on the hoodie. This way, I didn’t need to have space for the pelvis on the pants.
Sizing the Upper Skeleton
When using a hoodie, several items need to be considered when sizing the upper part of the skeleton. The arms need to join the rib cage. The ribs need to join the spine, and the spine connects to the pelvis. But the pelvis has to fit onto the packet of the hoodie.
The order in which I measured the bones:
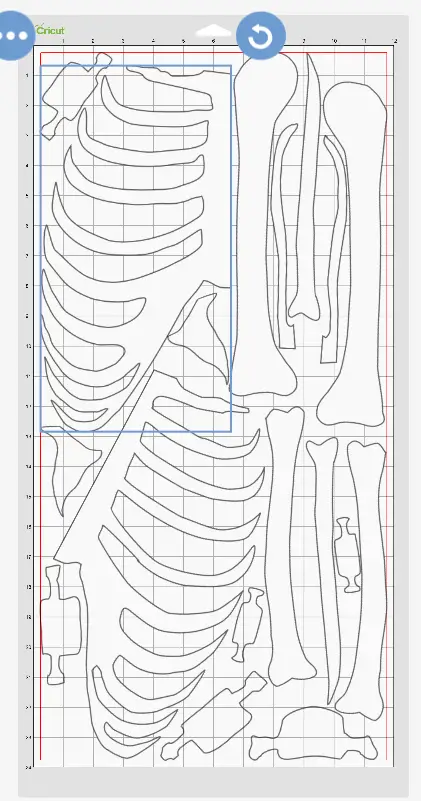
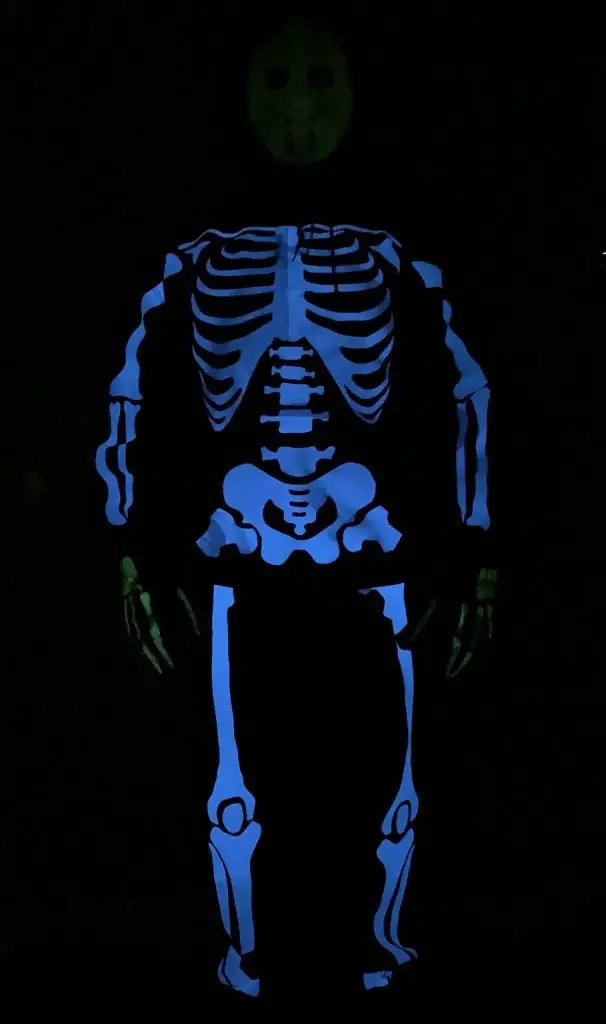
Rib cage – Need this to fit between the arms and above the hoodie pocket while leaving space for the spine. The size I was going for was 14 inches wide by 13 inches high, so I had to cut my rib cage into 4 pieces. This was so that I could fit it onto the mat and maximize my vinyl. I cut the rib cage in half in the center of the sternum, and then I cut the clavicles off the rib cage as well. This gave a bit more versatility on the cut.
Arms – Measure from just above the sleeve cuff, all the way to the body of the hoodie to where the rib cage will be. For this hoodie, it used 21 inches.
Pelvis – You need to measure the size of the pocket and make sure the pelvis fits in here. You can modify the shape (height/width ratio) to make sure it fits in nicely. I made my pelvis 9 inches wide by 6 inches high to fit perfectly.
Spinal Cord – This can be made bigger or smaller, or pieces can be removed. I ended up removing some spine pieces as there just was not enough space. After removing several spine pieces I had 7 inches of space available.
Maximizing Your Cut
The Glow-in-the-dark HVT that I purchased was only 5 feet long. So I really needed to be conscious of how much HTV I wasted with the cuts and layouts. I probably spent an hour aligning all of the pieces on the cutting mat to make sure I could fit the whole skeleton on the 5 feet of HTV that I had. I was making this costume for my husband, so I really needed to make sure I wasn’t wasting any HTV, as I didn’t want to buy a whole new roll to make one or two pieces. Below is my layout for cutting all 5 feet of HTV.
Layout the Glow-in-the-dark-skeleton design
After the cut is complete, weed the surplus material off and place each piece in its place. Lay all the bones out to make them fit where they belong. Do not rush this step. This is your last chance to make any modifications before you press the design.
Optional Femur Bones
Since I had some small scraps left of HTV, I decided to make the top portion of the femur to add to the front of the hoodie. This would be placed at the pelvis so that the legs looked like there were attached. This isn’t necessary, but I wanted to add this extra bit.
I used the existing size of my femur bones, cut them to be a 2.5-inch square, and pressed them on after the fact.
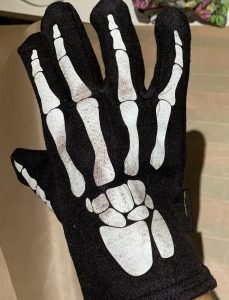
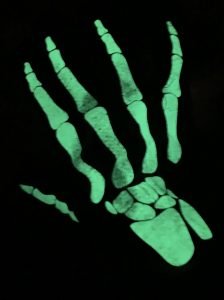
Skeleton Hand Gloves
The cut for the gloves was done on different Glow-in-the-dark HTV and not part of the 5 feet I had in my original package. I was rather wasteful with the material as I had a full 12″ x 12″ sheet for just two hands to use. But if I were constrained to the 5 feet I had above, I might have taken each piece of the hand part to maximize my material.
For the gloves, I used an iron. I was unable to get the HTV and glove to lay flat and still while trying to get it into place.

Glow-in-the-dark HTV – Cut and Press Setting
Make sure you read the instructions that come with the HTV. I did some practice cuts and practice presses to see how it would work.
These are the settings that I used:
- Cutting – Sports Flex-HTV
- Pressing – 302F for 15 seconds and a hot peel.
And that’s It! You’re done your Skeleton Costume!
Lessons Learned
Like with all of my projects, I always learn something new. I make some mistakes, and I try again. This project on how to make a skeleton costume was no different. Here are some of my major takeaways.
- Make sure you read the cutting and temperature requirements for glow-in-the-dark HTV. And if you are limited on size, make sure you use a small amount for a test cut and press. I did a few test cuts and a few test presses, and I was a bit frivolous with how much material I was using. The whole project could have been jeopardized if I had made the practice pieces any bigger.
- I have only worked with glow-in-the-dark HTV one time before, and they all seem to have a bit of a flaw – or perhaps I have not mastered using it yet. If you are pressing one piece of HTV, there is no problem. However, if you add multiple pieces of HTV at several different times, or if you have to press the HTV more than one time, it will quickly start to melt, and the fabric will show through the HTV.
Did you find this tutorial Helpful?
Did you find this tutorial on how to make a skeleton costume helpful? Let me know your thoughts below.
Also, check out these other Halloween tutorials:
- How to Apply Halloween Face Paint
- The Easiest Way to Carve a Perfect Pumpkin
- How to Make Maleficents Cape
- How to Make Maleficents Staff
Sign Up for my Newsletter
and
Get my Free Skelton SVG