How to Make Hair Bows for Kids
Although my girls (currently) don’t want to wear bows, I did spend a good amount of time making and learning so what better place to share that knowledge than here!
As an Amazon Associate, I earn from qualifying purchases. This post contains affiliate links. I may receive a commission if you purchase an item from one of my links. This will not change the price you pay.
What You Need:
- A reason to make bows. You don’t need kids, you can wear them yourself if you like.
- Method to cut the design. I use my Cricut, but you can use scissors or a sharp knife.
- Material for the bows. I used textured fabric, but you can use felt, faux leather, etc.
- Hair clips – I used barrette clips, but alligator clips work also.
- A bow design – I got mine from jennifermaker.com. She has a large selection of really nice ones for free!
- Glue – I use a glue gun and glue sticks but you can use anything that suits your fancy.
Let’s Begin!
Prepare your design!
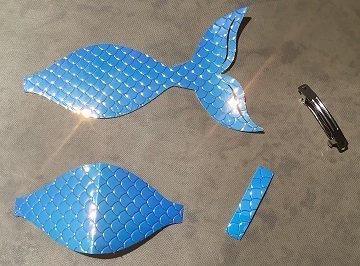
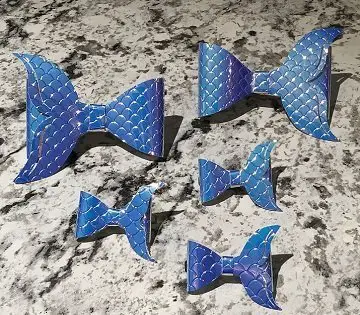
Find and upload the design you like into Cricut Design Space. I used this fish/mermaid one from jennifermaker.com as my kids are into mermaids.

The design was created to use multiple colors but as I was just learning and experimenting I opted to use only one color (and at the time I only had one color to use).
To do this, I just select the design and Ungroup. Now I can select them all and change them to cut in the same color.

DO a sanity check on parts/pieces when using someone else’s design. As sometimes piece can be missing.
Before You Cut!
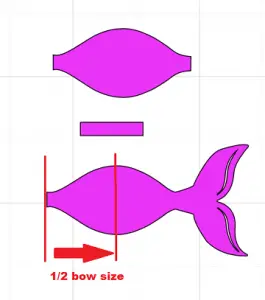
DO a sanity check on the size of the bow before you cut. I did this with my first bow, but I still left it too big.
The image to the below shows you how to measure the bow size. The larger this distance is, the larger the bow is. For my 5 year olds, 2″-2.5″ was a good size.
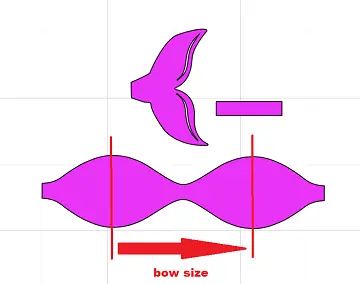
If the bow design has more pieces and is cut in half, then you need to use the 1/2 bow size to calculate your bow size (just time 2).
Cut
Send the Design to get cut. You can rearrange the layout so that you don’t waste much material. I try to save as much material as I can.
When cutting this material, I set the dial to Custom and selected Faux Suede and I did 2 passes without removing the material. Depending on your material, you will need to find the best fix.
DON’T think that all material that you buy is the same quality and thickness! I made other bows that the material needed 6 passes!
DON’T take the material out of the machine until you are certain you have cut all the way through. You can re-cut if you leave the material in the machine. If you take it out, the cut may not happen in the exact same spot.
Assemble and Glue
Assemble the pieces to your work area.
DO a test run on folding and assembling before you glue!
DO practice holding the piece to learn how you would assemble them. These pieces like to jump out of your hand and the smaller they are the harder they are to manipulate!
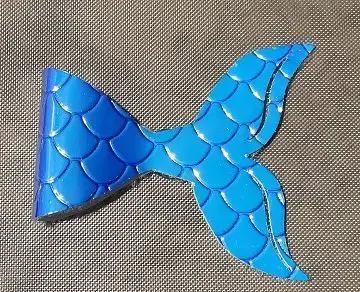


And That’s It! You’re Done!
Additional DON’Ts
DON’T listen to everything that you read on the internet! I asked for help about the hair clips and a bunch of people suggested the barrette hair clip. My kids hate this and it is one of the reasons they won’t wear the bows. They prefer the traditional alligator clips.
DON’T settle on one bow type. There are lots out there, and you can mix and match pieces. Be creative!
Was this helpful?
Was this tutorial on how to make hair bows helpful? Let me know your thought on this! Let me know if you tried making your own bows and if you had any mis-adventures as well!
Check out my other tutorials here


These are so cute! I have a silhouette but I never thought of making hair bows with it. My girls love mermaids this would be a great art project for us. Thanks so much for the tutorial!
Wow, these look so much easier than I thought they would be. I will have to have a go at making them for my niece! I love the tips too.
These are adorable! What a great idea. 🙂 My daughter would love these. She’s dreaming one day about having twin baby sisters. Oh boy!