Another School Year Done For The Kids

These past 2 school years have been quite something different. Everyone in the whole world was somehow impacted. I am fortunate, my kids are still small, and it is easy to shelter them from the big bad wolf. They do not like not seeing their friends and not going to school, but being at home will not traumatize them. They will learn plenty at home, and online school has its benefits. Like every school year, this one is coming to an end. And the last day of school is approaching, so is the need for the last day of school sign.
As an Amazon Associate, I earn from qualifying purchases. This post contains affiliate links. I may receive a commission if you purchase an item from one of my links. This will not change the price you pay.
Remembering The Last Day
For quite some time now, people have been buying and making first-day-of-school and last-day-of-school signs. You can either get them in a chalkboard fashion or in a whiteboard fashion. The concept is that you have a pre-made board, and you just fill in the five or six blanks for what your kid likes at that age/school grade. Once completed, take a picture of your child and the board together to commemorate the moment.
You can also make a chalkboard sign yourself here. Just remember that you have to store this somewhere all year. I have a small house, and I do not like clutter, and things pile up fast in a small house, so my chalkboard is multi-purposed.
At first, I painstakingly tried to write it out (nicely) by hand. But this would take way too much time and my penmanship is worse than that of a first-grader.
So what I have done instead is have made a template to print off. I print it off (or, in my case, use my Cricut as I do not have a printer) at the beginning and end of the school year, and then I fill in the blanks with my kids. This way I am only using two sheets of paper, maybe four if I messed things up. And most importantly, I do not have to worry about storing extra stuff around the house, and I can always just make one at the end of the year.
School’s Out For Summer!

It is hard to believe that the school year is almost over.
We just have one week left of classes here. Even though the last 3 months have been some weird form of homeschooling.
At the start of the year, I took pictures of the kids as they went off to school on their first day. I didn’t buy a fancy pre-made sign. I just used pen and paper.
Now that the school year is almost done, I will one-up and use my own pre-made sign on paper.
My kids still have a long way to go until they are done with school, so I will be printing off this for several more years.
I have attached several files to download and print and use yourself instead of buying a pricey sign. I have tried to label them for ease of understanding, and I have a user note below. Hopefully, they make your life a bit easier! And save you from buying a pre-made sign
Enjoy!
Sign Files
Note about all files:
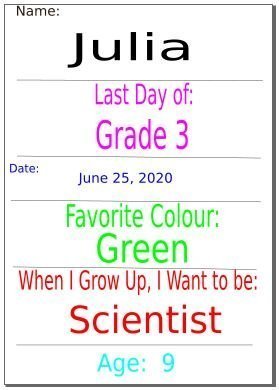
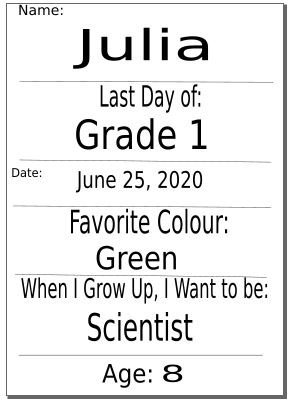
All PDF and all SVG files only have text for Name, Last Day of, Date. The samples shown above are examples to illustrate what should be put into those spots. You will need to fill this in by hand/Design Space/other.
Note about SVG files:
I have created the SVG files so that they are compatible with Cricut Design Space. Sometimes, when uploading to DS, an error indicating that the “text” will not be imported appears. This is not the case. The text will import. Just click Ok and carry on.
If you want to have your Cricut Draw the words on paper, you will need to make several changes to the files:
1) Select each text portion and change from Cut to Draw. You will have to do each work section individually (sorry)
2) Once you change to Draw, my color scheme will be replaced by black and white (if you chose the color SVG). You will need to apply different colors if that is the look you are going for. And you will also need to remember to use colored markers, as well.
3) Now, you will need to Attach the whole section so that it will print on an 8.5″x11″ paper.
4) You can add the missing details with Design Space or you can do them by hand. If you do them in design space, they will also need to be attached to the section in item 3) above so they draw in the correct spots. Again, colors can be applied to these if desired.
Was this Tutorial Helpful?
Did you find this tutorial helpful? Let me know your thoughts in the comments below!
If you liked this tutorial, be sure to check out my other tutorials here.
Sign up for my Newsletter!

