Easter is on the way, and I’m trying to get ahead of the game. This year, I have decided to try making paper carrots. I have had to try to keep this away from the kids while working on it, as they love to see what the next candy holder will be. They know Easter is full of treats so they are expecting more goodies. So, today we will learn how to make paper carrots!
As an Amazon Associate, I earn from qualifying purchases. This post contains affiliate links. I may receive a commission if you purchase an item from one of my links. This will not change the price you pay.
Supplies Needed to Make Paper Carrots
This is a cute project and doesn’t require too many supplies, but there are a few things needed, so let’s review:
- Carrot file – I have designed a Paper Carrot file that you can get a copy of here.
- Cardstock – We need a few different colors of cardstock, I used my standard color cardstock.
- 1 sheet 8.5″x11″ orange sheet
- 1 sheet 8.5″x11″ green sheet
- 1 sheet 8.5″x11″ light pink/light purple sheet – you can have a scrap piece instead
- 1 small piece of dark purple scrap card stock – need about 2″x 2″ max
- 1 small piece of white card stock – need about 2.5″x 2.5″ max
- Cutting Machine – I used my Cricut Explore Air 2. However, if you are not a Cricut user the file will work on any other cutting machine software.
- Cutting mats – These are needed to cut cardstock on a Cricut Machine.
- Cricut Pen – Optional – If you do not want to cut the toe beans out in dark purple cardstock, you can use a pen or marker with your Cricut to draw them instead If you do not have Cricut Markers, read this post to learn how to use off-brand pens and makers with your Cricut.
- Scoring Stylus or Scoring Wheel – If you have an Air Series Cricut Machine you will need a scoring stylus, if you have a Maker Series Machine you will need a scoring wheel.
- Glue – I use my Bearly Art Craft Glue. If you prefer, you can use double-sided tape instead.
- Crinkle cut paper – This is to stuff the carrot and reduce the amount of candy required.
- Treats – To fill the carrot once it is complete.
Now that we have all the supplies, let’s learn how to make paper carrots!
How to make paper carrots
Ok, let’s jump in and start making this cute paper carrot!
Using the Paper Carrot SVG File
As I mentioned above, I have designed a file that you can use for this. You can get a copy of that file here.
Importing the Carrot SVG File
Once you have the file saved to your computer, you will need to perform the following steps:
- Unzip the file –
- Right-click on the file with your mouse and select Unzip
- Select a location where you want the file to be saved.
- Hit Enter and your file will be unzipped and saved.
- Upload the file to Cricut Design Space.
- Select the Upload Icon on the left side of your screen.
- Select the Upload Image button.
- Select the File from the location where the file was saved from above.
- Select the file from your DS Recently Uploaded documents. There should be a green rectangle around it.
- Hit the Add to Canvas button.
Once the paper carrot SVG file is on your Design Space Canvas we can make some minor modifications so that the design cuts out perfectly on our Cricut.
Making the required modifications to the Carrot SVG File
Adjusting the File Size
Select the design that has been uploaded onto your Canvas. Before you do anything, we need to verify the size. Typically when I design files, Cricut likes to change the sizes. We want to change the height of the whole design to 15.5″. This will adjust the design so that the carrot cuts out nicely on an 8.5″ x 11″ sheet of cardstock. If you want to cut it out on a larger sheet, like a 12″ x 12″, you can further increase the size.
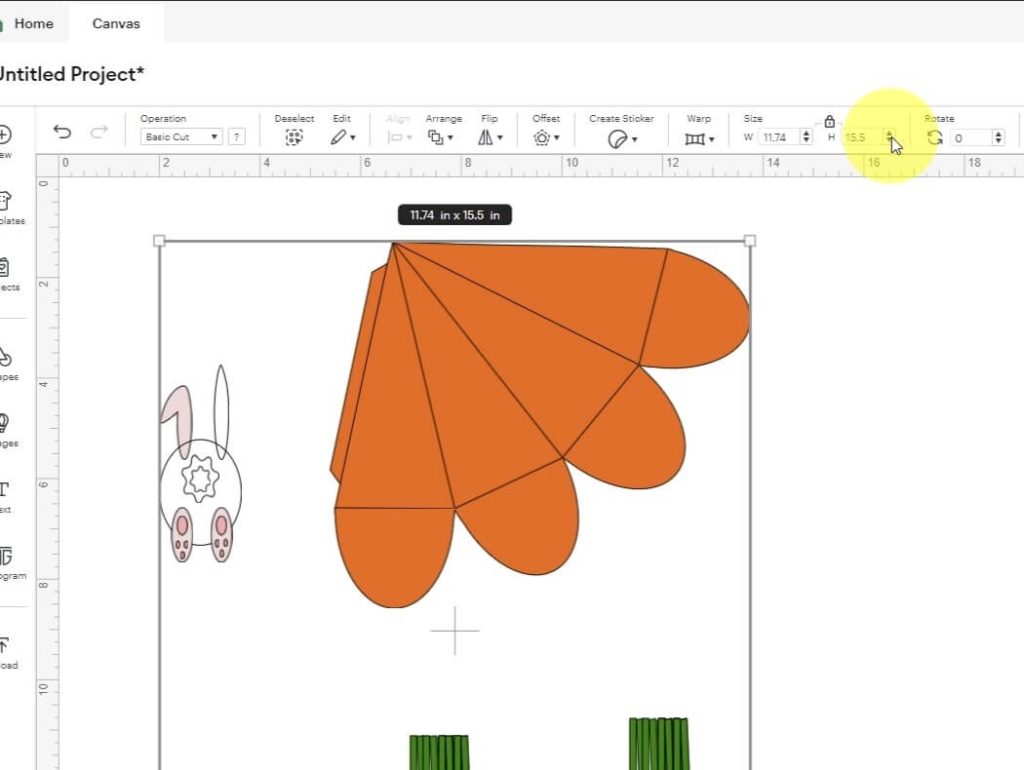
Once the size is adjusted, we can select the Ungroup button. This will allow us to work with individual items.
Attaching the Score Lines
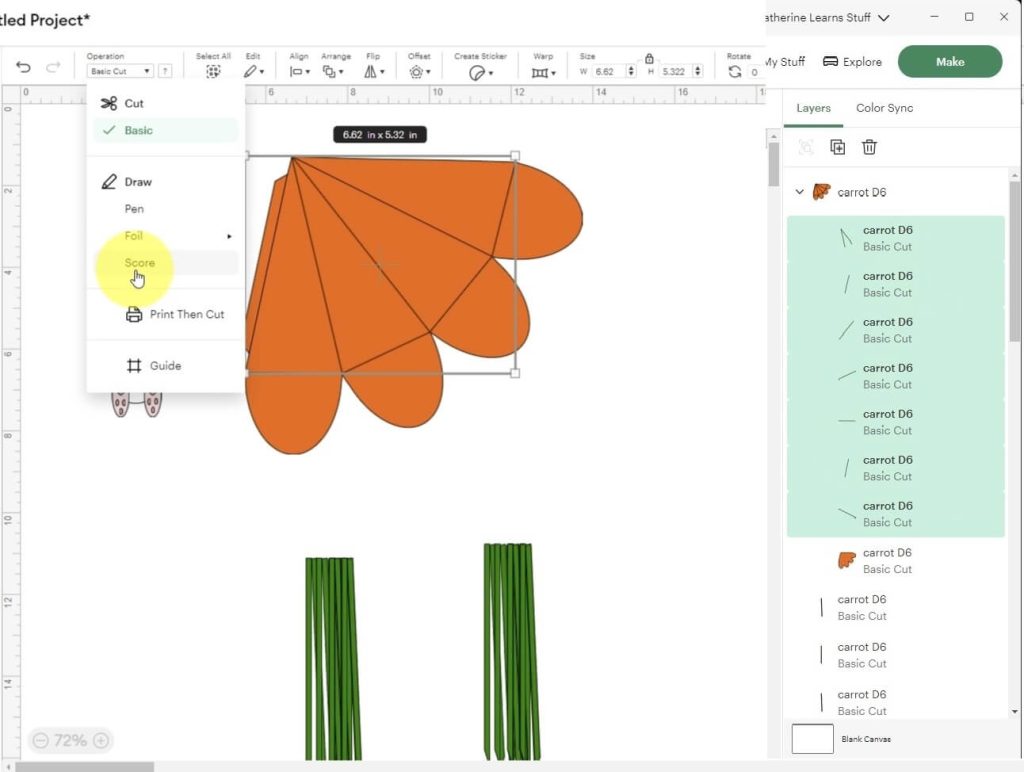
In the Layers Panel on your right side, select the down arrow next to the carrot. This will open up all the elements that are part of the carrot. Select each of the cut lines (you can click and hold shift to select multiple at a time). Then, in your Operations menus, change the operation from Basic Cut to Score. Now, select all the score lines and the carrot body, and click the Attach button to attach all the items together. This will ensure that the lines are scored in the correct place on the carrot.
Drawing the Toe Beans
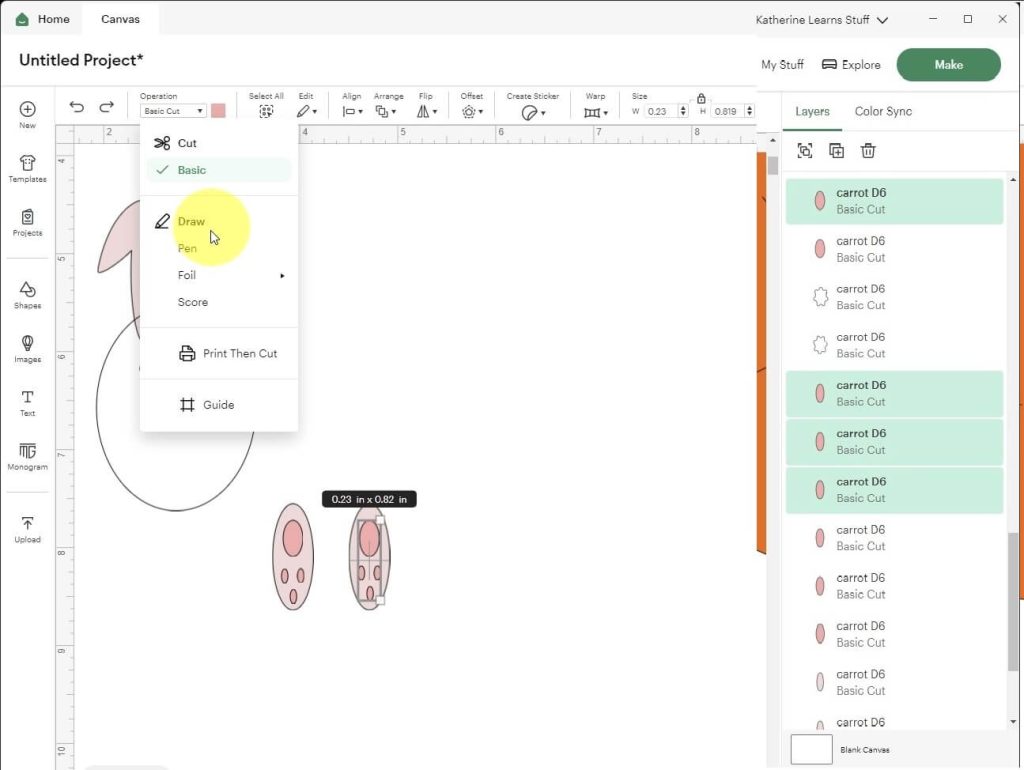
Finally, we can change the toe beans from Cut to Pen. Working with small items can be difficult because they tend to get lost after they are cut. So, if you want to draw the toe beans on the rabbit foot, select the small ovals on the rabbit feet, and in the Operations Menu, change the operation from Basic Cut to Pen. Then, choose the toe beans on the foot and the foot itself and attach them together. Repeat for the second foot.
Now we are ready to cut out our design. Select the Make Button and cut out our design!
Review of the Paper Carrot Cut Pieces
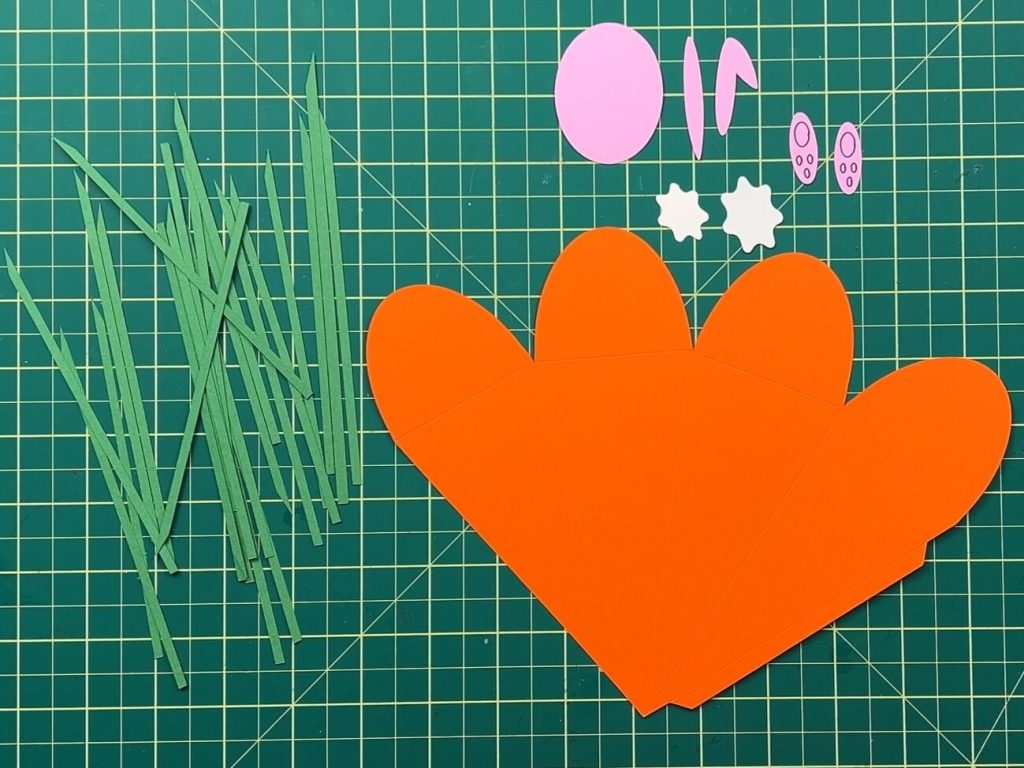
Now that we have adjusted our design and cut out the design, you should have the following:
- Large carrot with score lines,
- Multiple green stems for the carrot.
- Rabbit pieces –
- 2 ears – one straight, one floppy,
- 2 tail pieces,
- 2 feet with toe beans drawn on (If you opted to cut the toes beans, you should have 6 small beans and 2 medium beans.)
Building the Paper Carrot Body
I like to start by building the carrot body. This is a fairly simple task, so let’s start with the easy items first.
Fold the carrot along the fold lines. Remember, we want to fold inwards to make it look like a cone.
Once you have all the sides folded, fold the carrot so that the 2 middle triangles are flat and the two outer triangles fold the top.
Run a bead of glue along the narrow tab and place it under the one triangle. Hold it in place until the glue dries.
You can use double-sided tape instead of glue if you prefer.

Attaching the Carrot Stems
Once the carrot body is dry, we can attach the stem. I designed this project so that stems are only on 2 panels. Apply glue to the inside of one of the top flaps and place a bunch of stems down. Allow this try dry and repeat on the opposite side.

Making the Bunny eat the carrot
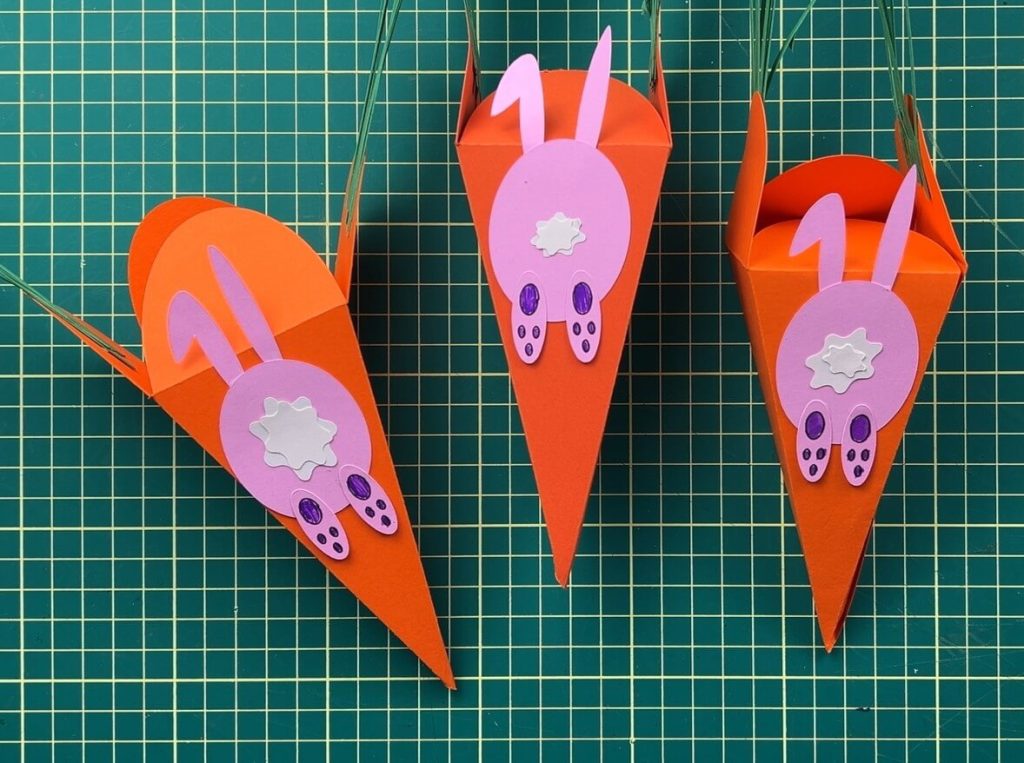
I thought it would be cute to add a bunny to this carrot. Now, obviously, the bunny is much smaller than a real bunny compared to a real carrot, but that is not the point. It’s there to add a bit of fun. So, let’s quickly assemble the bunny.
The bunny is glued together in the following order. The ears are glued under the body. The two tail pieces are glued together and glued on top of the body, in the center. The two feet are glued on top of the bottom of the bunny’s body.
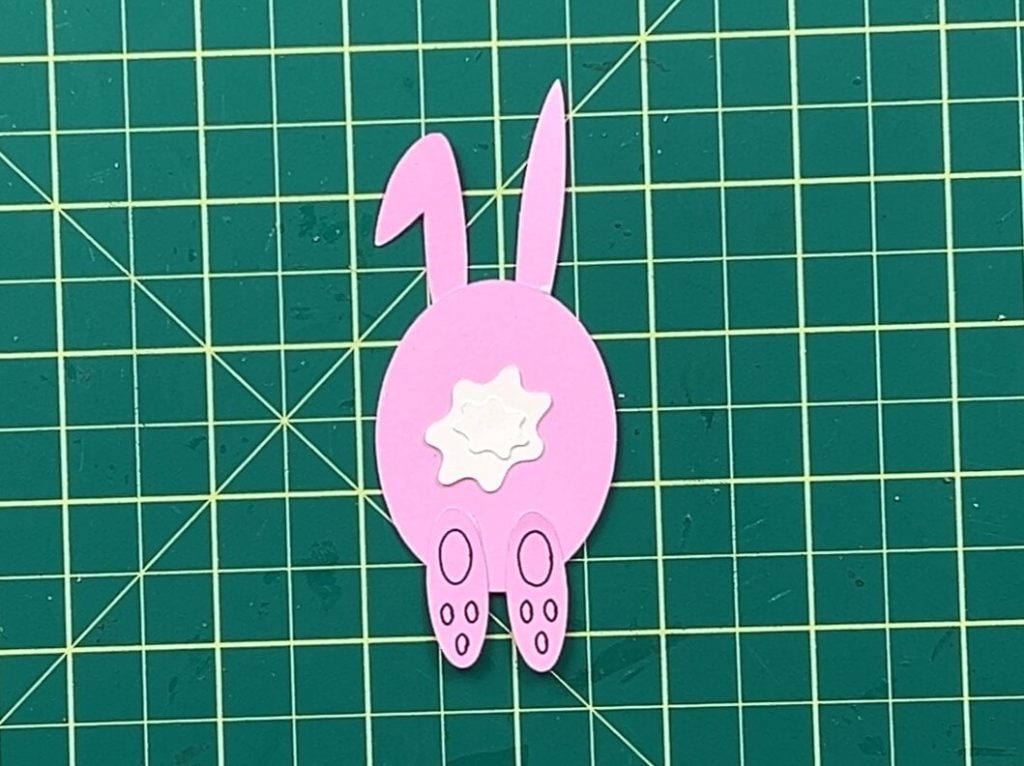
If you used markers to draw the toe beans, now is your chance to color them in.
Attach the Bunny to the Carrot
Now we have all our pieces complete! So, we can do the final assembly!
It is time to glue the bunny onto the carrot. In my head, the bunny should be glued onto a side that does not have the carrot stems, but the choice is really yours. You want the bunny to be close to the top of the carrot so that the ears clear the top fold.
Fill your Carrot with Easter Treats!
Now that the carrot is complete, it is time to fill it with treats!
If you want to fill the whole carrot with treats, I will not judge you. However, I prefer to fill the carrot with crinkle paper to reduce the amount of candy that goes into the carrot.
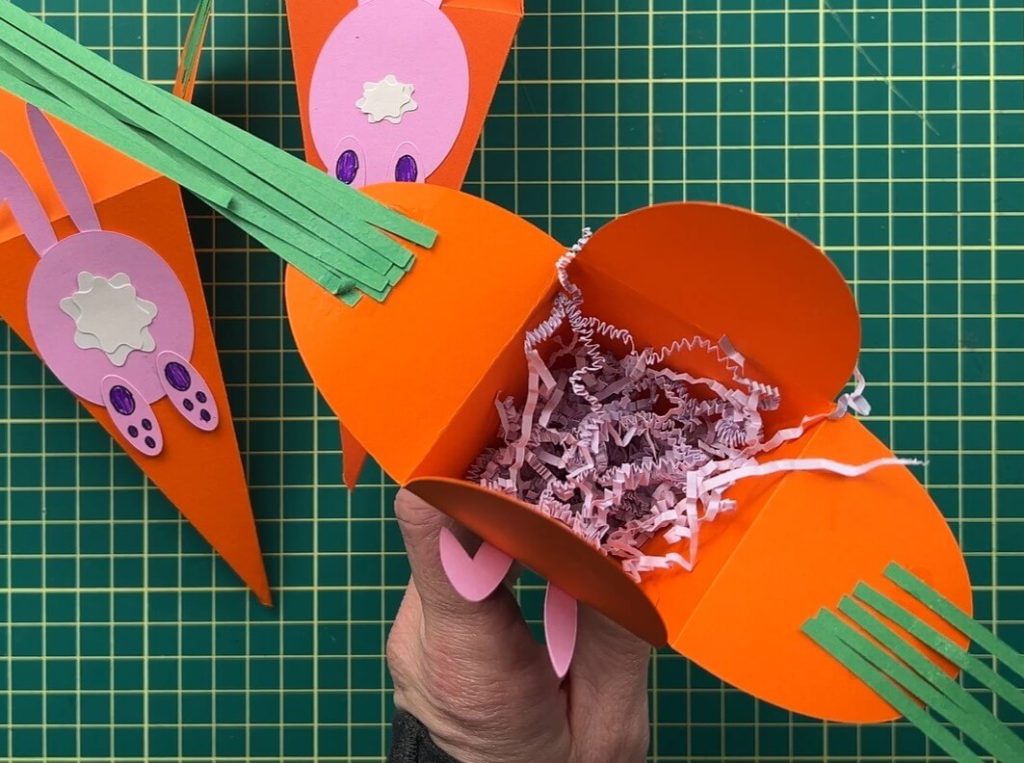
Once the carrot is full, flip the 2 orange flaps shut. Then, using double-sided tape or glue, attach the two carrot sides with the stems to close the box.
And there you have it! Your Paper Carrot is complete!

Things I learned while Making Paper Carrots
As always, I learned a few things while making this craft. So, let’s go over them, so we can all learn together:
- When working with the toe beans. I recommend using the pen feature instead of cutting these out. I cut out a set of toe beans, and they got lots. In the end, I had to cut them out 3 times to have enough little pieces to get the rabbit feet completed. So, I highly recommend drawing them on.
- If you watched the video you will see me fumbling trying to select all the toe beans – I recommend you click and drag over one foot at a time, selecting the whole foot and toe beans, and then deselect the foot. This will be much easier than attempting to individually select the toe beans.
- When folding and gluing the carrot – The carrot is symmetric. All the triangle sides are the same size. This makes gluing easy if you fold it in half and glue the middle tab inside. Trust me.
- I am not a fan of cutting things out with scissors, I have a cutting machine to do that for me. But if you prefer to cut straight green lines out with scissors, you can do that instead of sending them to your cutting machine.
- The design has a bunch of green stems. You do not need to use them all if you don’t want to.
- There are several ways you can close the carrot. I opted to use double-sided foam tape because that is what I had handy. But you can use glue, staples, tape or whatever you have in your drawers to help hold it shut.

Did you enjoy Learning How to make paper carrots?
Did you enjoy learning how to make paper carrots? Let me know in the comments below! If you tried it and have any comments on how to improve this craft, be sure to drop me a note!
If you enjoyed this paper craft, check out my other Paper Project Here.
You can also check out my other Easter Projects Here.