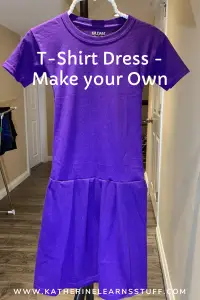
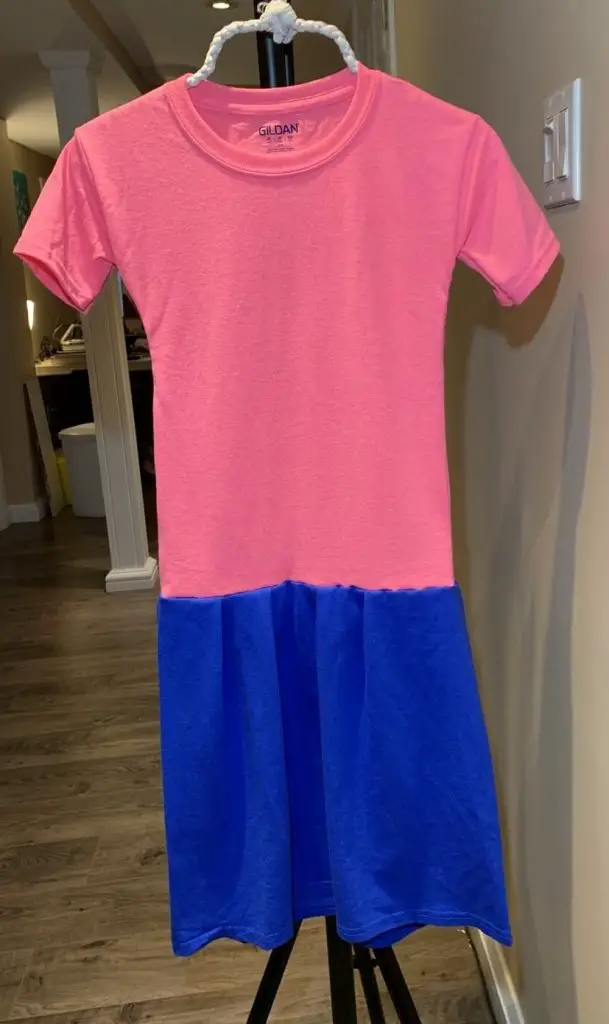
What is a T-Shirt Dress
What is a T-shirt dress, you ask? There may be another name for this, but I have to be honest with you, I came up with this one day when my kids wanted more dresses, and I was not willing to pay $30 for a dress that was going to be worn in the mud. So, I pulled out some old t-shirts and made some dresses.
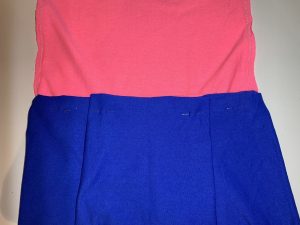
But, simply, a t-shirt dress is a dress made of one or two t-shirts. In this case, it is made of two t-shirts.
As kids get taller it is hard to make the material go that extra mile. Unless you are looking for the short-short look… which I am not.
As an Amazon Associate, I earn from qualifying purchases. This post contains affiliate links. I may receive a commission if you purchase an item from one of my links. This will not change the price you pay.
What you need:
- 2 T-shirts.
- The first t-shirt will be used for the top portion of the shirt – so ideally, you want this one to fit. That way, no modifications are required.
- The second shirt will be the skirt portion – so you can use an old (or new) adult t-shirt. Small, medium, or large sizes work. The bigger the shirt, the longer and the more ruffles the skirt can have.
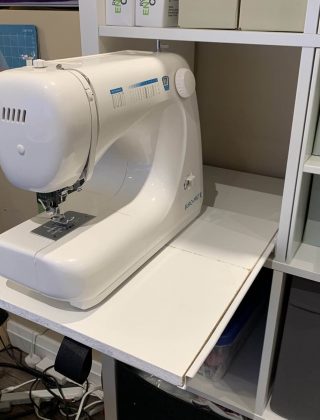
- Sewing machine and matching tread
For the sake of this tutorial, I used a new t-shirt, but you can up-cycle old shirts for this as well, which is what I have done in the past.
Let’s Begin!
Some things to remember before you start
- Fabric shrinks! So make sure you wash and dry your new/old shirts. Even if it is an old shirt, there is still some shrink left it in.
- Once the shirts have been washed, iron them. This makes it easier to work with.
Top Parts
If you have been reading my blog, you know my kids are small, so I need to modify all of their clothes. If you are in my situation, check out this post to see how to make the top part (shirt) smaller.
The shirts I used were a bit long and went past the girls’ bums, so I did not bother shortening them. But they could be cut at waist length if desired (this will allow for a shorter dress).
Now, if you are lucky and your kids do not need their shirts smaller, you can flip your shirt inside out and get ready for the next step.
Cut the Larger Shirt
Flatten out the larger of the two shirts, and cut a straight line right under the armpit, from one side to the other.
I do this for 2 reasons:
- If it is a used shirt, you cut out the stained areas,
- It leaves a fully formed tube of material that works great to make a skirt.
From now on, this larger shirt will be called the skirt. Make sure you flip it inside out. You need to use the same side of that material for the shirt and shirt.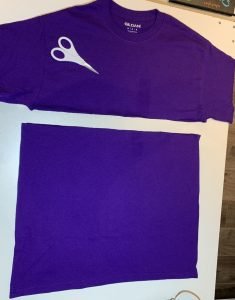
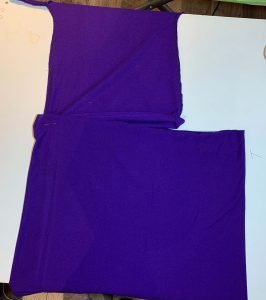
Combining the two
Combine the top shirt and bottom shirt, which is now the skirt of your dress.
Make sure the skirt is lying flat. Line up one edge of the skirt and the shirt. Pin it together.
Then, carefully bring the other side of the skirt into the shirt. Make sure to collect both layers of the skirt. Pin it together.
When pinning the material together, pull the shirt edge and skirt edge up. This way, two fabrics are touching on the inside, and the edge of the fabric is together.
I left the original hem at the bottom of the shirt. I can now use this as my guide on where to pin the fabrics together. This will help keep a straight line when sewing.
Add Pleats
Since the skirt is larger than the shirt, around the hemline, I add pleats. This will also allow the skirt to be a bit more flowing.
I try to evenly distribute the material into 2 sections on the back and 4 on the front. Each of these sections is folded into a Z (the fabric is folded back and forth). I use my fingers, but you can use a fork or a ruler to make the pleats perfectly even.
I have found eyeballing it works just fine.
Front – 4 pleats
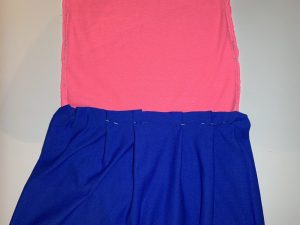
Back – 2 pleats
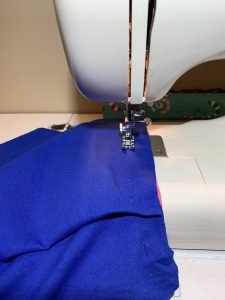
Sew it together
This sounds simple enough. You need to sew it together.
Some pointers for before starting:
- You should be sewing the dress from the inside. Double-check before you begin.
- You need to flip the shirt or skirt into the other. This allows for space to sew and not get the dress caught together and sewn in the wrong spot.
- This is your chance to make sure you have aligned your pins in the correct direction. All the pins should be pointing in the same direction, and they should be easy to pull out when sewing towards them. If you do not do this, sewing this will be a challenge.
Flip the dress and presto!
And That’s It! You’re Done!
Some things I learned along the way…
- My girls love to wear dresses. And they love to wear dresses when they climb trees and roll around in the grass. A t-shirt dress works really well because it can get dirty and ruined, and there is no guilt that a $40+ dress was ruined.
- You can always add decals onto the dress, just like you would with a shirt.
- This is an ideal way to upcycle old shirts that do not work with your style, but the material is still useable.
- I tried to get a picture of the final dress on my girls, but they became silly and ran off to play… so it was a success.
Was this Tutorial Helpful?
Did you find this tutorial on how to make a t-shirt dress from two shirts helpful? Let me know your thoughts in the comments below.
If you liked this tutorial, be sure to check out my other sewing tutorials here.
Don’t forget to sign up for my newsletters! You’ll get inside tips on upcoming posts and additional behind the scenes details about what’s happening on the site!
Really cute idea!
Thanks! It’s super easy and the kids love it.