The other day, I was perusing my crafting Facebook threads and saw a neat purse that everyone was making. They called it a Galentine’s Day Purse. I really like it and thought it would be fun to make. So, I did some searching and found it online, in Cricut Design Space, and it was being sold for about $15 for the cut file. That was more than I was willing to spend on the design of a paper purse. So I decided to design my own.
How to design a paper purse In Design Space
I normally do not design much in Design Space, as I can not share the files with my friends and readers. I know not everyone has access to other design programs, so this tutorial will be based solely on creating the design for a paper purse in Design Space.
So it is possible to make this design in Design Space is possible, it is just a matter of figuring out how to get the shapes and design that you what. This paper purse is relatively easy to design. You just need to be creative with welding and slicing. I would say that about 95% of this design is just squares, a few circles, and duplication, so let’s begin.
As an Amazon Associate, I earn from qualifying purchases. This post contains affiliate links. I may receive a commission if you purchase an item from one of my links. This will not change the price you pay.
What you need to Design a Purse?
All you need is access to Cricut Design Space.
And once you are done your design, a Cricut cutting machine such as a Cricut Maker Series machine or a Cricut Explore Air Series machine.
Make the Front Panels of the Purse
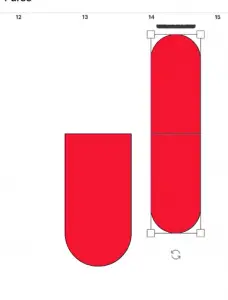
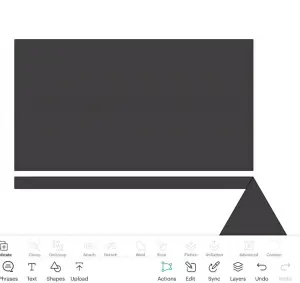
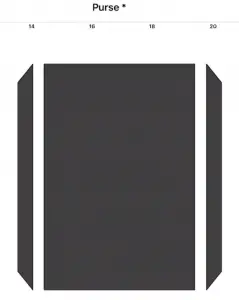
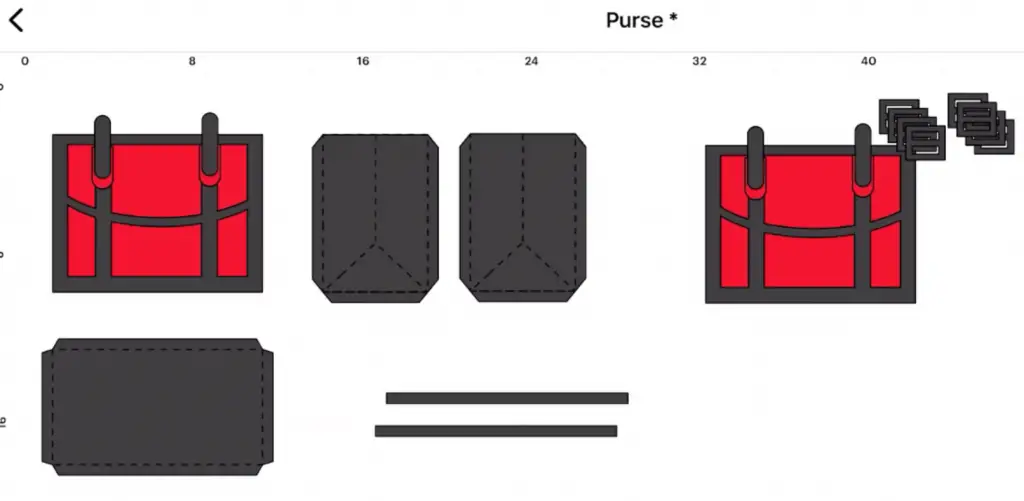
Using the Shapes tools – select a Square. Unlock the shape so that you can change the length and width individually. This allows the length and width to change without impacting each other. Extend the square to look like a rectangle. I made mine about 9″ x 7″. Then repeat this step, but make the second rectangle smaller than the first. Changing the color will help see which one is which.
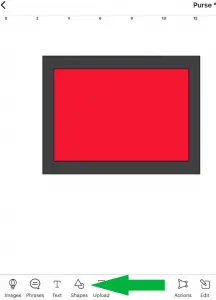
The smaller rectangle will be the design piece of your purse and will be the one modified. You can hide or move the larger rectangle so it is not in the way.
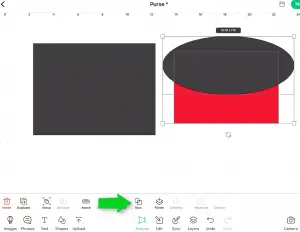
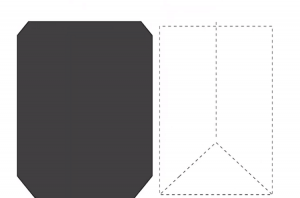
Again, using the shapes, select a circle this time. We want to make sure it is not locked into a circle but can become an oval. Stretch the oval out to be longer than the rectangle and place it closer to the top. This is to make a nice lip or flap for the purse. Using the slice feature, slice the rectangle into 2 with the oval. You can now delete the 2 oval pieces. Make sure to keep your 2 rectangle pieces that are now sliced with an arch through them.
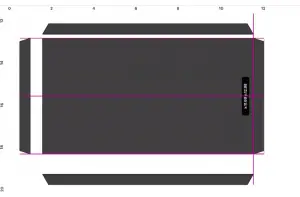
Next, we want to create another rectangle, but this one will be narrow and long. We want it to be about 0.75inches wide and long enough to pass the top and bottom of the smaller rectangle. Once you are happy with the size, duplicate it, so there are two. Place them over the smaller cut rectangle. They should be the same distance from the outer edges. You will now need to grab one narrow rectangle and the top cut rectangle and slice. You will need to repeat this 3 times to slice through the full cut rectangle.
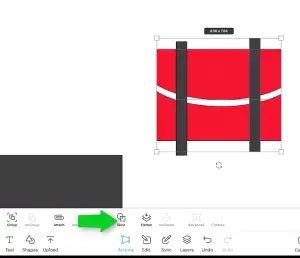
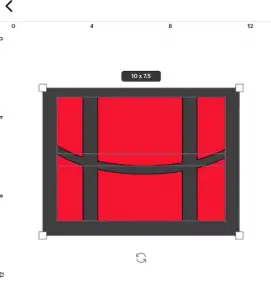
Slicing only works with 2 shapes at a time. Once all of the slicings are done, delete the two narrow rectangles and the sliced bits from the cut rectangle. Now you have the design for the front and back of your purse.
Duplicate this whole above section so that you have a front and back.
Design the clasps
The purse will require four clasps, 2 on each side. These are to hold the straps.
Again, we will be using Shapes and selecting rectangles.
- Create a rectangle 1 inch wide and 2.5 inches long.
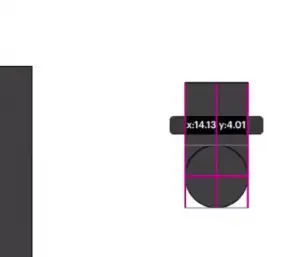
- Select a circle, and make the diameter 1 inch wide.
- Place the circle at the bottom of the rectangle. The middle of the circle is to be the top of the bottom of the rectangle.
- Once they are lined up, Weld them together.
- Now, select the piece you just made, and duplicate it.
- Make sure your measurement lock is on, so that the sizes stay proportional, and reduce the width to 0.75″.
- Now, duplicate this piece.
- Flip it 180degrees.
- Join the 2 flat ends of these tabs together by welding again.
This piece will attach the buckle that holds the handles.
Selecting both of these pieces, duplicate 3 times to have 4 sets.
Design the Buckles
We are going to create a buckle that is used to attach the handles to the purse clasp we just made.
- Make a rectangle, we want to be slightly larger than the latches we just made. About 2 inches wide, maybe a bit smaller.
- Make 2 smaller rectangles, that will need to be about 1 inch wide and about 1/4″ high.
- We want them to allow for the straps to fit through the clasp.
- Placing these on the top of the 2-inch wide rectangle, centered, we will again slice two times to make notches in the clasp.
- Deleting all of the slices pieces, and just leaving the one piece that will hold the handles and purse together.
We will need 4 of these in total, so again, duplicate 3 times. If you want, you can create 8 in total so they can be glued together to be stronger.
Design the side and bottom panels of the purse
The side panels and the bottom of the bag all rely on the same principles. You want them to be rectangles with lips on the sides that will fold.
We will use the bottom panel for the walk thought.
- Make a rectangle that is as wide as the front of the bag. In our case, that is 9 inches.
- You will want the width to be the same as your side panels, so let’s set it to 5.5 inches.
- Duplicate this rectangle and change it from cut to score.
- Make another narrow rectangle that is also 9 inches long but only 0.5 inches wide.
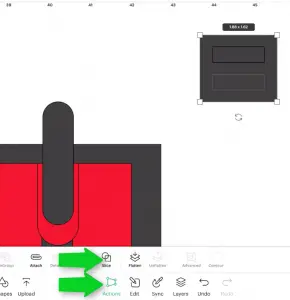
- Drawing a triangle, place it at one corner of the narrow rectangle. It will overlap the rectangle.
- Using the slice tool, slice the two pieces.
- Now your rectangle has a notch cut out of the corner.
- Repeat this on the other side.
Once you have completed this shape, duplicate and flip it so that you have 2 tabs. One for each long side of the bottom rectangle.
Now,
- Duplicate one of the narrow pieces again,
- Rotate it 90 degrees,
- Reduce the length from 9 inches to 5.5 inches.
- Duplicating this piece again you now have 4 tabs.
- Line up all 4 tabs to the rectangle so the long sides touch the rectangle.
- Weld them all together.
- Place the scored box you made above on top of this box,
- Attach the two together.
You will repeat this same process for the sides, however, you will only need 2 tabs, as the top and bottom will not require one.
For the side tabs, the one extra thing I did was, I created a triangle with a line, pointing off the top/middle for the full height of the side panels. I set them to score and attached them as well, this way there will be a nice fold line at the side of the bag.
Design the purse handles
If you want the handles to be made out of paper as well, you can simply make 2 rectangles that are 11.5″ long by 0.75 inches wide.
You want the handle to fit through the latches we made above, and 11.5″ is the largest you can make the cut from 12″x12″ card stock.
However, if you want to skip this step, you can later use ribbon for the handles instead of paper.
And that’s it! Your Paper Purse has been designed in Design Space
Watch how to design a Paper Purse in Design Space on YouTube instead
If that was a bit too messy to understand, check out my YouTube video on how to design it in Design Space. It only takes 15 minutes.
Don’t want to design a Purse? Want a free purse cut file?
If you won’t want to create your own cut file, sign up for my newsletter and gain access to my resource library and get a free cut file there.

Was this tutorial helpful?
Did you find this tutorial on how to design a paper purse helpful? Let me know in the comments below!
Now that you have designed the purse, you can follow this link to learn how to assemble it!
If you liked this tutorial, check out my other paper crafts here.