We Need More Outdoor Toys!
If you have kids, you understand how important it is to have outdoor activities available for them. And the past several years of the pandemic and lockdowns, we needed additional activities for the kids outdoors. We decided the next item we needed in our backyard was a swing set. After lots of research and searching, we decided it was better to build a wooden swing set instead of buying one.
So, let’s jump into How to Build a Wooden Swing Set.
This post contains affiliate links. If you purchase something from one of my links, I may receive a commission. This will in no way increase the price you pay for the product.
Supplies needed to make a wooden swing set:
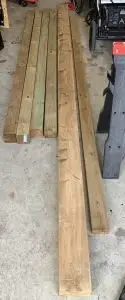
- Wood –
- Four 8-ft long, 4″x4″ beams – these will be the legs. You can use 12ft long beams if you want the swing set to be higher.
- Two 12-ft long, 4″x6″ beams – This will be the top span of your swing set
- Two pieces of shim – I used 1″x6″ deck-board.
- Construction Adhesive – this is not the same as wood glue.
- Lag Bolts for top beam.
- Corner Brackets – I used these Eastern Jungle Gym Easy 1-2-3 A-Frame Brackets.
- Swings – Either one, two, or three swings. This depends on your plan – I used 2 of these.
- Hanging bar – Optional. I bought one of these as my kids like to climb. This is also great for expending energy 😉
- Heavy Duty Hangers – You will need 2 per swing/attachment. For this design, you will need a total of 8 hangers. I bought these hangers.
- About 15ft x 10ft of space.
Let’s Begin Building our Swing set!
Measure Your Playground Space
Before you get too excited about installing a wooden swing set, it is imperative to measure the available space. Do not get carried away thinking you can build a massive wooden swing set. These take up more space than you realize. Kids will need to have room to swing, so the total footprint requires an additional 6-feet of space on the front and back of the swing set.
We have an available 18ft x 18ft space. And at the end of the day, even that seems tight.
Wood Requirements
For our backyard, we decided it was best to go with only 8ft long 4″x4″ and a 12ft top beam.
The brackets that we bought are for a 4″x6″ beam, but we cannot purchase a 4″x6″ beam. A 2″x6″ beam is actually about 1.75″ x 5.75″.
The Eastern Jungle Gum A-Frame brackets have a 4″x6″ slot for the top span and 4″x4″ slots for the legs.
We cannot purchase a 4″x6″ beam. So we needed to use two 2″x6″ beams, however, those are actually about 1.75″ x 5.75″. So we needed shims to make sure the top span would not move inside the frame.
There were no issues with the slots for the legs, the 4″x4″ beams fit perfectly.
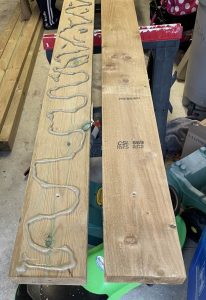
Draw out your plan
Before you cut, before you drill, before you glue, before you do anything, you need to measure. And with the price of wood being so high, you really do not want to mess this up. So measure, measure, MEASURE!
For best results:
- Place the two 2″x6″ beams on top of the other,
- Slide on the brackets. For these brackets, the maximum inside span can be 10ft. Make sure you read the instructions from the product you buy, as it may change over time. Slide the brackets onto the wood to their correct spots.
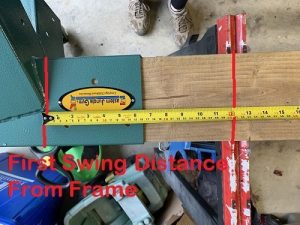
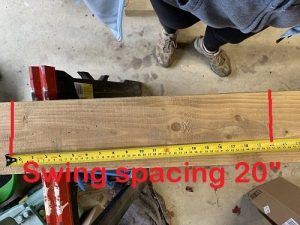
- Mark out with a pencil/pen where the swings will be. Ideal spacing for the swings and hangers is:
- 12 inches apart – swing to swing
- 20 inch spacing for chains on individual swings.
- First swing from the frame – 12 inches from the center of the legs. This is about 6″-8″ from the top of the legs on the brackets. Remember, your legs will be leaning out and not going straight down – at least not with these brackets
- Lag bolts – mark off where you want them on your beam. Remember, you do not want them interfering with your swing hangers. So if you plan on putting them in line with your swings, they need to be offset a bit.
- Make the markings on the top and sides of the wood, so they are visible on all sides
Once you have everything measured out, go back and check your math. Just to make sure.
Lag Bolt Holes
If using 2″x6″ beams, you really should add in lag bolts. As mentioned above, the locations should have been marked with the other measurements. But if not, you can do it now.
The 2 beams need to be aligned. All the edges and corners need to meet up.
Using several clamps, clamp the two 2″x6″ beams together. This will ensure the holes make it through both beams without the beams moving.
Drill your lag bolts holes.
Once all of the holes have been drilled, check to make sure the bolts fit in holes. Do not leave bolts in the beam.
Gluing the Beam
Be sure you have completed the measuring steps and lag bolt drilling above before gluing! Once you glue, you cannot un-glue.
IMPORTANT: You now have holes in the beams for the lag bolts. Take special note of the way you take the board apart. This will be the same way you put them back together once you apply the construction adhesive. If you flip the top beam off, you will need to flip it back on. Otherwise, your holes will not line up, and you will have a mess.
Spread the construction adhesive generously on the wide side of the wood.
Put the other board back on top. REMEMBER YOU WANT THE HOLES TO LINE UP, so you need to put it back on the way it was taken off.
Line them up so that the holes are lined up. Insert lag bolts and tighten. Once they are all in and tightened, add clamps as well to help hold the beam tight.
Let the construction adhesive dry. Depending on what you use, you will need 12-24 hours.
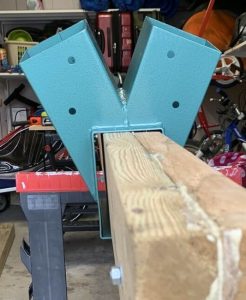
Install the beams into the swing Brackets
Once the construction adhesive is dry, it is good to carry on with construction.
This is where it gets a bit tricky. I mentioned above that the sizes are off a bit.
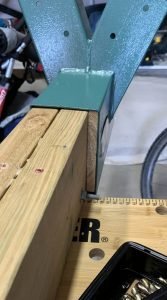
You will need a shim piece to install into the brackets as well.
We had a piece of deck-board that we cut to fit the length of the bracket. It was a bit too thick, so we shaved off a bit with a plainer.
Once it was reduced in size a bit, we started the process of assembling the whole thing. This involved the glued beam, the bracket, and the shim.
With some brute force and a mallet, we pushed the shim into the brackets with the beam.
This required some finesse so that the bracket would be in the correct final position.
Finally, drill in pilot holes, and install the lag bolts into the wood to hold the frame and wood together. Do not forget the washer.
This set comes with everything you need to hold it in place.
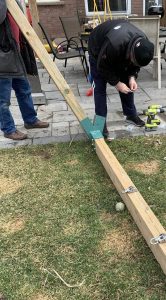
Drill in Swing hangers
Before we get carried away, we want to drill in the hangers. It is much easier to do this when the beam is at ground/waist level than when the beam is up in the air.
You already have the locations marked off, but you can do one final check to make sure.
Drill pilot holes before you try to drill in the hangers. You do not want to split the wood. Drill in the hangers. The set that I recommend comes with heavy duty-screws, so no need to buy extras.
Drill them all in, and then do a check with a ratchet to make sure they are all tight.
Installing Swing Set Fram Legs
Up until this point, we were doing all of the work in the garage. So, we needed to move to our final destination.
This part requires a few people (at least two, but 3-4 is ideal).
Installing the legs is easy. But, just in case:
Insert first leg, one person holding the 4″x4″ up, while the other person drills in pilot holes followed by the lag bolts, with washers.
You can either have someone hold the first leg secure or lay it on the ground. Then follow step one for the second leg.
We did both legs on one side and moved to the next side. Once on the other side, someone will need to hold the legs on the first side secure, so the frame doesn’t twist and break.
Install third and fourth legs, following steps 1 and 2 above
Legs are installed!
Flip the wooden frame and Install Swings
Flipping the wooden swing set from its side to the upright position required 2-3 people. Remember, when standing up the set, you will need to start as far off to the side as you can so that the feet can land on the ground.
Once all 4 legs are on the ground, lift and put it in its final spot.
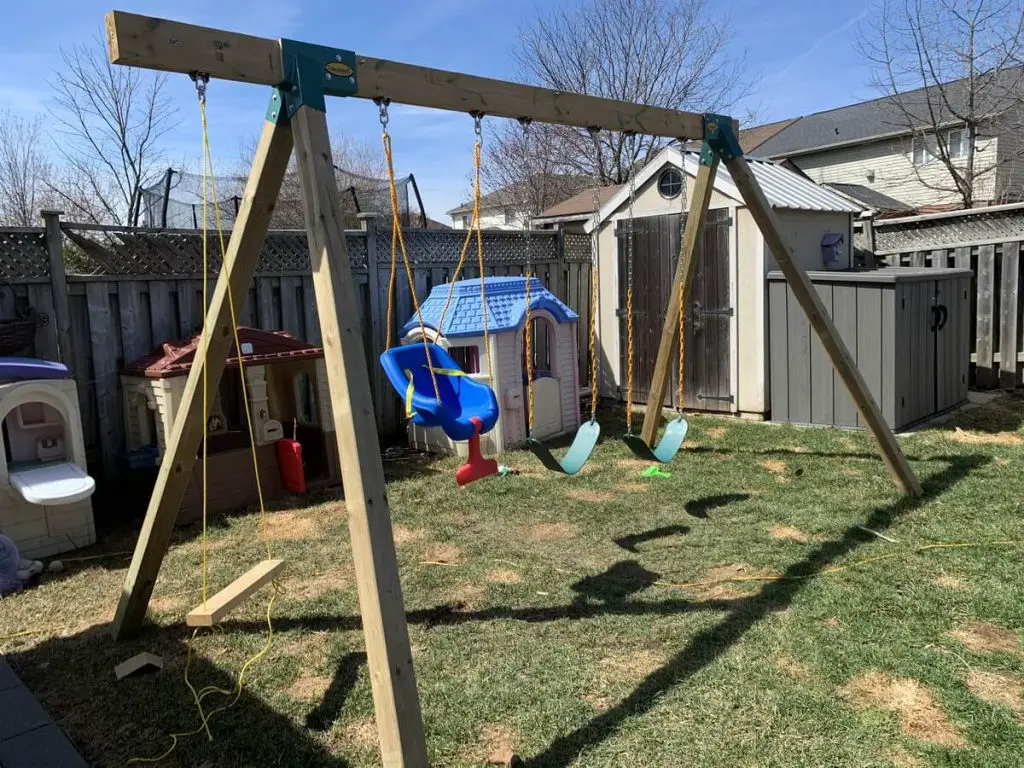
Then install swings.
And That’s It! You’re Done! Your wooden Swing Set is Complete!
Frequently Asked Questions about building a wooden swing set
Is it better to buy or build a swing set?
Buying a standard swing set from the store is much easier. All you need to do is pick a set, purchase it, bring it home and assemble it. There are lots of different swing sets available. Some are just swings, some have playhouses, some have slides. There are lots of options. However, the more features the swing set has, the higher the price. So you may not be able to afford a swing set you want.
Building your own swing set requires some additional research, and creativity in figuring out what you want. This also allows you to add additional modifications as the years go one. And you can make it the exact size you need for your yard.
How much does it cost to build a wooden swing set?
This is not a simple answer. Since the pandemic began, the price of wood has doubled, tripled and even quadrupled at times. So a standard 2″x6″ and 4″x4″ have significantly increased in price.
The number of swings and accessories you want to install on your swing set will also increase the cost. But you can count on playing in the range of $25-$100 per accessory.
But with inflation and material costs, it can easily cost over $500 for a simple wooden swing set.
How long do wooden swing sets last?
A wooden swing set can last 20 years outside. Your kids will outgrow it before it needs to be replaced.
Is Pressure Treated Wood safe for wooden swing sets?
Yes, you can use pressure-treated wood for a swing set. The one thing that you should remember about pressure-treated wood is that it will easily give people and kids slivers and splinters. So if your kids like to climb all parts of the swing set, not just swing on the swings, consider using other types of wood, like cedar.
How far apart should swings be?
The swings should be 12″ apart from each other – so the outer hinge of the 2 swings should be 12″ apart.
How wide should a swing be?
The swing itself should have 20 inch spacing for each swing/hanger chain.
How much clearance is needed around a swing set?
You want at least 6 feet clearance in the front and behind the swing set. This 6-foot clearance should be measured from the feet of the swing set, not from the center beam.
How high should a swing set be?
Using an 8-foot 4″x4″ beam will give you 7 feet in height for the swing set.
A 12-foot 4″x4″ beam will give you about 10.5 feet in height. However, this height will require a much larger footprint in your yard, you will need to account for the additional momentum in swinging, so having larger anchors in the ground will be required, and you will need a ladder to switch out accessories on the swing set.
Are Eastern Jungle Gym Easy 1-2-3 A-Frame Swing Brackets good?
The Eastern Jungle Gym Easy 1-2-3 A-Frame Swing Brackets are easy to use, and are durable, at least from my experience.
The bracket is designed for 4″x4″ legs. There were no issues installing the 4″x4″.
The top of the bracket, and therefore the top of the swing set is a 4″x6″ slot. But we cannot purchase a 4″x6″ beam. A 2″x6″ beam is actually about 1.75″ x 5.75″. We needed two 2″x6″ beams, which leaves a gap at the side of the bracket. To ensure the bracket worked well, and that there was no additional torque on the top beam, we needed to add a shim into the bracket.
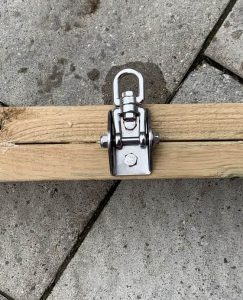
Can swivel hangers be used for swings?
Swivel hangers can be used to attach swings to the swing set. But it is good to remember that they will allow the swings more movement, and not only go straight back and forth.
Final Thoughts
Some things I learned while building the wooden swing set:
- Before, during, and after building the swing set, we had a vision of what we wanted. We want this to last for years to come, and we want to be able to add and modify it as the kids grow. That is why we used wood, instead of buying a metal one from the local store. One day we want to add:
- a climbing wall on the one end
- a rope ladder on the other end
- add a ninja warrior obstacle course on the hooks instead of swings
- Possibly modify it to allow for a slackline.
If we had just purchased a regular swing set, we would not have been able to plan for these items in the future. But who knows? Maybe we will never get there.
2. The price of wood is astronomically high due to the pandemic and everyone doing projects of all sorts. If we had bought this wood last year, it would have cost less than 1/2 the price. If we had bought it before the pandemic, it would have cost us 1/8th the price.
3. We purchased a 12ft span of wood for the top beam. This allows for an overhang on each side. One side has only about 3 inches, and the other has about 20 inches. This allows us to add additional hangers for more ropes and activities at a later date.
4. I recommend you install anchors into the swing set to hold it down. Once kids start to swing higher, there will be enough momentum in the system for the legs to lift off the ground. Depending on your yard space, you may need to check for utilities belowground. If your backyard has no utility lines running through, go ahead and install anchors. Although I always recommend you check just in case. For this, you will need to purchase some steaks – 15-inch or longer. Drill a pilot hole in the bottom of each leg, and hammer the steaks into the ground.
Was this Tutorial Helpful?
Did you find this tutorial on how to build a wooden swing set helpful? Let me know your thoughts in the comments below!
If you liked this tutorial, be sure to check out my other wood projects here.
Don’t forget to sign up for my newsletters! You’ll get inside tips on upcoming posts and additional behind the scenes details about what’s happening on the site!


Wow! Great play set built here. I love the idea of changing it in the future as your kids grow. Love it!
The only problem with modifying it in the future is we told the kids now that we would “one day” do it, so now they won’t stop asking for more… lesson learned!
Great job on this detailed DIY. I would love to have something like this for my children in the future… Especially if it’s modifiable as kids get older. Awesome stuff!! Thank you for sharing this.
My kids are loving it. It gets used daily, and it’s worth the effort! I really recommend it!
This is so great – outdoor play is so important for kids and giving them more opportunities is key! Thanks for sharing this, if we ever get a yard I will definitely get back to it! Thanks again!
It’s really a great investment so far. The kids are outside daily, and getting lots of exercise and fresh air. And they sleep great at the end of the day! I highly recommend it!
This is so timely for me. We are deciding between buying vs building. Thanks!
We thought about buying, and we even tried out a few sets out. But for the amount of money the pre-built sets were, it really didn’t seem worth it.. and they wouldn’t have supported three kids at once. We’re really happy with the new set, and kids are already looking forward to the future mods.
This is such a great way to spend money on a play set. They can get so expensive! Thanks for the detailed guide!
It really was worth it. And if it weren’t a pandemic, it would have been cheaper, it we probably wouldn’t have needed one anyways… completely worth it!
Very impressive Wooden Swing Set! I will share this with my father in law, I think it will be a perfect addition to our summer house!
I hope you convince him to make one! It’s been a great addition to our yard!
This is such a great idea! I keep looking at the sets online but we just can’t afford one, I mean who can?! This is a perfect frugal diy option.
It’s really great. The kids love it. And we have the option for upgrading and accessorizing as they grow and get bored. Worth its weight in gold!
This must be the most detailed DIY project I’ve read in ages! I’m impressed:)
Thanks! I was trying to have it make sense! I’m glad it did! And as a bonus, my kids are having a blast!
This actually looks really doable because you’ve broken it down so well! If I had the space, I’d totally give it a shot.
Thanks! The kids love it!
This is awesome.
Thanks so much!