Last week I posted a 3D paper carrot candy box because I thought it was cute and wanted to make it for my kids. And you may recall that I didn’t want to add more candy to Easter, but I did. And now, here I am, this week, doing the same thing… well, in that, I’m giving my kids more candy…. Just so we’re clear, my kids do eat more than just candy! But maybe the carrot isn’t for you! Maybe, you need a paper egg candy box! Everyone is different! And that is why I have made more than one Easter candy box! So, let’s get started making this Paper Egg Candy Box!
As an Amazon Associate, I earn from qualifying purchases. This post contains affiliate links. I may receive a commission if you purchase an item from one of my links. This will not change the price you pay.
Supplies Needed to make the Paper Egg Candy Box
This is a cute project and doesn’t require too many supplies, but there are a few things needed, so let’s review:
- 3D Paper Egg File – I have designed a 3D paper Egg file that you can get a copy of here.
- Cardstock – Each egg will need one sheet of paper. You can either do this with 8.5″ x 11″ or you can make this with 12″ x 12″ paper. Keep in mind, that the larger the paper, the larger the eggs will be. I opted to use Easter colors.
- Cutting Machine – I used my Cricut Explore Air 2. However, if you are not a Cricut user the file will work on any other cutting machine software.
- Cutting mats – Cutting mats are needed to cut cardstock on a Cricut Machine.
- Scoring Stylus or Scoring Wheel – If you have an Air Series Cricut Machine you will need a scoring stylus, if you have a Maker Series Machine you will need a scoring wheel.
- Glue – I use my Bearly Art Craft Glue. If you prefer, you can use double-sided tape instead.
- Crinkle cut paper – this is to stuff the egg and reduce the amount of candy required in the egg box.
- Treats – this is the final step to fill the egg once it is complete.
We all need more sweets in our lives, so let’s jump in and make this 3D paper egg candy box!
How to Make a 3D Paper Egg Candy Box
We all need a bit more sweet in our lives, so let’s jump in and make this 3D paper egg candy box!
Using the Paper Egg Candy Box SVG File
As I mentioned above, I have designed a file that you can use for this. You can get a copy of that file here.
Importing the Paper Egg Candy Box SVG File
Once you have the file saved to your computer, you will need to perform the following steps:
- Unzip the file –
- Right-click on the file with your mouse and select Unzip
- Select a location where you want the file to be saved.
- Hit Enter and your file will be unzipped and saved.
- Upload the file to Cricut Design Space.
- Select the Upload Icon on the left side of your screen.
- Select the Upload Image button.
- Select the File from the location where the file was saved from above.
- Select the file from your DS Recently Uploaded documents. There should be a green rectangle around it.
- Hit the Add to Canvas button.
Once the Paper Egg Candy Box SVG file is on your Design Space Canvas we can make some minor modifications so that the file cuts out perfectly on our Cricut.
Making the required modifications to the Paper Egg Candy Box SVG File
The SVG File I created for this project includes 2 eggs and 2 egg walls. One egg and wall is smaller than the other egg and wall. This is so they fit into each other.
Adjusting the File Size
Select the design that has been uploaded onto your Canvas. Before you do anything, we need to verify the size. Typically when I design files, Cricut likes to change the sizes.
If you plan to use 8.5″ x 11″ cardstock, you will need to change the width to be 13.5″.
If you plan to use 12″ x 12″ cardstock, you will need to change the width to be 14.5″.

Once the size is adjusted, we can select the Ungroup button. This will allow us to work with individual items.
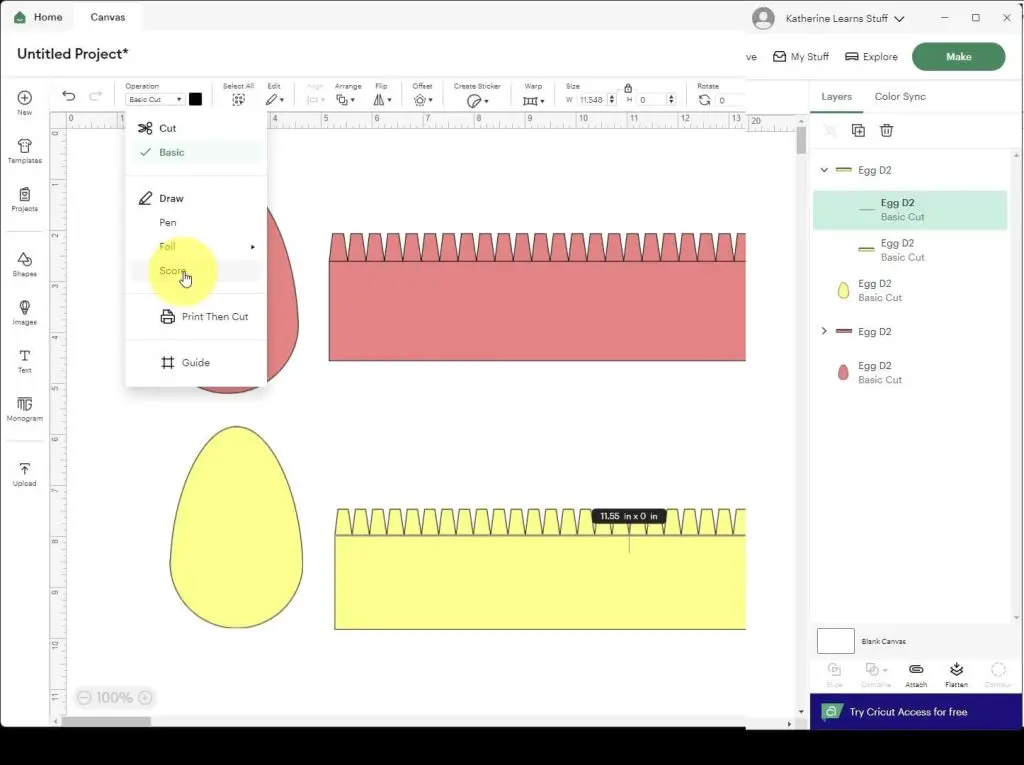
Attaching the Score Lines
In the Layers Panel on your right side, select the down arrow next to one of the eggs. This will open up all the elements that are part of the egg. Select the cut line that runs across the rectangle with teeth. Then, in your Operations menus, change the operation from Basic Cut to Score. Now, select the score line and the egg wall (rectangle with teeth), and click the Attach button to attach all the items together. This will ensure that the line is scored in the correct place on the egg wall. Repeat this for the second egg.
Now we are ready to cut out our design. Select the Make Button and let’s cut our design!
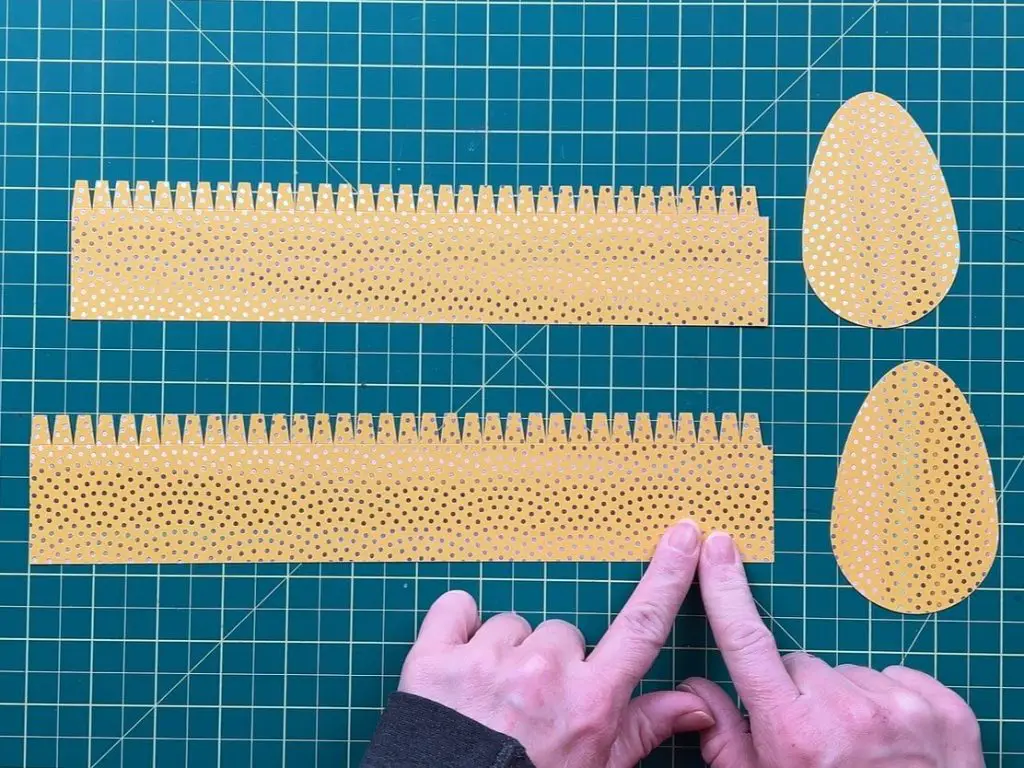
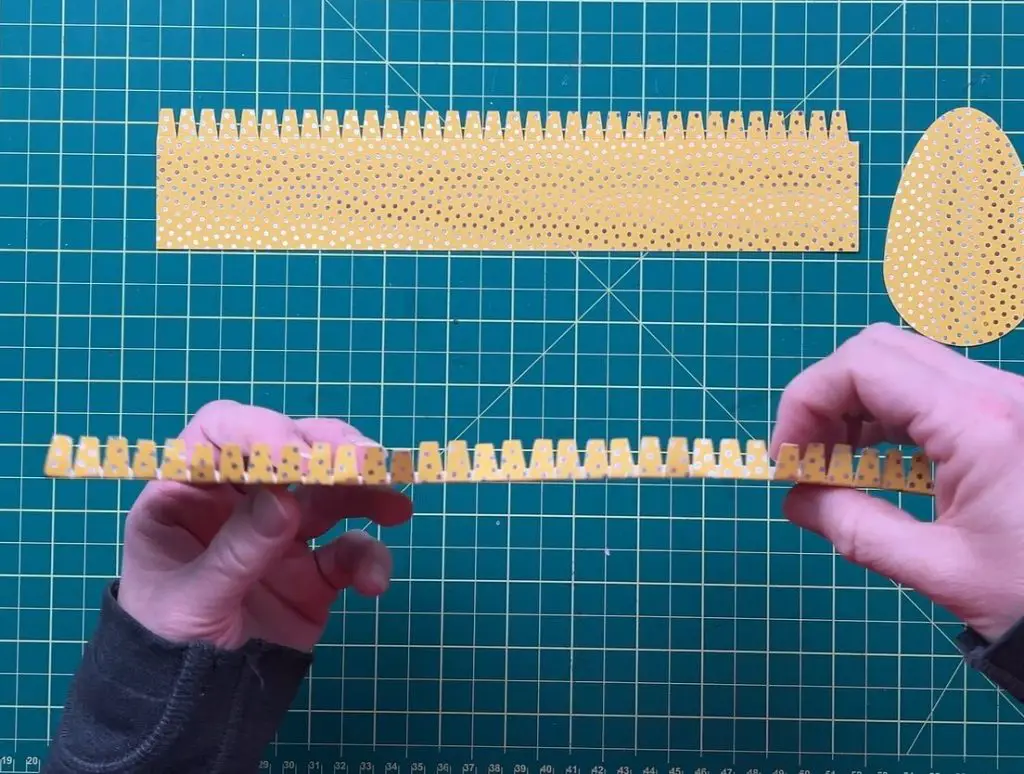
Review of the 3d paper Egg Candy Box Cut Pieces
Now that we have adjusted and cut out the design, you should have the following:
- 1 large egg,
- 1 small egg,
- 1 large egg wall with teeth and score line,
- 1 small egg. wall with teeth and score line
Building the 3D Paper Egg
Now that we have all our pieces cut out it is time to start assembling this cute egg candy box! And this is a simple one!
The one thing I want to point out before you start to assemble the 3D paper egg is that you need to know which 2 pieces are the larger and which two are the smaller egg. You don’t want to mess this up!
Fold the teeth back on the rectangles. You want the colorful side of the paper facing outwards.
Apply glue to several teeth of the egg wall. I recommend starting at the side edge of the egg, not the top or bottom as it is easier to start gluing along a straight surface.
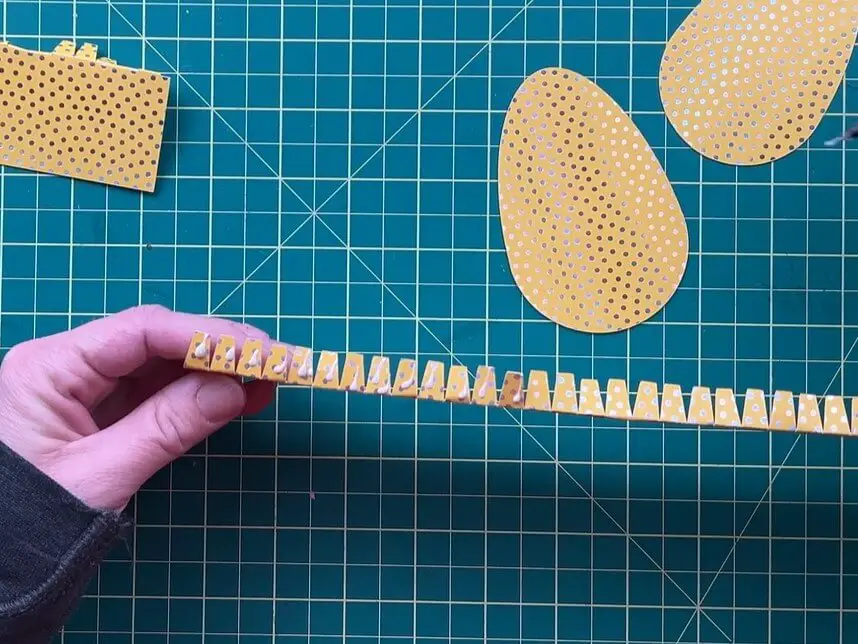
Press the teeth of the wall against the back of the egg. Then, slowly apply more glue to the teeth and work around the egg until you have glued the whole egg and wall together.
There is an overlap section on the wall. This is there on purpose. Apply glue to the overlap to help secure the egg wall shut.
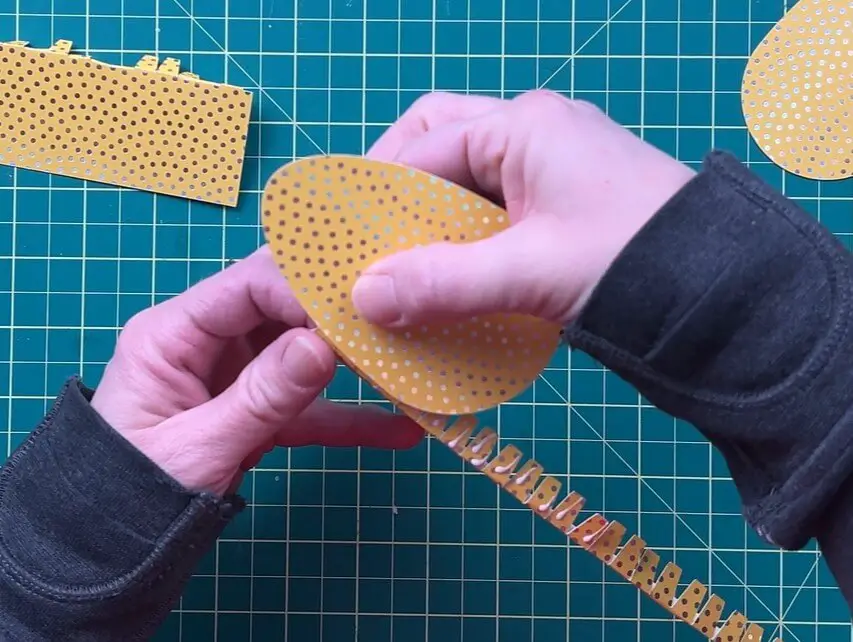
Repeat this for the second half of the egg candy box.
Fill your Paper Egg Candy Box with Easter Treats!
Now that the paper egg candy box is complete, it is time to fill it with treats!
I like to fill the bottom half of the egg which is the smaller of the two pieces. Place some crinkle paper inside and then top it with a few treats.
If you want to fill the whole egg with treats, I will not judge you. But I prefer to fill the egg with crinkle paper to reduce the amount of candy that goes into it.
Once the egg is full to your liking, place the larger half on top of the smaller half, and your easter egg candy box is complete!
And there you have it! Your 3D Paper Egg Candy Box is Complete!

Things I learned along the way while making a 3D paper egg
This was a cute and quick project, but that doesn’t mean I didn’t learn anything. So, let’s review what I learned:
- Working with the egg shape can be a bit of a challenge for many reasons. As it is almost all curved sides, gluing the walls in the correct spot can be challenging sometimes. I found that staying close to the egg edges was not always easy.
- When I designed the egg walls, I initially made the teeth much larger. This proved to be a problem. When trying to glue the wall to the egg’s face, the teeth caused the wall to look jagged and boxy because the teeth were fatter than the curve of the egg.
- Flipping the egg upside-down, with the design facing downwards, made gluing the wall easier as I could press it all down against my work table.
- The top egg is larger than the bottom egg. If you glue the small egg too tight or glue the large egg too loose, the box may be loose overall but will still be fully functional. I have left the sizes the way they are to allow a good fit no matter how off you are when gluing.
Did you enjoy making this Easter Craft?
Did you enjoy making this paper egg candy box? Let me know if you tried it out and how it turned out! If you have any suggestions on how to make this better, let me know!
Don’t forget you can grab my design file here.
If you enjoyed this paper craft, check out my other Paper Project Here.
You can also check out my other Easter Projects Here.