Why is Outdoor storage Necessary ?
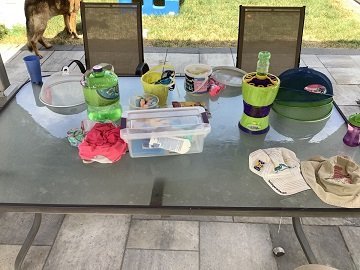
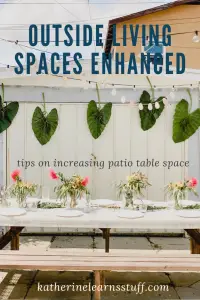
I love to spend time outside in the summer. I love to eat breakfast, lunch and dinner on the back patio table every chance I get. But having three kids, there is always a ton of junk on the patio table, from sunscreen, hats, bubbles, bug screens, and more. All these items are essential to have outdoors and handy, but on top of the patio table is not the right place for them. So, I decided it was necessary to DIY a patio table shelf. And as you can see from my patio table picture, I desperately needed some outdoor storage!
what you need for a DIY Patio Table Shelf:
- Metal Frame Patio table – You can do this with any patio table, however, metal tables already have a support structure within the frame that will support the shelf.
- Large scrap piece of wood (or you can go and buy one specifically for this) – I used a scrap piece of melamine board I had in the garage, just waiting for my next project.
- Saw for cutting wood – either table, circular or old school hand saw.
Let’s Begin improving outdoor storage Space!
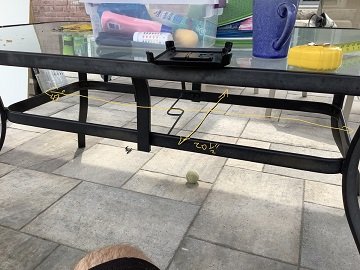
Measure the Patio Table Frame
First, you need to measure the metal frame underneath the table. Each table has slightly different sizes, so you need to measure yourself.
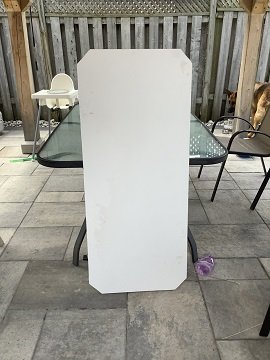
The dimensions of my patio table frame were 20.5″x 47″. This is the measurement to the outside of the frame. If you measure the inside of the frame, you will have wobbling and an unstable shelf.
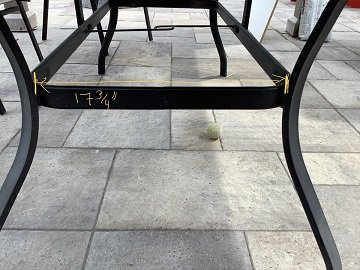
My melamine board will need notches cut out at all four corners to account for the legs. On my table, the internal distance between the legs, width-wise, is 17-3/4″.
As I mentioned, I had a 3/4″ piece of melamine board leftover from a previous project. It was large enough to use for this project. It only needed two cuts and it would be the correct size to fit under my patio table.
Cut the Patio Table Storage Shelf
Before I cut, I like to do one final measurement. You cannot fix a cut if it is too small. It will waste the whole piece of board. If you cut it too large, you can still cut more off. So, do one more measurement check, just in case.
Now we are ready to cut!
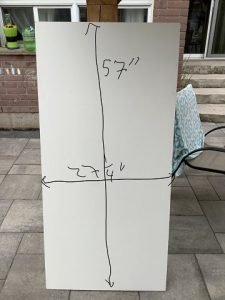
The first two cuts will remove the excess length and width of the board. In my case, it was to make the shelf board 20.5″x 47″ from 27-1/4″ x 57″. I used a table saw for this, but any other saw would have worked.
Once I was happy with the size, I needed to add some notches at all four corners. The width of the board was 20.5″, and the inner width of the notched location was 17-3/4″. Leaving a 2-3/4″ difference. So each notch would need to be half of that. But to be safe, I made each notch a 2″ triangle (2″ off the lengths, and 2″ off the width).
Install the Patio Table Shelf
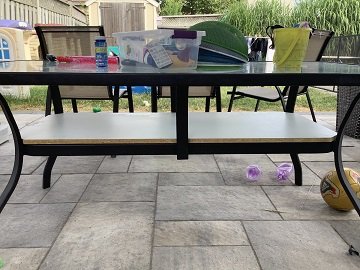
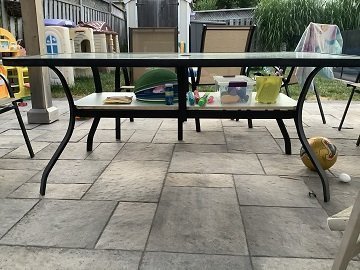
This is the easy step! Install the board under the table. You may need to have it on an angle to get it through the gap but otherwise, it should fit smoothly!
And That’s It! You’re Done your DIY Patio Table Shelf!
Frequently Asked Questions when Installing a DIY Patio Table Shelf
Do you need to cut notches into the corners of the shelf board?
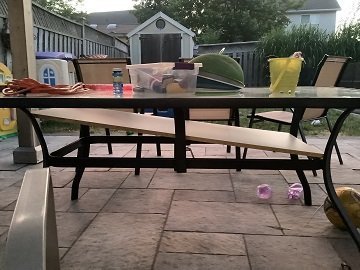
If you do not cut notches into the corners of the board, it will not fit under than table. The legs of the table will interfere, and the shelf will be angled similar to my photo. The board will not fit.
You can avoid using notches altogether by reducing the width of the board. Simply use the inner dimensions of the legs and leave the length. This will only give the shelf support on two sides of the frame, allowing it to wobble and more around more.
What Material is best for the patio table shelf?
This all depends on:
- Where is your table located? Under a patio? Or in the middle of the yard?
- How much rain exposure is there?
- Is the umbrella hole open, allowing water to drop down?
If the table and shelf are going to be exposed to a lot of water, there is no “best” material. All wood products will deteriorate over time.
If the umbrella hole is sealed and doesn’t exist, MDF, melamine or even plywood will work just fine, as typically, rain doesn’t go up but down.
Do you need to Do any Finishing Touches to the Patio Table Shelf?
I used melamine, so the top and bottom surfaces already had a nice white finish. You can use melamine finishing tape around the cut edges to give it a nice finish and reduce exposure to the elements. I haven’t gotten around to doing it yet, and probably never will.
If you use particleboard it is a good idea to paint it with a sealer to help it retain its lifespan.
How long does a Patio Table Shelf Last?
Like any furniture, you need to keep it clean and dry to help it last longer. If you have snow in the winter, you need to cover it or put it away.
I have had my patio table shelf for 4 years now, and the melamine is still in perfect condition. But it does not get winter-worn, and it stays dry during the summer, even with all the humidity that we get.
Did you find this Tutorial Helpful?
Was this DIY Patio Table Shelf tutorial helpful? Did you try it? Did it work out? Let me know in the comments below.
Don’t forget to check out my other tutorials here!


This is super insightful and helpful for someone who’s not so great at this kind of thing. Thanks so much for sharing the deets!
Thanks!
Great idea! I will have to try this!
This is a superb idea! Especially with everyone wanting to get outside right now.
This is a really cool idea! I love that there are people like you who can put these ideas out there for people like me with no imagination. 🙂
Very clever idea! And great way to store items that won’t fit on top! thanks for the inspiration
This patio decor looks so amazing
Great tutorial that looks achievable!
That is such an amazing idea. I love it.
This is a fantastic DIY idea!
Clever idea to create more space and storage! I love using scraps from other projects…but if you had to purchase something new, pressure-treated plywood would be great for outdoor use. You could even stain it to match your deck or fence, etc.
What a smart and brilliant idea !!!
Great tutorial to have a step by step guide, Thanks for sharing this :))