Several months ago, I invested in a 3D printer. I have been printing up a storm of useful and useless items. And with all this printing, I started making some homemade Halloween decorations. But if you know anything about 3D printing, even a simple print can take a long time. So, even though I purchased all these cool fluorescent filaments, the time it takes to make a simple flat skull can be 4-8 hours, depending on the size. Now, for the most part, these are set-it-and-forget-it prints, but not always, and I end up having to play around with them and ultimately waste a lot of time. The time that could otherwise have been used to make quick Halloween decorations in no time flat. I also decided to buy some fluorescent paint and use simple cardboard, rocks and dollar store decorations to paint and see how they fluoresce, as compared to 3D Printed fluorescent decorations.. And here are the journey and the results of my homemade fluorescent Halloween decorations.
As an Amazon Associate, I earn from qualifying purchases. This post contains affiliate links. I may receive a commission if you purchase an item from one of my links. This will not change the price you pay.
Items used for homemade fluorescent halloween decorations
- Fluorescent paint: I purchased some fluorescent acrylic paint on amazon. This is the brand of acrylic paint I use for all my crafts, so I went with this brand. But there are lots of other brands that may also work very well. The 6 pack I bought had a nice variety of colors.
- Leftover cardboard – Any random leftover cardboard from other projects, cereal boxes, and (of course) amazon deliveries.
- Rocks – just a handful of hand-sized rocks from the garden.
- 3D Printer – I used my Prusa 3D Printer
- Fluorescent PLA filament – from the local 3D print shop, but you can buy it online here.
- Black lights – I bought these a few years back, and they work like a charm! They are super strong and bright. (And I am sure they will blind you if you look at them for too long).
Fluorescent Paint
With fluorescent paint, I focused on working with easy-to-find items around the house. Ideally, things that can be up-cycled, take up little storage space, or will not be a shame to throw it out at the end of the season. So we focused on rocks and cardboard, and I threw on some dollar store decorations for fun, as they are always readily available.
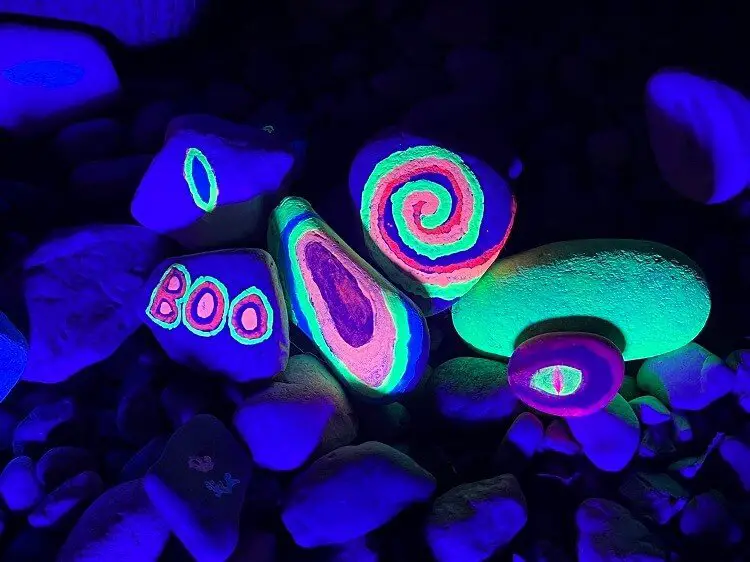
Homemade Fluorescent Rock Halloween Decorations
I have a rock garden out front of my house, and it is literally just a bed of potato stones that spans a portion of my front yard, so I have an abundance of rocks.
We quickly grabbed a few and tried painting them with fluorescent paint. This was a pretty quick activity as the acrylic paint dries fast, so we could do several layers and multiple colors in a short time.
Pros Of Fluorescent Rock Halloween Decorations
- Supplies are basically free,
- We have an abundance of them,
- They can be decorations out front or back all year around.
Cons Of Fluorescent Rock Halloween Decorations
- Rocks are limited to lying on the ground or on the stairs,
- Hard to see in the grass,
- Can stay outside all year, but the paint will fade and need another application the following year.
End Results of Fluorescent Rocks
We like the idea of them and will make some more in years to come, but this will not be our go-to homemade fluorescent Halloween decorations. This is what our rocks look like under black lights.
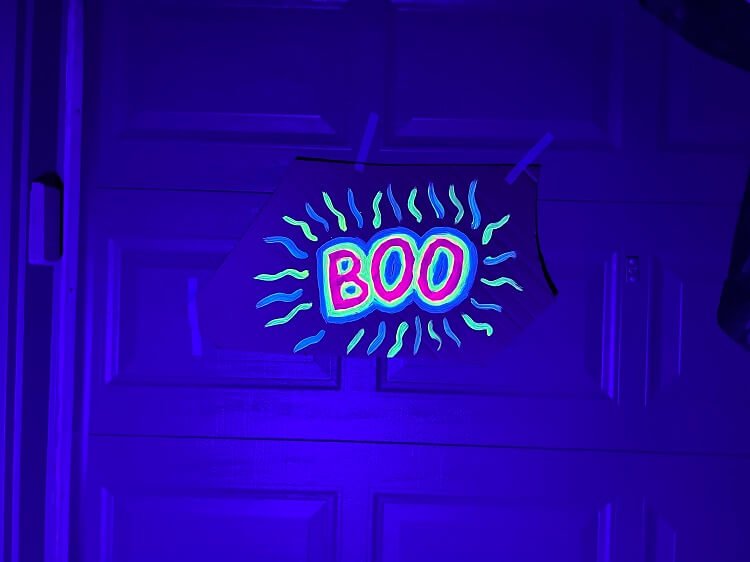
Homemade fluorescent cardboard decorations
Cardboard is readily available at my house. And we use it for a lot of crafts, so we are accustomed to using it. Thick or thin cardboard both work for this activity.
Pros Of Fluorescent Cardboard Halloween Decorations
- Cardboard is readily available all the time,
- It can be recycled (or thrown out) at the end of the season,
- It is quick to work with,
- Paint adheres quickly and nicely,
- The paint dries quickly on the cardboard,
- Can be stored for years and takes up minimal space.
Cons Of Fluorescent Cardboard Halloween Decorations
- For the most part, it looks cheap, especially if your painting skills are not great,
- You have to paint the whole front face to make it look nice. It does not need to be with fluorescent paint, but it needs paint,
- The edges and sides need to be pained as well.
End Results of Fluorescent Cardboard
I do not like the look of it, but I think this is more to do with my painting skills than what it could look like if I was a better painter. We will still keep using this method and hopefully, over time, become better painters.
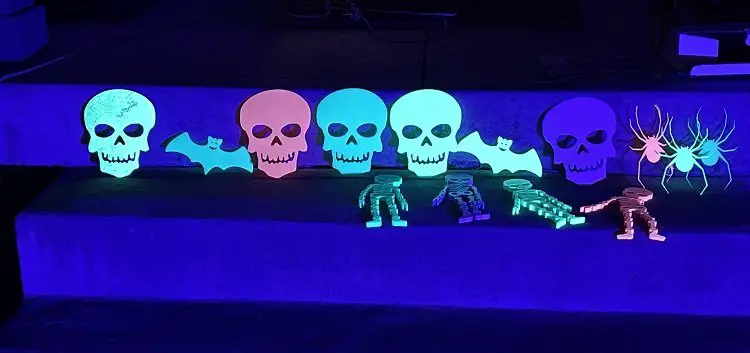
Homemade fluorescent 3D printed Decorations
Admittedly, this one is a bit more challenging because not everyone has a 3D printer, but they seem to be gaining popularity, so you may have access to a 3D printer. Printing 3D Halloween decorations is fun, and there are hundreds and thousands of free designs to be found. I get most of my free designs here. Then all you need to do is get fluorescent filament, and you are ready to make homemade fluorescent 3D Printed Decorations
Pros Of Fluorescent 3D printed Halloween Decorations
- There is an abundance of free designs available,
- You can design your own decorations and have very unique items,
- Decorations can be in fluorescent filament or just standard, glow in the dark or other.
Cons Of Fluorescent 3D printed Halloween Decorations
- Printing in 3D takes time. Even the simplest of designs can take hours to make,
- You need to have a 3D printer which can be expensive,
- You need to learn how to manage new 3D printing software.
End Results of 3D Printed Fluorescent decorations
I have created multiple 3D-printed fluorescent decorations, and I think they are great. The only main concern is how long it takes to print them all. Will I do it again? Absolutely, I am still printing more as we speak. Fortunately, I have enough time left before Halloween to get them done.
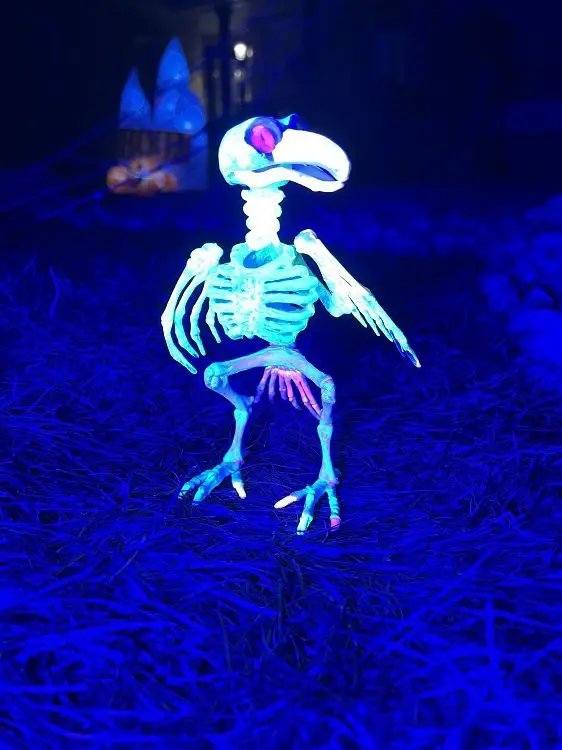
Fluorescent Painted Dollar Store Decorations
I love the dollar store. They always have odds and ends needed for any season, and they always have a great selection of Halloween decorations, be it skulls, skeletons, body parts or weird animals, they have it all. And with a little bit of fluorescent paint, they can look amazing!
Pros Of Fluorescent Painted Dollar Store Halloween Decorations
- Dollar stores have a great variety of inexpensive decorations.
- Adding fluorescent accent paint to these decorations is quick and easy.
- You do not have to be very creative, as the designs are already made for you.
Cons Of Fluorescent Painted Dollar Store Halloween Decorations
- You are limited to the decorations that are available at your local dollar store.
- You need to plan for this in advance as oftentimes these decorations get sold out quickly.
- May other people will have similar decorations as you.
End Results for Fluorescent Painted Dollar Store Decorations
This is my favorite way to decorate my house for Halloween. The dollar store decorations are right on point, and adding some accent paints is quick and effective. And honestly, I think these items look great.
Final Thoughts on Homemade Fluorescent Decorations
I love the look of the glowing fluorescent colors at night on Halloween. They really catch everyone’s attention and can add great creepy details to decorations. We add fluorescent paint to decorations every year and make new ones every year as well.
My favorite, by far, is painting inexpensive dollar store decorations. This is like a combination of 3D printed items (which you do not need to print) that can be customized with fluorescent paint.
Painted rocks will keep growing, and the ones from years passed will stay.
Although 3D Printed fluorescent decorations are fun, they are time-consuming and can be costly at the end of the day, I will finish printing off this year’s batch, and we will see what next year bring.
And finally, we paint cardboard signs every year, they always look cheap, but we still work with them.
Frequently Asked Questions about Fluorescent decorations
How far away do you need to have blacklights for fluorescent to work?
With the paints and lights I have used, we can get good fluorescent flow up to 25ft. Further than that, the objects painted need to be larger for them to have a better impact. Small decorations will still produce a glow, but do not stand out as much.
Can you use glow-in the dark paint instead of fluorescent paint?
Yes, you can, the only difference is that you will not need to use a black light to allow the paint to glow. You will need to have very little light. But you will need to charge the glow-in-the-dark paint beforehand. Either by having it outside all day or shining bright lights at them beforehand. Very few glow-in-the-dark paints will glow without a charge first.
Fluorescent lights vs Black Lights for Halloween Decorations
If you are using fluorescent paint, you need to use Black lights to make the fluorescents shine. Fluorescent lights are the things you have in office building and some homes.
Did you find this post helpful?
Was this post helpful? Did you learn anything? Make sure to share your comments below! And let me know if you tried making homemade fluorescent Halloween decorations as well!
If you liked this Halloween post, be sure to check out some of my other Halloween posts: