Easter is always fun for kids, and there is always lots of chocolate, but what if you don’t want more chocolate? Didn’t we get chocolates on Valentine’s Day? Well, why not skip the chocolate and make a Hoppy Easter Shaker card? Well, that’s what we are doing today, so let’s jump in!
As an Amazon Associate, I earn from qualifying purchases. This post contains affiliate links. I may receive a commission if you purchase an item from one of my links. This will not change the price you pay.
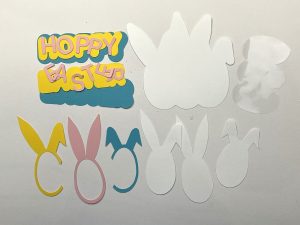
Supplies Needed
Shaker cards always need a bit more work and a few more supplies. Today we are also designing these cards, so there is much to do. Let’s review what we need:
- Design program – I’m using Design Space for my Cricut. I only use the free shapes and fonts that I have in my system so that I do not have to pay extra for them. So, basically, we will design a free Hoppy Easter shaker card. If designing in Design Space is not your thing, you can use any other design programs to help. My other go-to design programs are Vectornator for my iPad, and Inkscape when on my computer. If you don’t have time to design this card, don’t worry! I have recreated this file and you can get a copy of it here.
- Card Stock – For this card, we want spring colors, vibrant colors, pastels, and anything that reminds you of spring! I’m using pink, green, white, blue and yellow.
- Glue – I use Bearly Art Craft Glue – This is my go-to glue for cardstock since it dries quickly and doesn’t leave stains when dry.
- Double-Sided Foam Tape – For the shaker card to work you need some thick tape to provide a gap between the cardstock and clear sheets.
- Gems/Glitter/Confetti – As the name suggests, a shaker card needs to shake. You can use gems, glitter, confetti, or whatever you like. Using themed confetti is always fun as well.
- Cutting Machine – I use my Cricut Explore Air 2, but you can use any Cricut model. If you are not a Cricut fan, you can use any other cutting machine such as a Silhouette.
- Acetate Sheet – Shaker cards need a clear window to allow the glitter and gems to stay in place and be visible. You can use any number of supplies to create this clear window. In the past, I have used zip-lock freezer bags, paper protector sheets, acetate sheets for crafts, and acetate sheets for baking. So long as it is clear you can use it.
- An Envelope – As with any card, you need an envelope. We are not going to do that here, however, you can watch these videos where I walk you through how to fold envelopes and how to make a simple envelope for free. Or you can buy large card envelopes here.
- You will require approximately 40 minutes to design and assemble the card.
Let’s design our Hoppy Easter Shaker Card
Don’t have time to design the card from scratch? Don’t worry! I have recreated this file and you can get a copy here.
You can jump to the assembly of this card by clicking here.
How to Design the Card
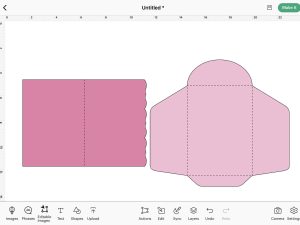
There are two simple ways that you can design the card backing. What I mean by this, is the part of the card that opens and closes, the large cardstock pieces that are the card body.
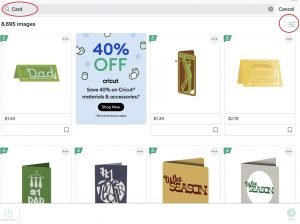
Free Card Template from Design Space
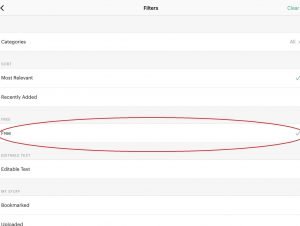
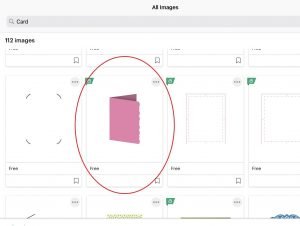
There is a really nice and simple card template available in Design Space, for free. All you need to do is select Images, type Card in the search menu, and use the filter to filter for FREE projects, and you will find a simple card as seen below.
Remember that the free templates in Design Space are not always free. Sometimes a different similar one will be free instead.
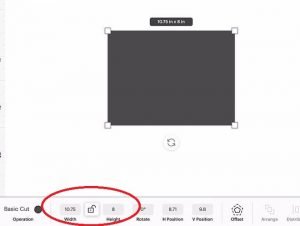
You will need to ungroup the card and envelope and modify the card to be 10.75″ wide by 8″ high. The envelop that is included in this design will not work with a card this size unless you have 12″x24″ cardstock or paper that you want to use to make an envelope. If that is the case, you will need to increase the envelope as well.
Also, the card that I am showing below is the one that is currently free, but there are always one or two different available color cards, so you may not find this exact one.
You can design your own card Template
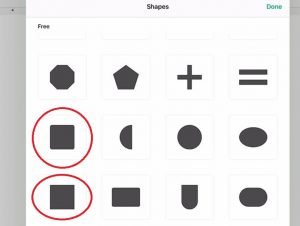
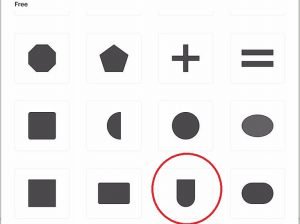
You can easily design your own template as well. All you need to do is select SHAPES and then select either the square with rounded or pointed corners.
Select the EDIT menu, and change the dimension of the square to 10.75″ wide by 8″ high. You will need to make sure that the dimensions are unlocked so that you can change them separately.
Now, pulling in a Score line from the SHAPES menu, increase the size to 8″ in height, and center it on the rectangle. Make sure to Attach the score line to the rectangle so that it scores in the correct place during the cutting process.

How to Design an Egg in Design Space
I often like to overcomplicate my projects and designs. When creating the eggs for this card, that is exactly what I did. But don’t worry, I review the simple and complicated ways to design an egg. You can pick which you prefer to follow.
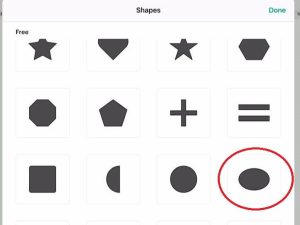
1. Simple Egg Design – Oval Egg
Go into the SHAPES menu, and select an oval. Your Egg shape is done. Your Egg is done.
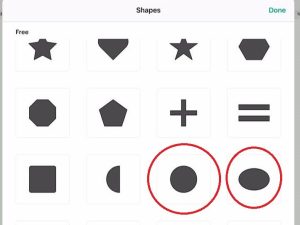
2. Complicated Egg Design – Egg-Shaped Egg
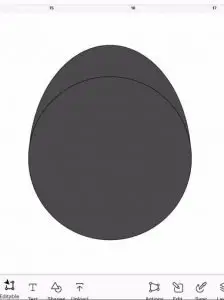
Go into the SHAPES menu, and select a circle and an oval.
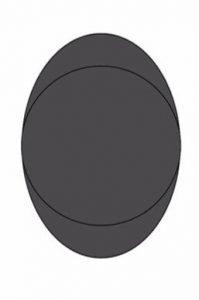
Lock your dimensions so that the circle and oval stay symmetric. Change your circle to have a diameter of 2″, change your oval to be 1.99″ (fat) by 2.82″ long, and finally, rotate the oval by 90 degrees. You want the oval to be slightly less fat than the circle.
Align the circle on top of the oval, and center it vertically and horizontally. Using your SLICE function, slice the circle out of the oval. Your oval will now be a top and bottom piece (one piece together), a left and right surplus piece. You can delete the surplus piece. And you will have 2 circles that are no longer 100% round. Delete both of these.
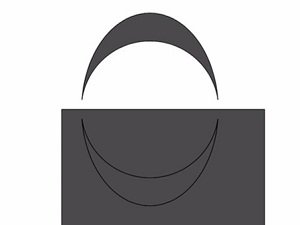
Bring in a square, place it on top of the bottom half of the oval pieces, SLICE, and then delete. All you should have left is a top portion of the oval.
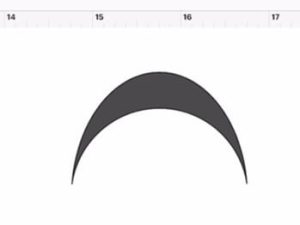
From your SHAPES menu, bring in another circle and make the size 2″ in diameter.
Bring the oval and circle together and match them up as best as you can. And WELD them together.
Your egg is now egg-shaped and not an oval.
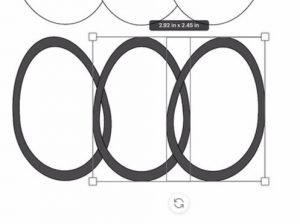
Sizing your Egg
Now you can modify this egg by unlocking the dimensions. You can increase or decrease the size to your liking. I made my egg 1.65″ wide by 2.45″ high.
Regardless of which way you made your egg once you are happy with the size, make sure you create a DUPLICATE and place it off to the side for later. This is there in case we mess something up along the way.
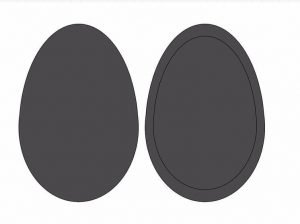
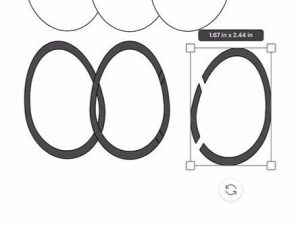
Making the Egg Outline
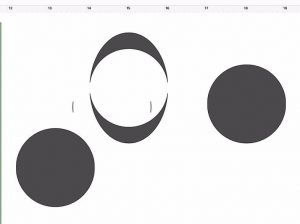
Ok, since we are making a shaker card, we need to make an outline for our egg. Make 2 duplicates of the egg that we just designed.
Make sure that the dimensions are locked, select one of the eggs and reduce the size to be smaller than the original egg. You want to have a nice outline around the egg. In my case, the egg was reduced to 1.43″ by 2.12″.
Center the smaller egg on top of the second duplicate egg, center vertically and horizontally. Select both eggs and SLICE them apart. Now you can delete the inner 2 eggs, and you are left with an outline for the egg.
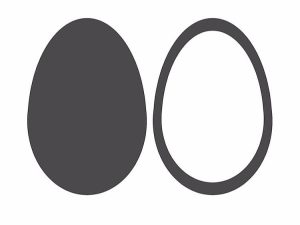
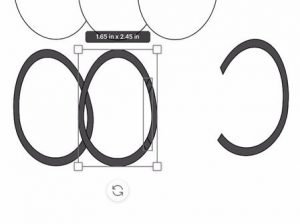
Duplicate Your Egg Pieces and Arrange
For this design, we will need 3 eggs, so we can duplicate the egg and the outline two times each.
Now, arrange the eggs beside each other, to appear the way you want them. You can just place them next to each other, have some small overlap, or even rotate them a bit.
For my design, I slightly rotated the left and right eggs and had a small overlap of the eggs.
Move the outlines out of the way, select the 3 full eggs and weld them together. It is best to have this done now, instead of later. Also, change the color to white.
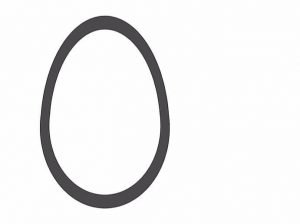
Slice Egg Outline
As I mentioned above, my eggs are overlapping, so I will need to slice out the eggs’ outline in the area where they overlap.
Using 2 egg outlines at a time, SLICE apart the overlapping portion. The surplus egg outline from one of the eggs will need to be sliced again with an oval to remove it entirely. The other egg will need to have the sliced portion welded back on.

Repeat this for the other 2 overlapping eggs.
You now have 3 egg outlines that are cut to allow for our design.
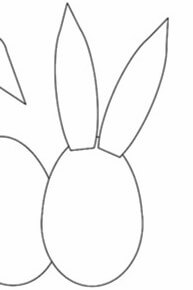
How to Design Bunny Ears In Design Space
Designing a Floppy Bunny Ear
Using the SHAPES menu, select a small pointy triangle and the long half-circle.
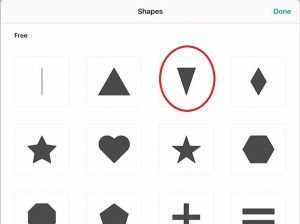
Flip half circle piece by 180 degrees, so that the round part is facing up.
Bring the triangle over top of the circle portion, with the point facing down, and rotate the triangle so that it is on about a 45-55-degree angle. And modify the size of the half circle, so that it is a bit longer and more narrow.
Once you are happy with the shape, weld them together.
We will modify the final shape and size of this later when it gets onto the eggs.
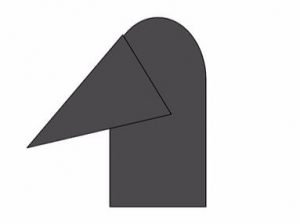
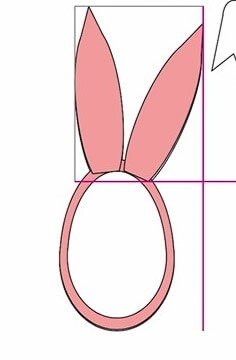
Designing a Straight Bunny Ear
Using the SHAPES Menu, select the pointy triangle and the oval.
Rotate the oval 90 degrees so it is the long way up, and the triangle by 180 degrees so the point is up.
Unlock the dimensions so you can change them asymmetrically. Reduce the size of the triangle so that it is a fat-ish triangle where the point can almost line up with the roundness of the oval. In my case, I reduced the size to 1.18″ in width and 0.95 inches in height. This dimension works with an oval that is 3.68″ long and 1.73 inches wide.
Now weld these two pieces together.
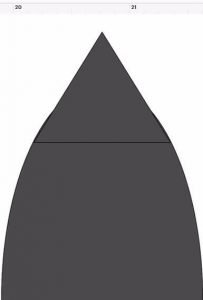
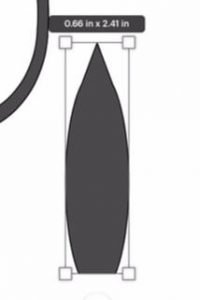
Bring in a square and SLICE off the bottom of the oval, close to the bottom of the oval, where it rounds back up. Delete the surplus bottom pieces. Modify the size as you like to make it longer and more slender. In my case, that was 0.66″ wide by 2.41 inches high.
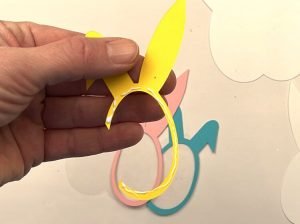
Combining the Eggs and Ears – Making Eggs into Bunnies
Duplicate the straight and flopsy ears so that you have 3 of each ear, for a total of 6 ears.
Change the color to white so that they match the background of the eggs.
Working with one set of ears at a time and the 3 welded egg pieces from above, arrange the ears over the eggs, and move them around to modify the size a bit to make them look like ears. Once happy with the layout, copy the ears and put them to the size. Weld the 2 white ears to the egg.
Match the egg outline to the one on the 3 welded eggs to make sure you are matching up the correct egg with the correct ears. Line up the egg with ears so that it is in the correct location, and place the ears on top as well. Now, select the outline and the duplicate ears and WELD them together. This is one bunny.

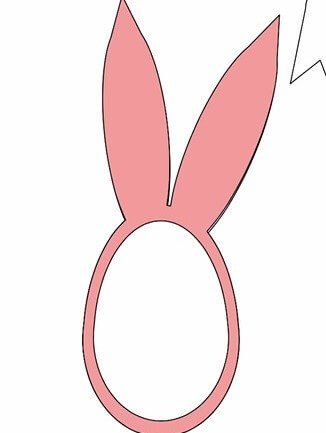
Repeat that for the other 2 eggs.
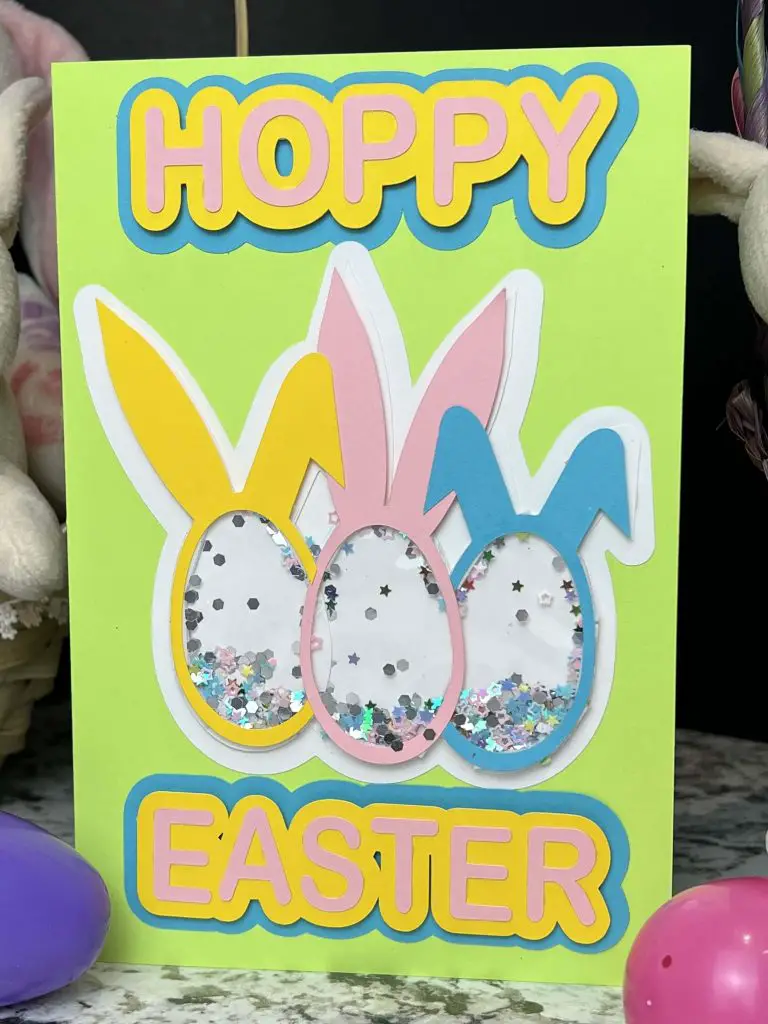
Change the color of the outlines as you like. In my case, I made the eggs, Blue, Pink and Yellow.
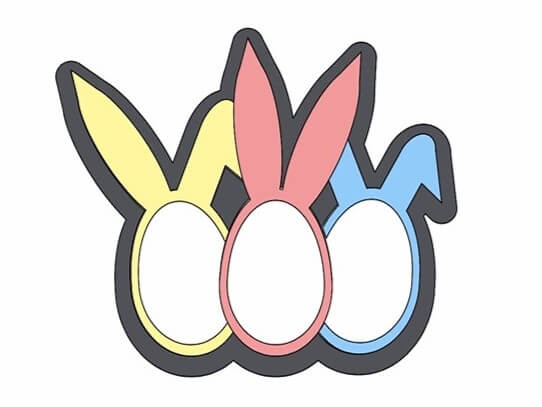
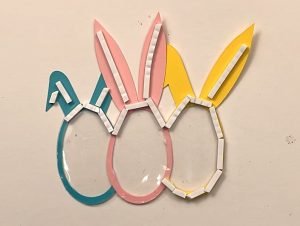
Arranging the Bunnies for the Shaker Card
There were a lot of pieces in play, so let’s do a sanity check on our Bunnies and make sure we have enough pieces and that everything fits.
Bring the welded bunnies together and place the bunny outlines on top. Make sure you have 1 background and 3 bunny outlines, and make sure they fit.
Select the back bunnies (the welded piece) and DUPLICATE it. This will be your acetate piece, change it to a color that you are not using in this project so you know it is different.
Also, if you want, again, select your back bunnies (the welded 3 bunny piece) and create an offset of this. This will give your bunnies more depth on the card. Make this white as well.
How to design Layered Text in Design Space
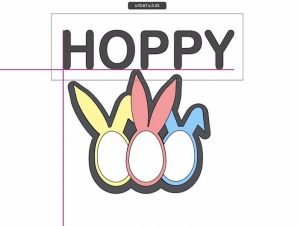
For this card, the phrase on the front will say HOPPY EASTER.
Select your TEXT function and select a text. I used Arial Rounded MT BOLD as it is a free font and I think it looks nice for a simple card.
With the Text function, write HOPPY, and then select the Text Function again, and write EASTER. You want this as two separate texts as one will be on top of the bunnies and one will be below.
Place the text above and below the bunnies to see how the size looks. Adjust the size as needed so that it looks nice.
Once happy with the size, select HOPPY. Using the OFFSET function, make an outline around the letters. Do the same for EASTER. Make sure you use the same offset distance. I used 0.273 for the first one. This was so that there would be no holes in the Ps.
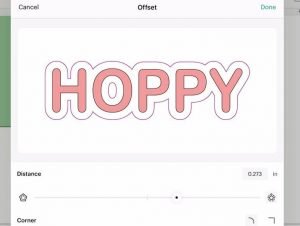
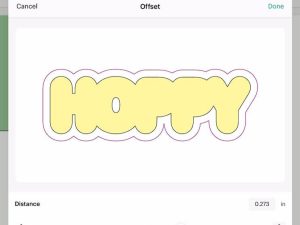
Now, select the offset that you created for HOPPY, and make another offset of that. And the same for the EASTER Offset.
I recommend doing the offsets for each word one after another, and not all the offsets for one word at a time, in case you change any dimensions. You want the offsets on top and bottom to be the same.
Change the colors of the text and offsets to your liking. I change mine to match the eggs, blue, pink and yellow.
Check the Design of your Hoppy Easter Card
Ok, now that all of our pieces are done, we want to lay them out so that they fit on the card.
Words – HOPPY EASTER – each with 2 offsets.
White Bunny Background – 1 offset, 3 bunnies welded together
bunnies – one left, one right, and one center.
Extra bunny background – this is for your acetate.
Card with a score line
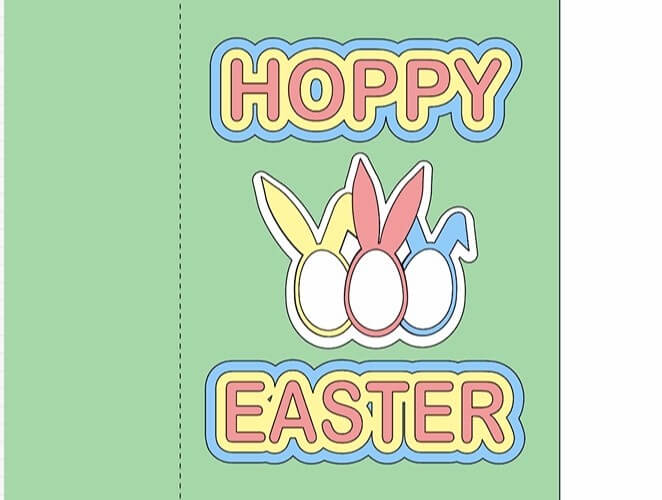
If you have all of these pieces, and everything fits on the card, you are ready to hit MAKE IT, and cut out the pieces of your Hoppy Easter Shaker Card.
I know that reading about design can be difficult, I tried my best. If you prefer to watch a video on how to design this card, I have one ready for you – you can watch it here.
Don’t have time to design the card from scratch? Don’t worry! I have recreated this file and you can get a copy of it here.
Assemble your Hoppy Easter Shaker Card
Now that all of your pieces are cut, it is time to start the assembly!
Let’s start with the hardest part first and work our way to an easy finish. So, let’s start putting the bunny shaker together first.
Assemble the Bunny Shaker
For the Easter Bunny assembly, we will be working with
- 3 bunny outlines – in 3 colors
- 1 x 3 welded bunnies – in white (my image has 3 separate white bunnies)
- 1 x welded bunny offset
- glitter
- foam tape
- acetate sheet of 3 welded bunnies
- glue
We will be working from the top down when assembling the shaker portion.
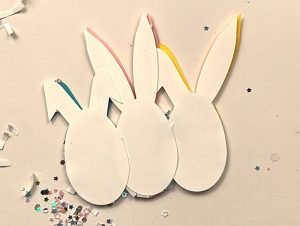
Before you glue, verify the direction of the bunnies on the acetate sheet and the white backing. You want them all facing in the same direction before you glue anything.
Glue your 3 bunnies (the 3 separate color bunny pieces) onto the acetate piece. In my case, I use heavy-duty sheet protectors instead as I don’t have acetate sheets on hand. This works well. Once all 3 bunnies are on the acetate, place them under a book to let them dry.
Once dry, using your double-sided foam tape, apply tape around the edges of the bunnies. You do not need to apply tape in the center/over-lapping section as you want the shaker to be open inside. Also, apply double-sided tape to the ears so that they have depth in them. Do not remove the tape protector off the second side of the tape yet.
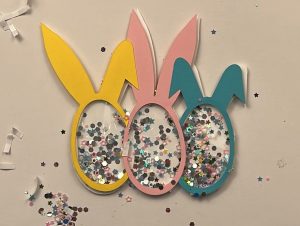
Input the glitter and confetti into the shaker area.

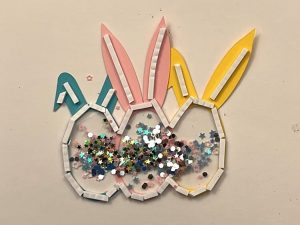
Now, take off the tape protection sheet. CAREFULLY. Try not to move the shaker as the confetti and glitter will go flying and cover the tape and your work area. Trust me, I know.
Once all of the tape is exposed, apply the white backing onto the shaker.
Now you can glue the offset onto the shaker, and the shaker portion of your card is done. Give it a shake, you know you want to.
Assemble the Text
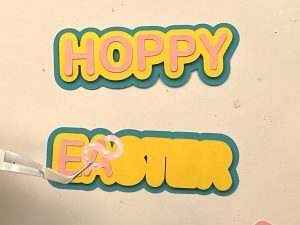
When working with cardstock for letters, I like to start with the back and work to the top.
I used double-sided tape to attach the two offsets together. This allows there to be more depth to the words. Then, glue the individual letters onto the top offset.
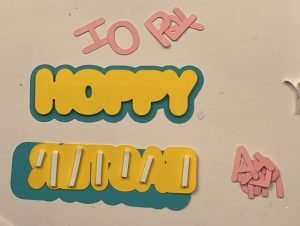
With the Bearly Art Craft Glue, I find that it dries really fast, so I don’t need to place it under a book to dry while working on it. It does help to have tweezers when applying the top letters and using the fine point on the glue.
Combine all the card pieces
Once all the pieces are dry, place them on the card – WITHOUT glue. Arrange them so they fit where you like, and then apply glue and one piece at a time.
And That’s it! Your Hoppy Easter Shaker Card is done!
Things I learned Along the way – Tips for Making a Hoppy Easter Shaker Card
- Not all eggs are equal. I am a bit of a perfectionist, so I decided to design a more complicated egg. This is not needed, but for me, it matters. But a simple oval egg is just as good and much faster.
- When I first made this card I had 3 separate bunny backings. This was a mistake. It made it much harder to design, and much harder to assemble. That is why in my design details above I recommend welding the 3 bunny outlines together. And that is why some of my pictures don’t completely line up. Sorry!
- Size matters! Making a small card is not ideal for making a shaker card. They are hard to work with and provide very little space for adding in the beads, glitter and confetti to make the card amazing. You CAN make a small shaker card, but I do not recommend it. I found that bigger was better. That is why I opted for making a 10.75″ x 8″ card (unfolded, and 5.375″ x 8″ folded).
- Since making this original card, I have switched to working with 10″ x 7″ cards. They are slightly smaller and fit into more standard-size envelopes better. If you want to create the card as described above and then select the entire design and reduce the size that will also work.
- Glitter and confetti get everywhere! When adding your shaker bits, be it glitter, confetti, gems or whatever, make sure you are using a steady hand, have your card flat on the table and do not have kids running around because they will contribute to making a very big mess.
- I like to add painter’s tape to the back of the shaker before I place it down onto my workstation and before I fill it with confetti. This helps keep things in place when removing the backing from the double-sided foam tape and helps keep the mess to a minimum.
- Working with double-sided foam tape – When working with intricate shapes like these 3 eggs with ears, it is easy to get stuck to the tape. The minute you try to get off of the tape, the confetti and glitter will go flying, and most of it will land on the tape. This is just the way it is. So be careful when removing the protective cover on the second side of the tape. This part was the death of me, and I almost gave up as a result.
- Envelopes – based on the size of this card, I have not designed a fancy envelope, but you can just buy standard envelopes to fit these cards. I have not found nice cardstock that is 24″ x 12″, and 12″ x 12″ is just a little bit too small to make it work.
Did you enjoy this tutorial on how to make a Hoppy Easter shaker card?
Did you enjoy this tutorial on how to make a Hoppy Easter shaker card? Let me know in the comments below.
If you like this tutorial be sure to check out: