As always, birthday season is upon us… or maybe it’s still here… it’s hard to tell. It’s always one birthday after another. And for this birthday, we needed some custom gamer gift bags. Why, you ask? Because that is what moms do for their kids. So, we set off to make some custom gamer gift bags.
As an Amazon Associate, I earn from qualifying purchases. This post contains affiliate links. I may receive a commission if you purchase an item from one of my links. This will not change the price you pay.
Supplies Needed to make Custom Gamer Gift Bags
When I started making this project, I had an idea in my head. Once that idea came to life, I realized there was another way to make it. As a result, this project will have 2 sets of supply lists, just to keep things interesting.
Making Custom Gamer Gift Bags with Sticker Paper
The original way that I made these gift bags was to use sticker paper. So, to make these custom gamer gift bags with sticker paper we need the following supplies:
- Gift bags – I bought my gift bags at the dollar store. They were about 8″ tall by 5″ wide. You can get similar ones here.
- Sticker paper – I used my Koala Sticker Paper as I purchased a huge package a while ago, and still had lots of sticker paper left.
- Printer – I use an Epson Eco-Tank ET2850
- Paper cutter or scissors – I recommend a paper cutter as it is faster.
- Access to Canva.com
Making Custom Gamer Gift Bags with Paper
After I finished making my custom gift bags, I needed to make a few more but I ran out of sticker paper. So, I decided to try it with regular paper. Since it worked, I will share the details as well. So, here are the supplies we need:
- Gift bags – I bought my gift bags at the dollar store. They were about 8″ tall by 5″ wide. You can get similar ones here.
- White printer paper – just any standard white printer paper will work
- Printer – I use an Epson Eco-Tank ET2850
- Glue – I used a glue stick instead of my standard crafting glue.
- Paper cutter or scissors – I recommend a paper cutter as it is faster.
- Access to Canva.com
Designing your Custom Gamer Gift Bag
I often do design work, but I don’t need to reinvent the wheel. And with that in mind, when I can use a free design, I will. And that it was I did. So, I will walk you through how I did this so you can do it too. But before I go into those details, I want to just quickly go over some details that you may not know about using Canva.com for making designs.
Tips and Tricks when Using Canva
I have used Canva for many projects in the past but I find myself using it more and more and as a result, it is good to know the rules behind what you are doing. So, I highly suggest you read their terms of use before you get carried away. Terms aside, I want to share some tips and tricks I have learned while using the free version of Canva.
- Not all designs are free. Any design with a crown or Pro on it requires you to either purchase the membership program or pay for the item.
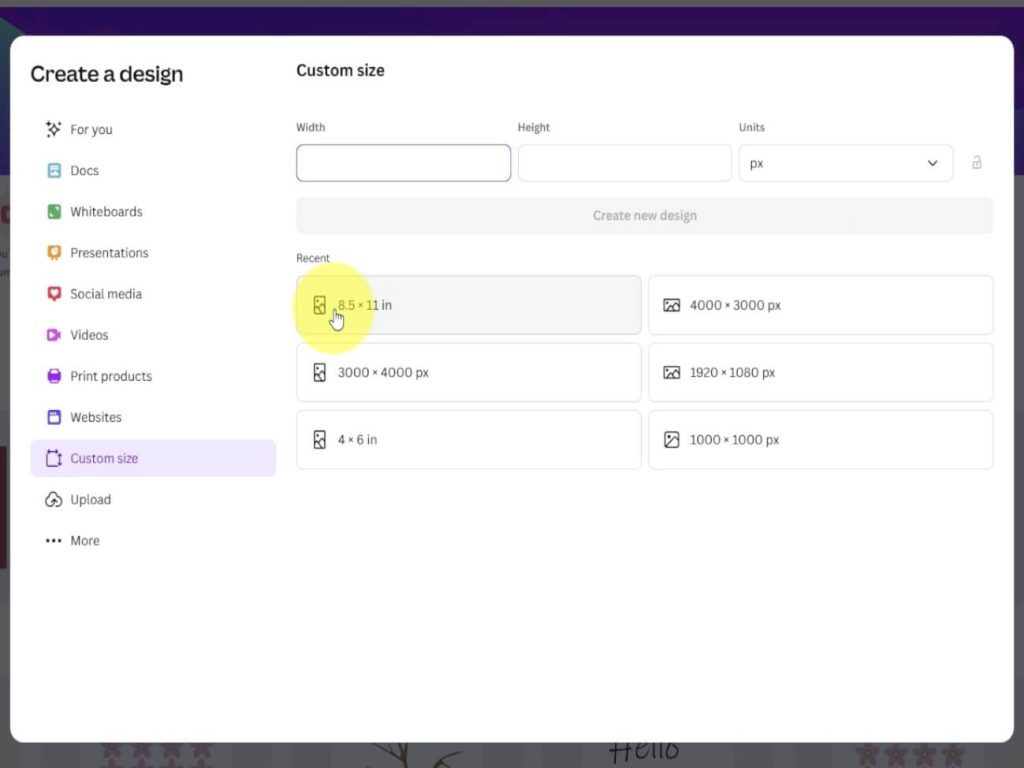
- When searching for templates or elements, the size of your worksheet will impact what shows up in the search results. If you have an 8.5″ x 11″ sheet for your starting point and you are looking for a template, you will only be shown templates that fit that size. But if in reality, you wanted to flip that page to landscape and be 11″ x 8.5″ anything that falls in that size will not show up.
- If you are using the free version of Canva, you cannot flip your page or change your paper size mid-project. You will need to start a new project with the size you want. But on the bright side, you can copy and paste entire displays from one project to another to avoid having to redo the whole thing.
OK, now that we have those items addressed, let’s start working on our design.
Finding a Custom Gift Bag Design
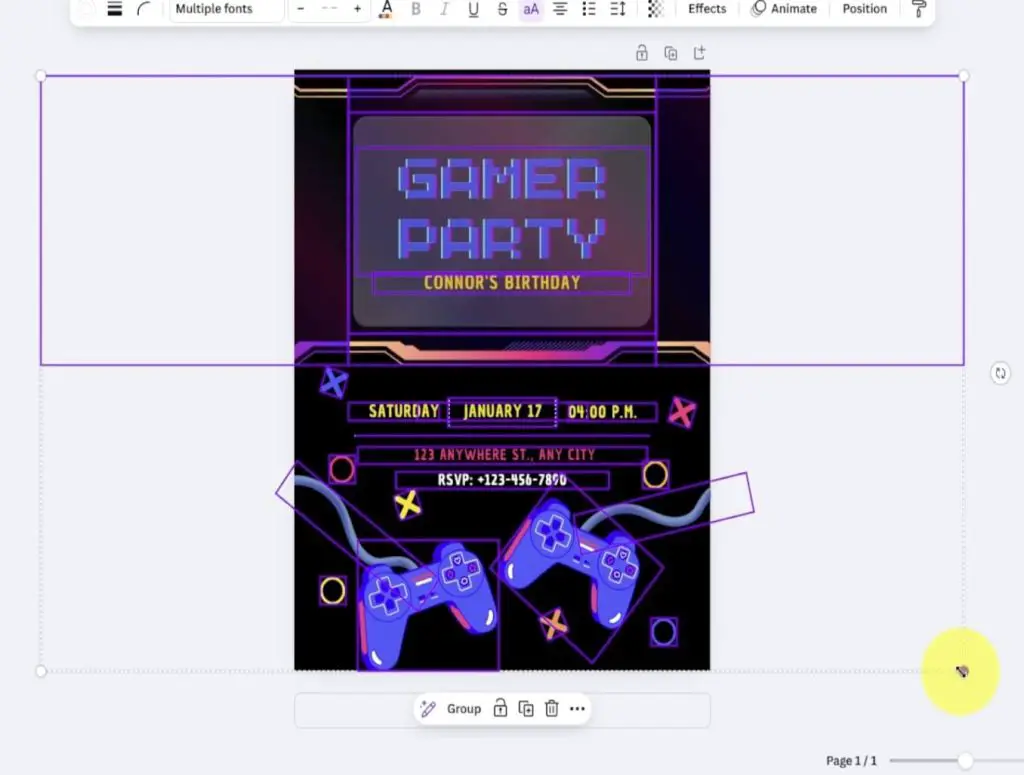
Long before the custom gift bags were in the picture, we came to Canva to find a neat invitation. And that is where the story of the Gamer Gift Bag started. We found a great free template! We customized it to say what we needed and off the invitations went!
But now, it was time for the party, and we needed to customize the invitations into decorations on the gift bags.
So, I started a new project. But I went into my custom sizes icon and selected a project that would be 8.5″ x 11″. This was the size of the game invitation template.
Then, select the Design Icon on the left side of the screen. From here, you want to ensure that the Templates are underlined. Now, you can type your query into the search bar. In my case, I wanted a Gamer Party. The specific one I wanted appeared at the top of the list, but you may need to search for something that suits your fancy. Then, with a simple click on the design, it was on my canvas.
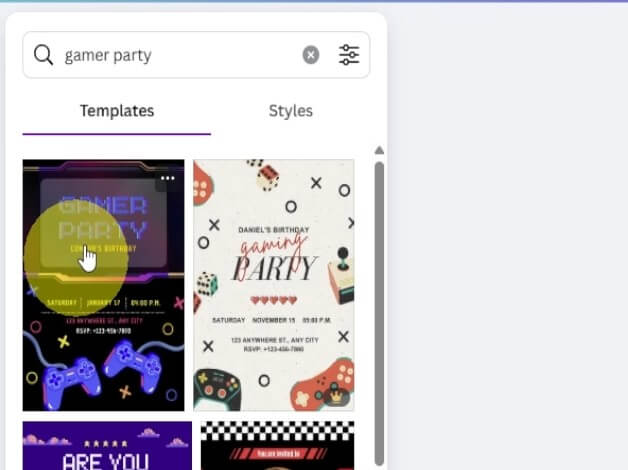
Now, I want to point out that you can do this for any theme. This does not have to be a gamer party. This is what we did. You can do princesses, race cars, champagne glasses, or whatever your party is about.
Editing the Gamer Design
Now, as I mentioned above, we can’t rotate the sheet. So you have two options. You can bite the bullet and work sideways for a few moments, or you can create a new project that is 11″ x 8.5″, copy and paste the design and work normally.
I decided to struggle sideways, but the details are the same regardless of how you set up your sheet.
The first thing you want to do is click and drag your mouse cursor over the whole design. Then, grab a corner and push the design inwards to make it smaller. I want the design to be in 2 parts, a front and a back. Each side will be about 8″ x 5 ” (that’s why I’m using an 8.5″ x 11″ as there will be little waste).
Once the design is about half the size, rotate it 90 degrees. This is done by grabbing the 2 round arrows and pulling your mouse around until the design has rotated to the desired angle.
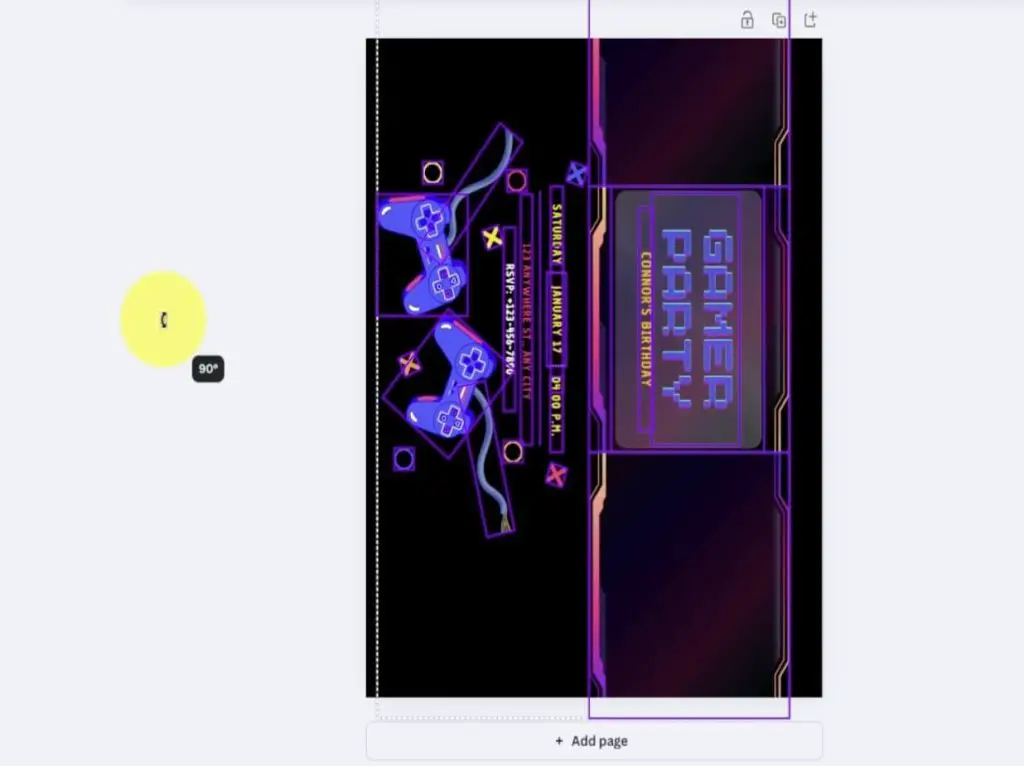
Next, delete all the elements that aren’t needed. In my case, I didn’t need the dates, locations, phone numbers and extra designs around the top banner.
Next, I’m going to select the pieces of the design that I want on one side and move them to the bottom half of the page. This may be done in several click-and-drag moves. Just move things around until you have what you want where you want it.
Again, with the second half of the design, move it to where you want it on the sheet. In this case, I am also going to change the text in the design. Simply by double-clicking, I can delete and modify the phrases. In my case Gamer Party was changed to Winner, and Connor’s Birthday was changed to Thanks for Coming.

It took some time to arrange all the design elements on the page to my liking.
Once happy with it, I selected the Share Button and saved a copy to my computer.
Assembling the Custom Gamer Gift Bag
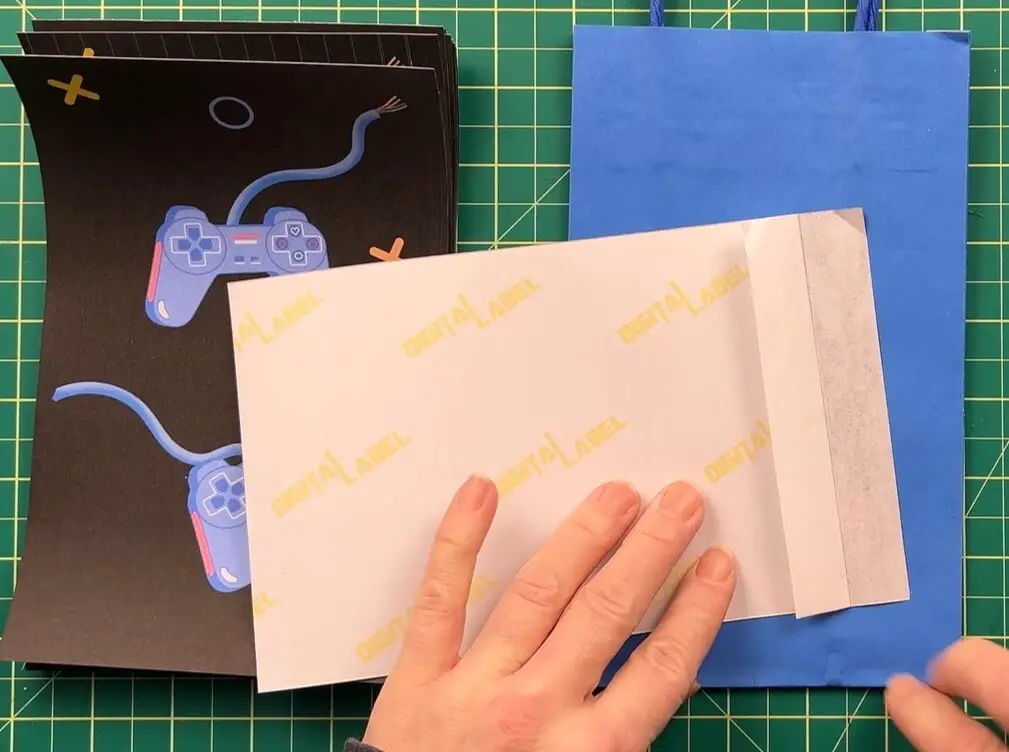
OK, now that our design is done, it is time to make these awesome custom gamer gift bags! Regardless of which method you will use, the first thing we need to do is print off the design. So, either using your sticker paper or your regular printer paper, print off as many copies of the design as you need (one for each bag).
Once you have a pile of designs printed off, cut the design in half. I like to do this a few sheets at a time, but you can do one at a time if you are worried about misalignment. Next, you need to do a quick check on the size, as you will need to trim a bit off the top, and possibly some off the side. Again, pull the paper through your paper cutter to make the sheets work. I like to keep the design pages as large as possible so that very little of the gift bag shows behind the design. So some attention to size is needed.
Making a Custom Gamer Gift Bag with Sticker Paper
Now that our design is cut out, it is time to attach it to the gift bags.
When working with sticker paper, I like to pull back about 1/2″ – 1″ of the protective backing at the top of the design and fold it down. Then, taking the bottom of the design, align the design over the bag so it is straight in all directions. Once happy with the placement at the bottom, slowly and gently smooth the design over the bag and allow the top unprotected portion of the sticker to adhere to the bag.
Then slowly pull the backing away while pushing the design onto the gift bag.
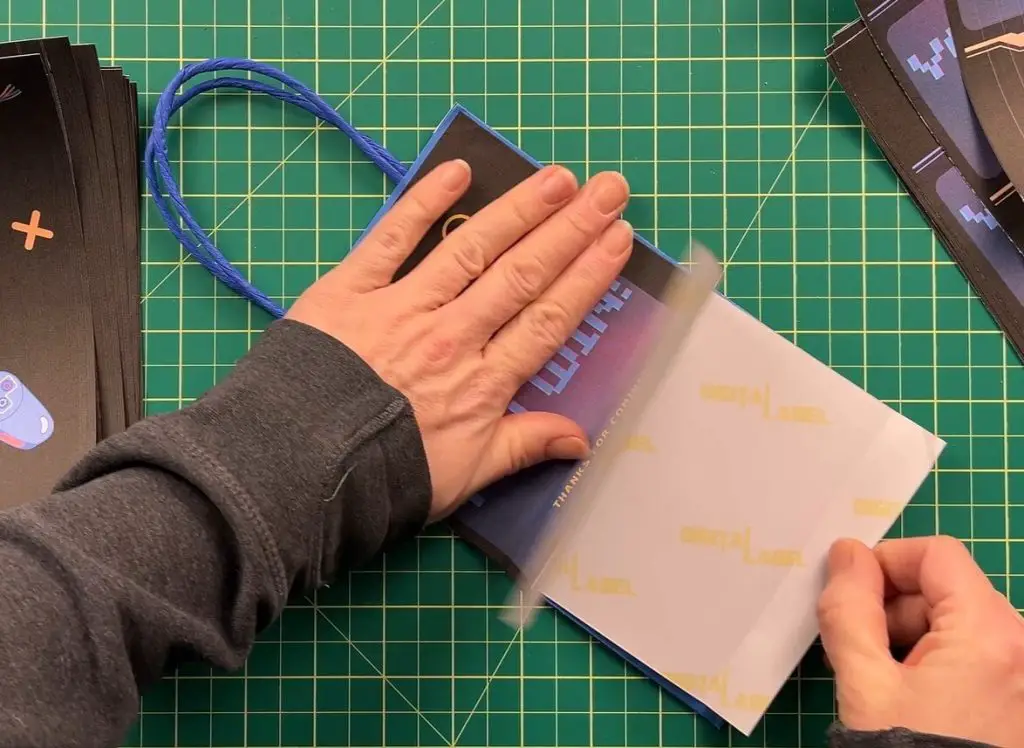
Now that one side is done, we repeat this on the other side. The only difference with the second side is that most bags have a fold on the second side. Unfold that portion and add a crease into the bottom of the bag. Then, repeat the above steps for applying the sticker to the back of the gift bag.
Now, you repeat this for however many gift bags you have.
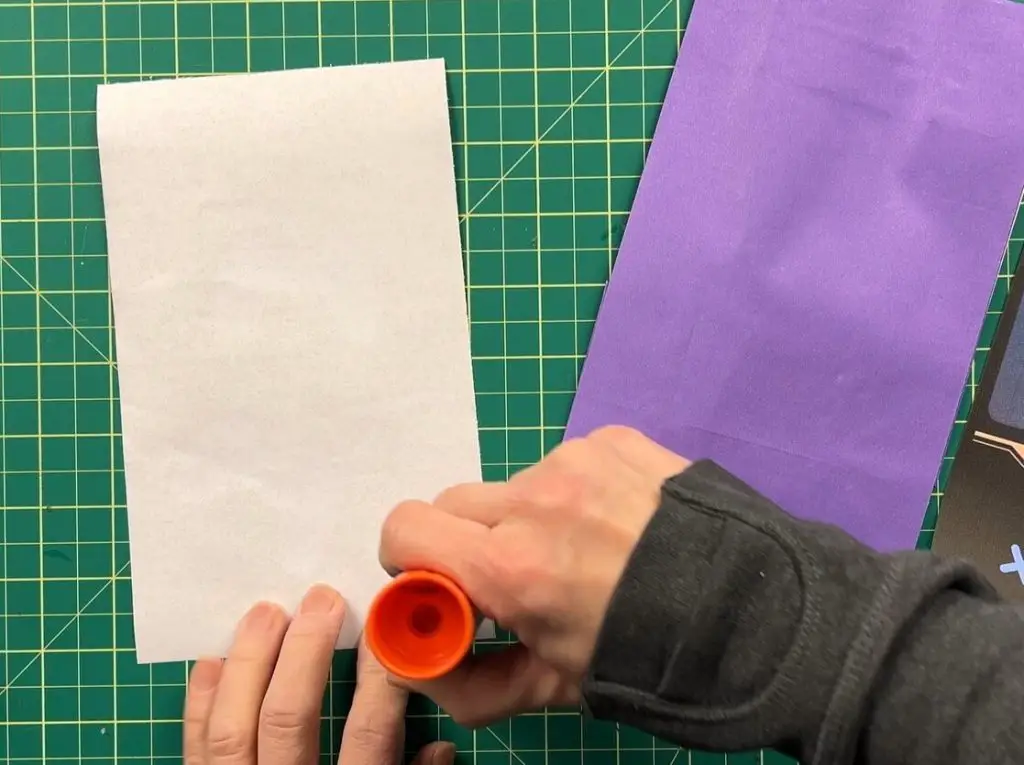
Making a Custom Gift Bag using Printer Paper
OK, so, if you want to make this custom gamer gift bag with regular printer paper, here is what we do.
You should already have the design cut up as detailed above.
Next, using your glue stick, apply glue to the back of the design. Gently align the design over the gift bag and place it on. When working with glue you have the luxury of realigning the design if it doesn’t adhere where you want it. You can slide it around or peel it off and reapply if needed.
Now that one side is done, repeat this on the other side. The only difference with the second side is that most bags have a fold on the second side. Unfold that portion and add a crease into the bottom of the bag. Then, repeat the above steps to apply the printer paper to the back of the gift bag.
Now, you repeat this for however many gift bags you have.
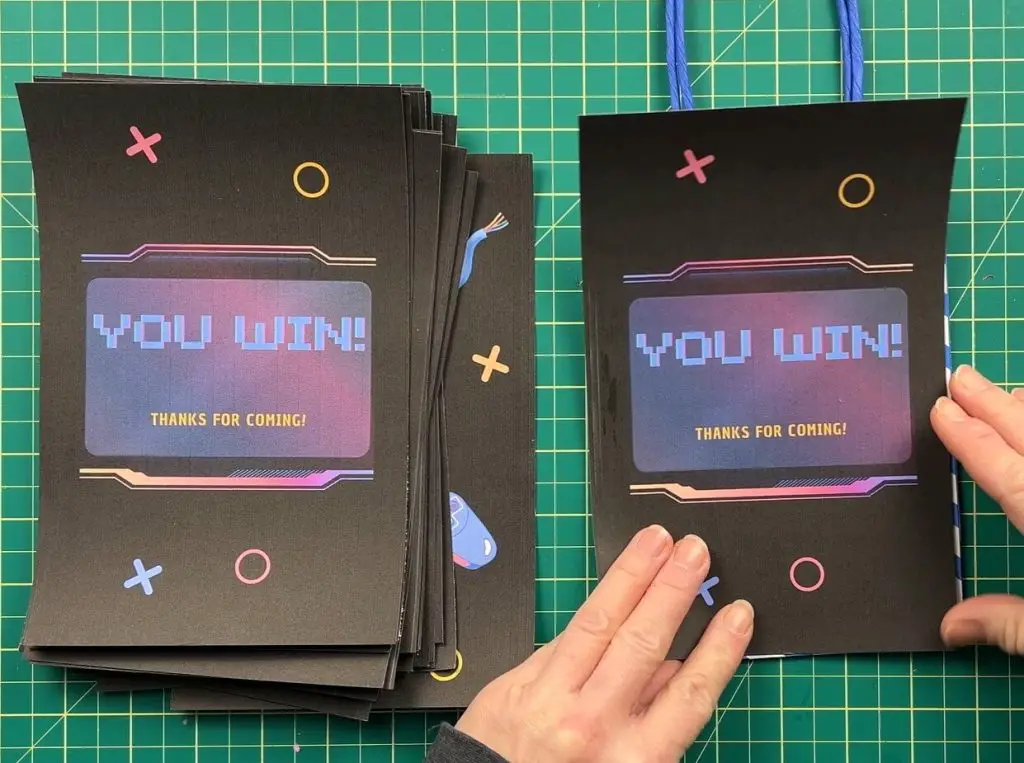
And that’s it! Your Custom Gamer Gift bag is Complete!

Things I learned while making these Custom gamer Gift Bags
- I left the design background black. Yes, this used a lot of ink, but I didn’t like any other color options (which still would have used a lot of ink) and leaving the design white was not my idea of a good time.
- When working on this design, I wanted my gift bags to have a design on both sides. This was my personal preference. You could apply a design to only one side of the bag to save sticker paper, time, and ink.
- When working with sticker paper, remember that once the sticker is placed down, removing it is not an option. So you want to verify the design is aligned properly before you stick it down.
- If your sticker isn’t 100% aligned, and you have some sticker coming over an edge, you can either stick it down to the side that it is overhanging, or you can cut it off with scissors.
- When working with glue you have the luxury of realigning the design if it doesn’t adhere where you want it. You can slide it around or peel it off and reapply if needed.
- When I started this project, I wanted to use a bunch of sticker paper because I wanted to try another brand and couldn’t justify buying more until I had used up my supplies. But having done this project now, if (aka when) I do this project again for another birthday, I will use printer paper and glue as the time to make them was the same, but the cost of using printer paper was much less. So, if you are looking for a tip on saving money, that’s the one.
- I made gamer gift bags for the project because that is what my son wanted as the theme for his birthday, but you can make custom gift bags for any occasion.
Did you enjoy making these custom gamer gift bags?
Did you enjoy making these custom gamer gift bags? Let me know in the comments below if you enjoyed this project. Also, let me know if you tried it and how it turned out! Do you have any suggestions on how to make this better? Be sure to drop me a note and let me know!
If you enjoyed this birthday project, check out my other Birthday Projects here.
If you are looking for more sticker projects, you can check those out here.