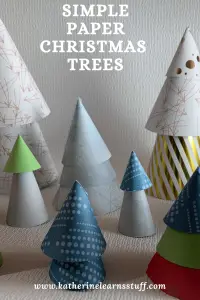
A friend of mine asked for help the other day to make a quick, simple ornament for her tree, something to make on her Cricut. She sent me a picture of these beautiful wood-carved Christmas trees. That was a bit above my skill level, but I did make a simple paper Christmas Tree that hit all of her criteria. And I also designed it so that you can place it on the dinner table, mantel, or even make a slight modification and put it up on your Christmas Tree. So, let’s get started.
As an Amazon Associate, I earn from qualifying purchases. This post contains affiliate links. I may receive a commission if you purchase an item from one of my links. This will not change the price you pay.
What you need to Make a This Simple Decoration
This is a simple craft, so the list of materials needed is short and sweet.
- Cardstock – I like to use thick cardstock, like Recollections Cardstock, but construction paper works well also.
- Glue – any glue will do, but I like using a new Ryobi glue gun because the glue dries quickly.
- Cutting tool – Scissors work well, but as I have a Cricut Explore Air 2, I let it to the cutting for me.
Let’s Start Making our Simple Paper Christmas Tree
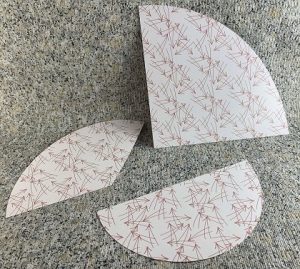
For this design, all you need is some semi-circles cut out in paper so that you can make a cone. The more sizes you have, the more versatility you will have. Also, keep in mind that if you want to stack the cones on top of each other for effect, you will need cones that are not just semi-circles, but quarter circles, and third circles, as well. This will allow for additional dimensions in the trees.
For my trees, I cut lots of different papers and sizes of these 3 partial circles. You can quickly reproduce these by hand or in a design program. But, if you would like, you can also get a copy of my premade partial circles by signing up for my newsletter.
Sign up for my newsletter
and get the free circles cut files
Cut and Glue the Cones
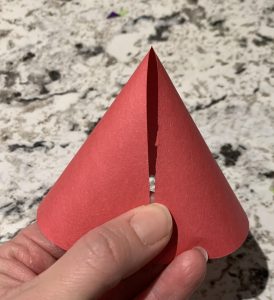
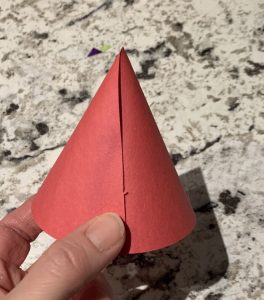
Once you have several semi-circles, third-circles, and quarter-circles cuts, it’s time to start gluing! All you need to do is apply glue to one edge of the circle. Then gently fold it to create a cone with the paper, as shown below.
Somethings to remember:
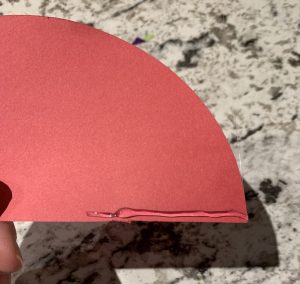
- When applying glue to the semi-circle, you only need to apply glue to half of the edge, as when you roll the paper to make a cone, one side will be on top, and one will be on the bottom.
- When applying glue to any partial circles, you do not need to place glue at the very tip. Additional glue at the top will make the top of the cone messy and is not required.
- If you are using crafters glue, you will need to hold the paper together until it has dried. Otherwise, it will open up, and you will have no cones.
- For best results, you want the quarter-circle to be largest, the third-circle to be medium size, and the semi-circle to be the smallest.
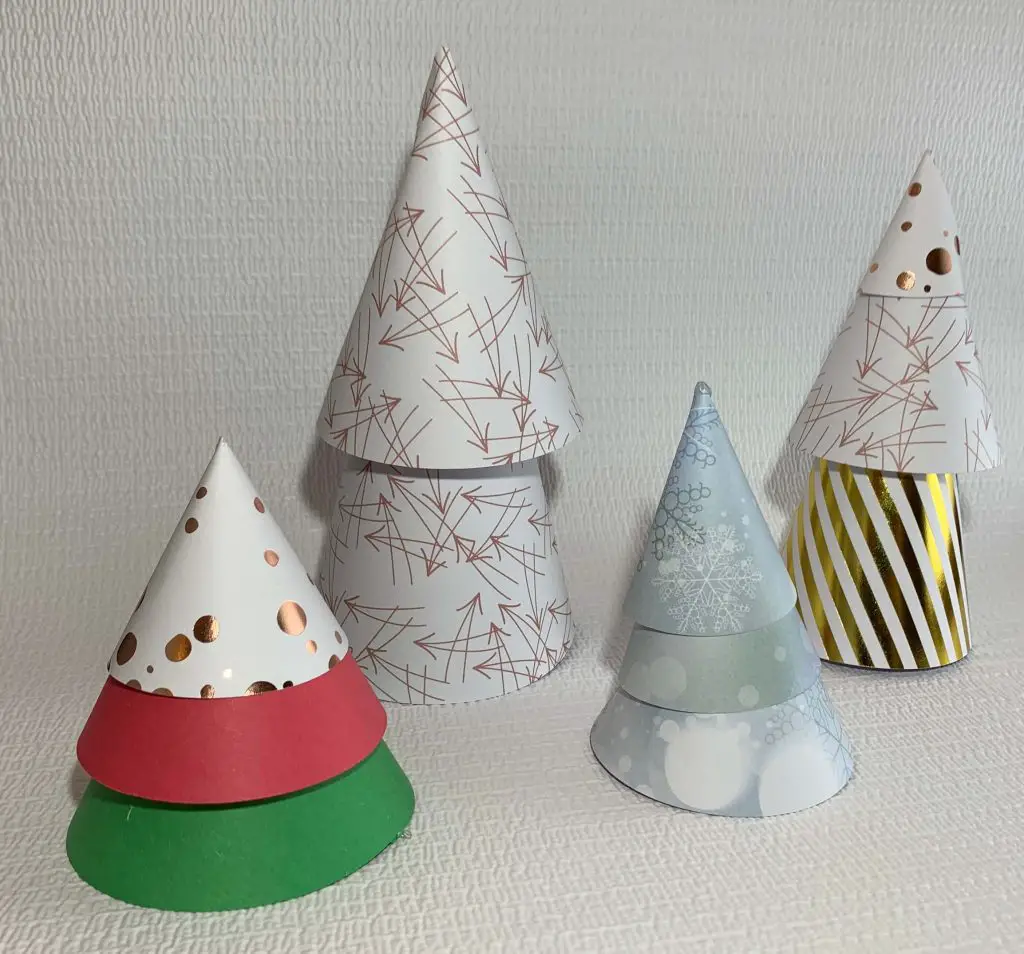
Stacking the Cones to Make Your Paper Christmas Tree
Once all of the cones are cut, glued, and dried, the fun begins. Now place them on top of each other to make your tree. If you have cut pieces in several sizes and colors, you can mix and match your trees to add character. Just place the cones on top of each other to get the desired look and shape of a tree.
And there you have your simple paper Christmas tree Decoration!
Make A simple Paper Christmas Tree Ornament
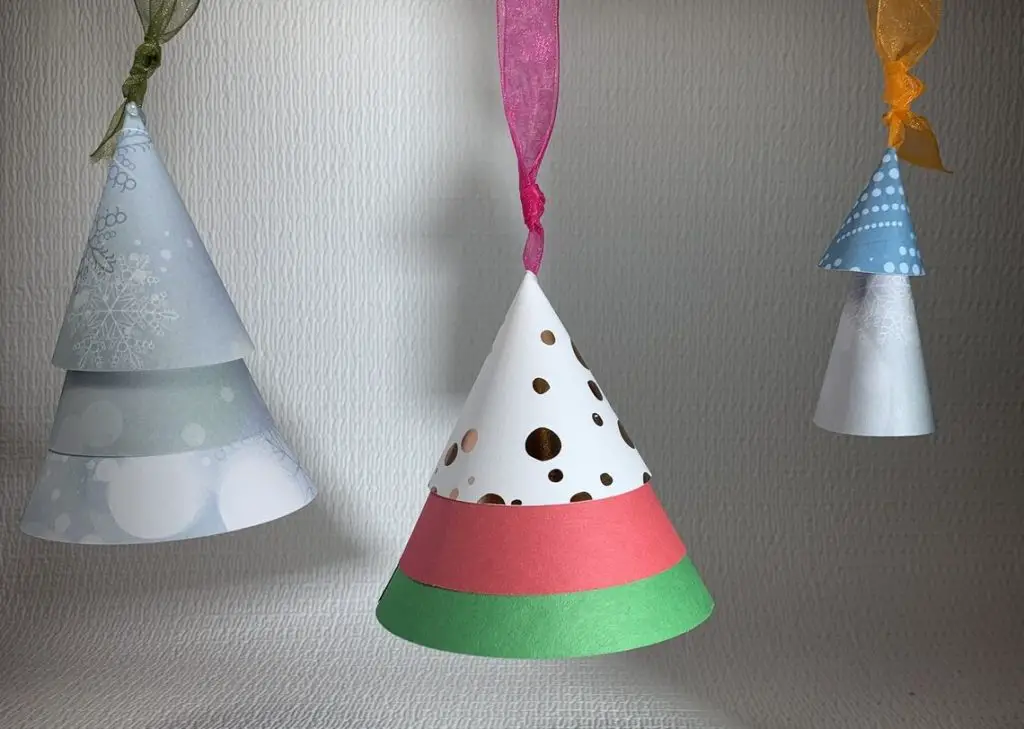
The nice thing about this design is that you can easily change these trees from tabletop decorations into hanging ornaments! If you are like me, you will have made too many cones in the original part of the tutorial, so you will have a few smaller ones left over. There are ideal converting into ornaments.
How to Make a Paper Christmas Tree Ornament
The only extra item you require to convert your Paper Christmas Tree from a standing decoration into a hanging decoration is some ribbon! It does not have to be a fancy ribbon. It can even be a string. I had some colorful ribbon leftover from another craft, so I just used that.
Hopefully, you were listening when I mentioned above that you do not want to add glue to the top corner of the partial circles. This is because the ribbon will be fed through that space.
All you need to do is tie a knot in one end of the ribbon and feed it through the cone. You can use just one cone, or two or three, or however many you would like. Feed the ribbon through all the cones that you want. Once you have them all on the ribbon, make a loop at the top of the ribbon. This is so that you can hang it up.


And that’s it! You’re Done your Paper Christmas Tree Ornament
Things I learns Along the Way With This paper Craft
- The whole point of this craft was for it to be easy. Or at least that was my hope. However, even with easy craft, there is a bit of a fear of starting, especially when something new. I think I had more anxiety over starting this craft than I did with anything else. But after I started and had about 30 different cones in every shape and size, things quickly improved.
- Rolling thick cardstock into cones is harder than it looks. I found that many of my quarter circles cones were more bent than circular. But with practice, they got better.
- Working with a larger cone, be it semi-circle, quarter-circle, or third-circle, the larger the original cut material, the easier it was to work with. Also, large trees look better on tabletops and mantels.
- At the end of the season, these will go into the recycling bin. But not before my kids play with them for a few weeks.
Did you find this tutorial helpful?
Was this tutorial helpful? Did you enjoy it? Share your comments below! Also, don’t forget to check out my other paper crafts found here.
Sign up for my newsletter
and get the free circles cut files