A few weeks ago I received a package in the mail! Yay! Mail! And this was a package full of products from Koala. They supply a bunch of products for crafting! They asked me to try their products and write a review with my thoughts and comments. So, this is how I have come to write up a Koala Product Review.
So, today, I’m going to review the following products I received from them
- Koala Inkjet Vinyl Sticker Paper
- Koala Holographic Printable Vinyl Sticker Paper
- A-Sub Dark Fabric Transfer Paper
- A-Sub 3D Puff Heat Transfer Vinyl Sheet
Full Disclosure – I got these products for “free” in exchange for me trying them and writing a review. The comments and findings are my own, but I did not purchase these products. Hopefully, that makes sense.
If you want to try out these items, you can use this Coupon Code to get 12% off products at Koalagp.com and A-Sub.com.
Coupon Code: LearnsStuff
So, let’s get this project started!
Koala Inkjet Vinyl Sticker Paper Review
If you have been paying attention, you know I like making stickers. So I was really looking forward to using this paper. In the past, I have used Koala Brand paper, but it was the mat kind, and I was actually pretty excited when this glossy sticker paper was in the package.
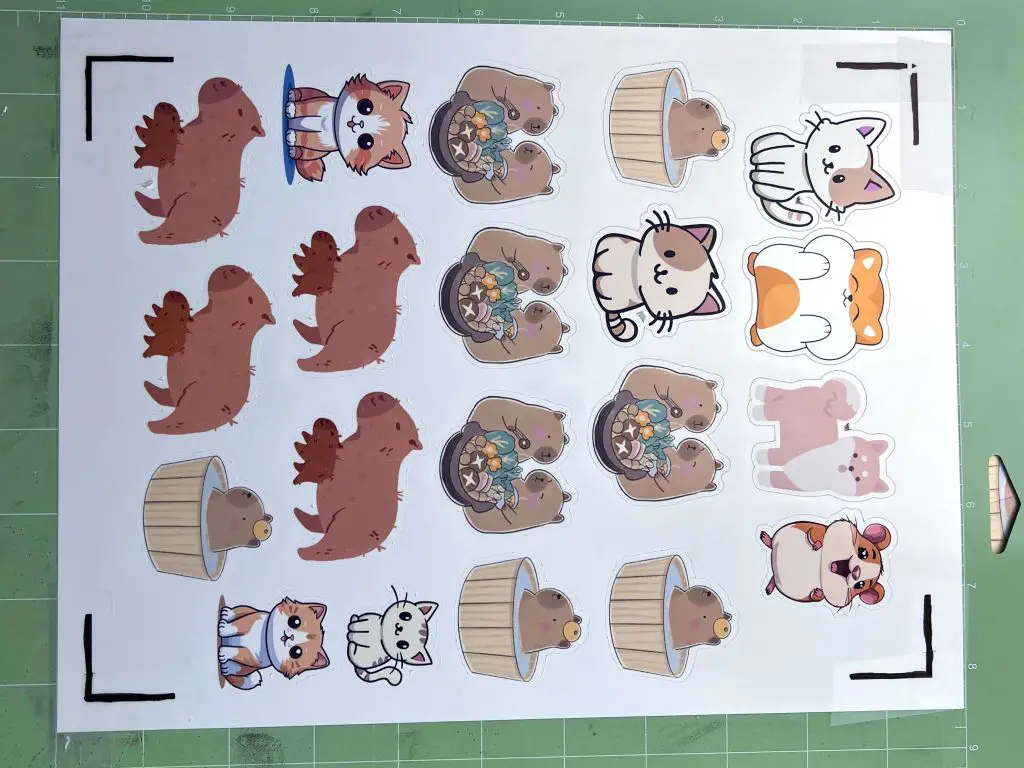
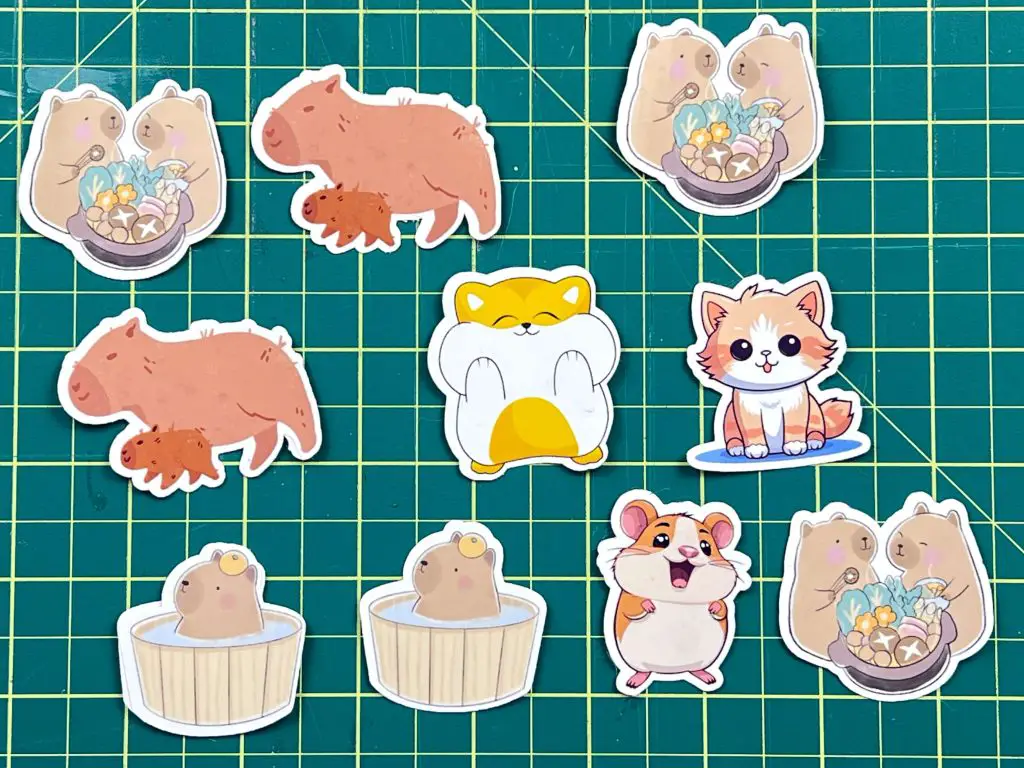
What Koala Inkjet Vinyl Sticker Paper Looks like out of the package
The back of the sticker paper has red/pink lettering. This is very helpful. I know this may sound silly, but I have used sticker paper where you don’t know which side is which.
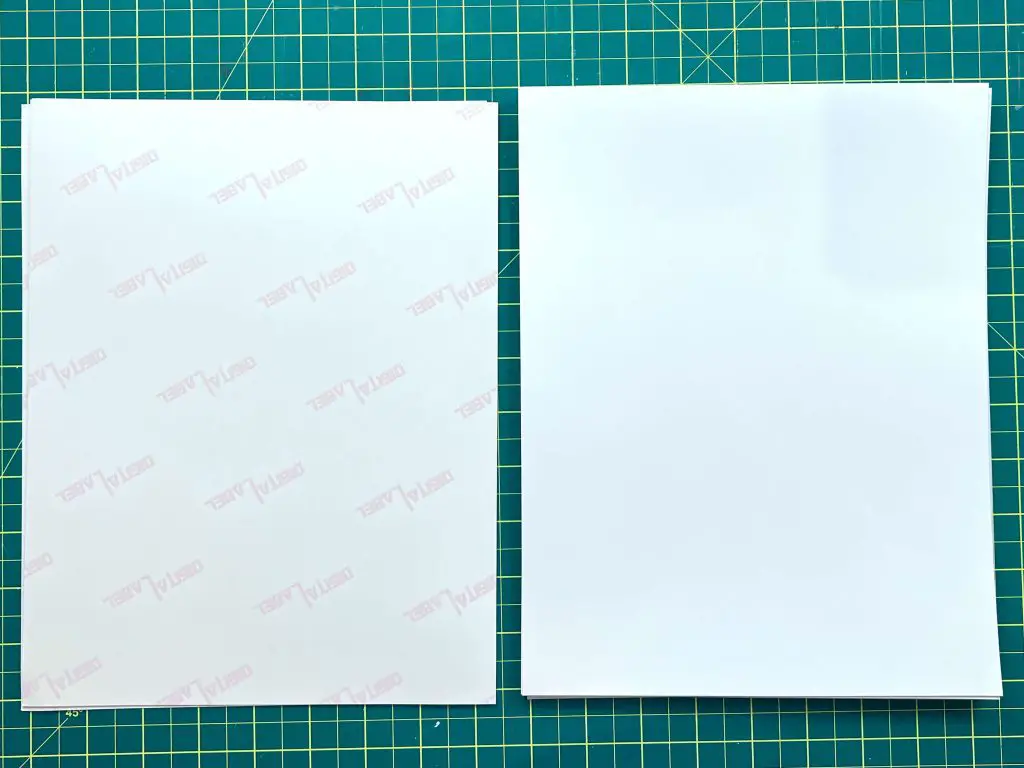
The front is shiny, glossy and smooth.
Printer Settings for using the Koala Inkjet Vinyl Sticker Paper
I used my Epson Eco-tank 2850 for all this printing.
When setting up the print, I set the paper setting to glossy photo paper and increased the print quality to high.
Now, if you are using your Cricut (or other cutting machine), you will need to make these changes in the cutting software settings before sending it to the printer.
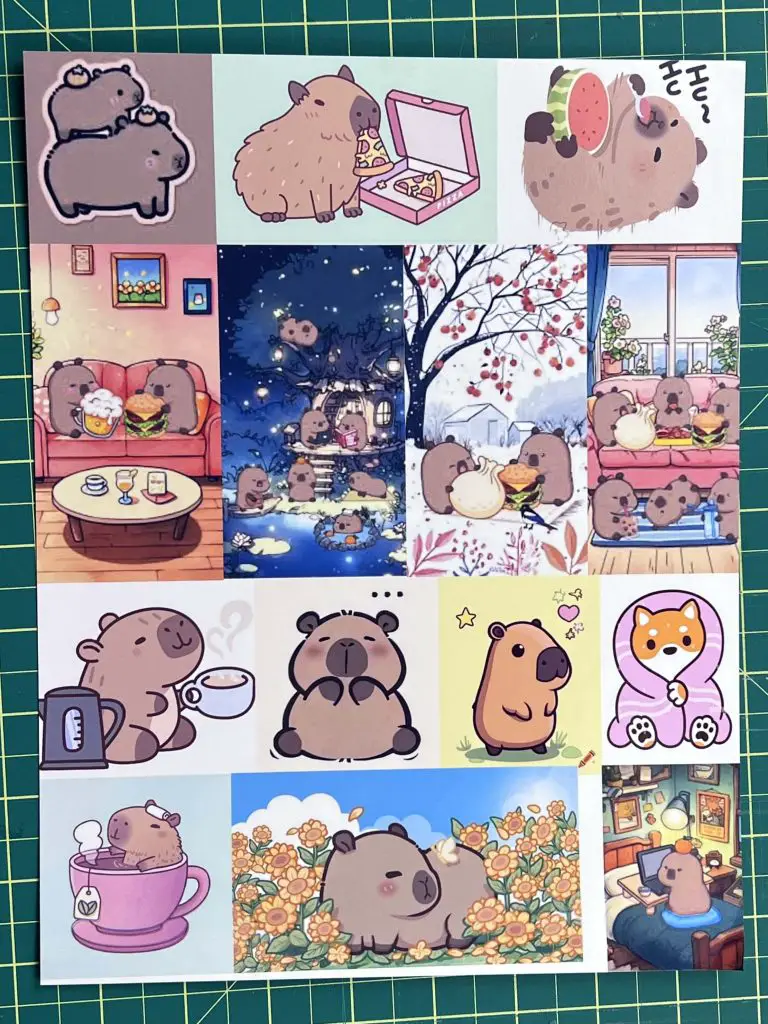
The quality of the printed stickers before cutting them out, was amazing! The color really popped, and even when I forgot to set the quality to high, the color was still very vibrant.
The really nice thing about this sticker paper was that the ink dried super quick. That means, by the time I walked from my work table to my printer (across the room) and back, it was totally dried. I could rub my hands over it without it smudging. That was really nice.
Cutting Koala Inkjet Vinyl Sticker Paper with a Cricut
Now, as with most of my stickers, I like to use my Cricut Explore Air 2. Well, maybe like isn’t the right word because Cricut likes to waste a lot of paper when performing Print-Then-Cut. But, I like the fact that it will cut complex shapes. And, it’s the only machine I have that will do it, aside from scissors and a paper cutter.
If you don’t like wasting paper during Print-Then-Cut, I have a blog post about that, which you can read here.
If you have the Explore Air 2, you may know it does not like working with glossy paper for Print-Then-Cut. And that was exactly what happened with this Koala Inkjet Vinyl Sticker Paper.
I watched the video, tried their suggestion and combined a few in an attempt to get this paper to cut on my EA2. Here are the results:
- Turn the lights off/close the top lid of the EA2 – This did not work.
- Light on, tape over the Cricut Print-Then-Cut marks – Did not work.
- Print a copy on regular paper, cut the registration marks and tape them on top of the sticker paper markers – I was able to cut the stickers with this method, but the cut lines were off by about 1/2″. I tried this a few times, and each time the stickers were not cut in the proper location. I think that’s me and my Cricut, not the paper.
- Light on, tape over the Cricut Print-Then-Cut marks and draw over Cricut markers with a black Sharpie – Did not work.
- Light off & top lid open, tape over the Cricut Print-Then-Cut marks and draw over Cricut markers with a black Sharpie – This did not work.
- Light off, top lid closed, tape over the Cricut Print-Then-Cut marks and draw over Cricut markers with a black Sharpie – it worked!
I want to comment on tape. Tape is not tape. There are a whole slew of different types of tape and not all tapes work! Magic Scotch Tape is the one that worked for me. This tape is not entirely clear. It normally has green packaging and labels on the tape. The Scotch Gift Tape – purple package and label that is clear, did not work. So, when you are trying to use “tape” I recommend a non-shiny, not totally clear tape.
Once I finally got my Cricut to cooperate, I set it to the Cardstock setting to cut individual stickers. And, they were cut through completely on the first try!
Cutting Koala Inkjet Vinyl Sticker Paper with Canva and a Paper Cutter
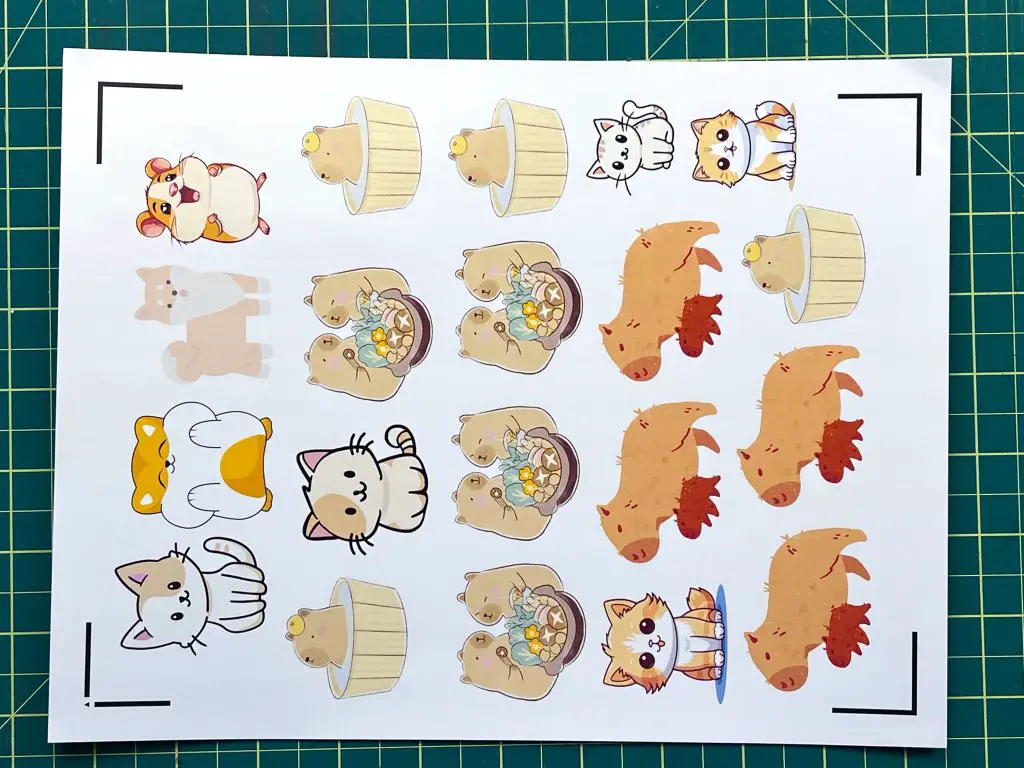
After spending several hours trying to cut with my Cricut, I also made simple square stickers from free designs from Canva.
Again, I set the printer to high-quality glossy photo paper.
These stickers and color took up the full page. Again, the sticker paper absorbed the ink quickly and the color was great.
I used a paper cutter to cut out the stickers.
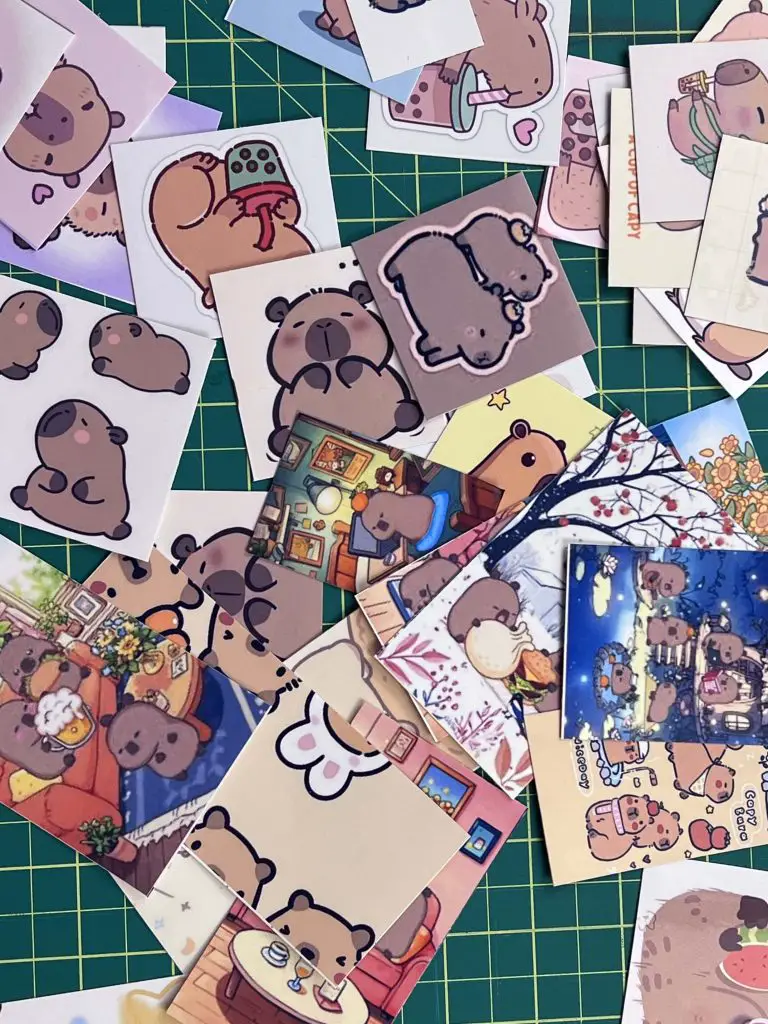
Final Result of the Koala Inkjet Vinyl Sticker Paper
Once the stickers were cut out, either with my Cricut EA2 or paper cutter, they were ready to go!
Both stickers were easy to peel. I bent a corner or edge and the sticker paper peeled off easily.
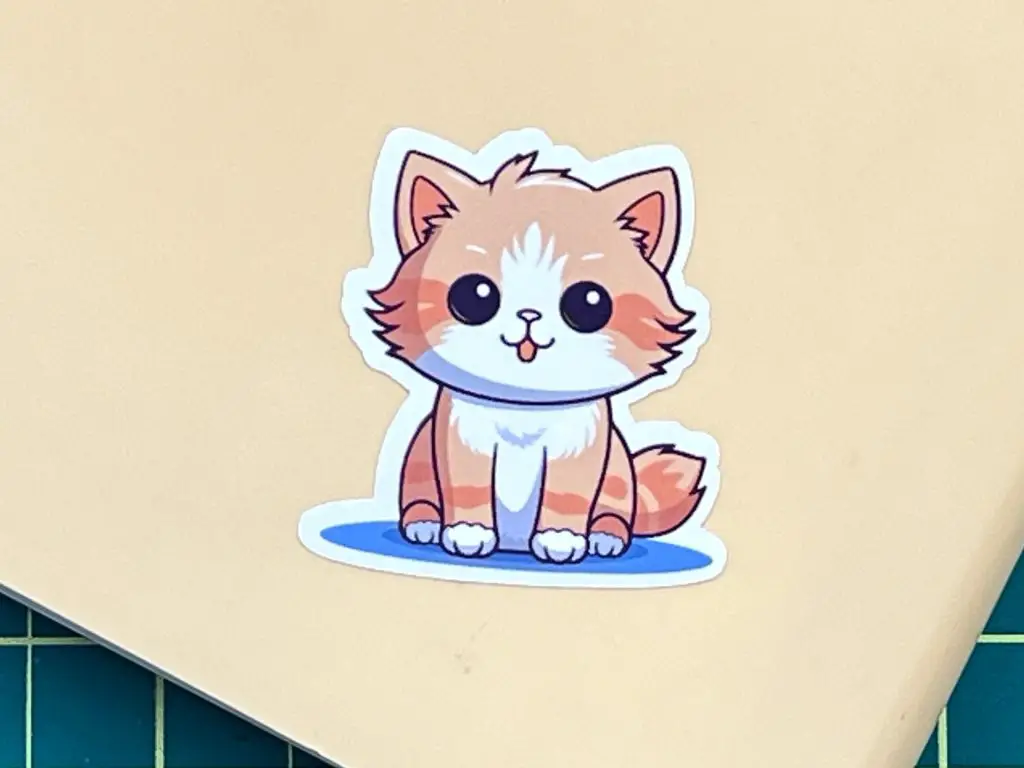
Sticking them to water bottles, paper, notebooks (and even walls) worked well. They stick well and have not come off yet. Scratches don’t seem to deteriorate the design, at least not after a few days.
I have even sent some stickers through the dishwasher and after one load, the sticker and color stayed like new. So this is a bonus. As I won’t need to make new stickers every week!
Would I buy Koala Inkjet Vinyl Sticker Paper again?
When I run out of this Koala Inkjet Vinyl Sticker Paper, would I buy this again? Yes, yes I would.
I really like this Koala Inkjet Vinyl Sticker Paper. It goes through my printer no problem and the color is amazing! The fact that it survives a load in the dishwasher is hands down awesome!
If you want to try out these items, you can use this Coupon Code to get 12% off products at Koalagp.com and A-Sub.com.
Coupon Code: LearnsStuff
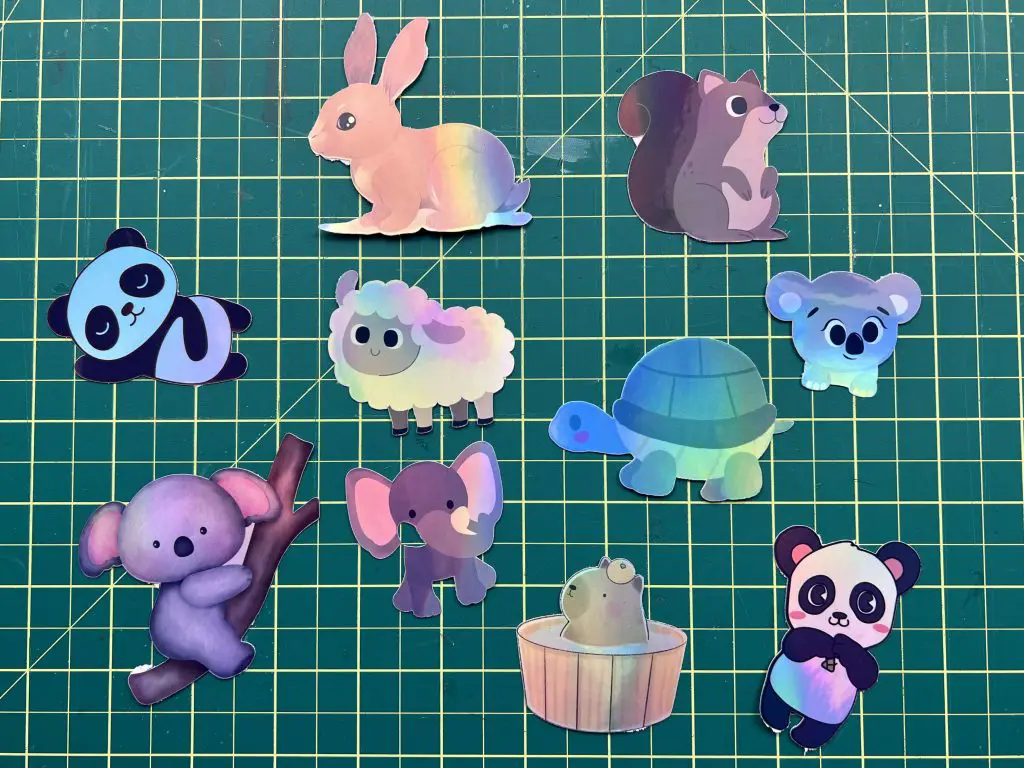
Koala Holographic Printable Vinyl Sticker Paper Review
The second item I received from Koala was Koala Holographic Printable Vinyl Sticker Paper. I have never used actual holographic sticker paper, I have made holographic stickers by using normal sticker paper and applying holographic paper on top. You can read that here.
So, when Koala Holographic Printable Vinyl Sticker Paper was included in the package, I was eager to see how it worked.
What Koala Holographic Printable Vinyl Sticker Paper Looks like out of the package
This is not at all what I expected. This is actual sticker paper that you print on. The top surface is all shiny and holographic, and the back is white.
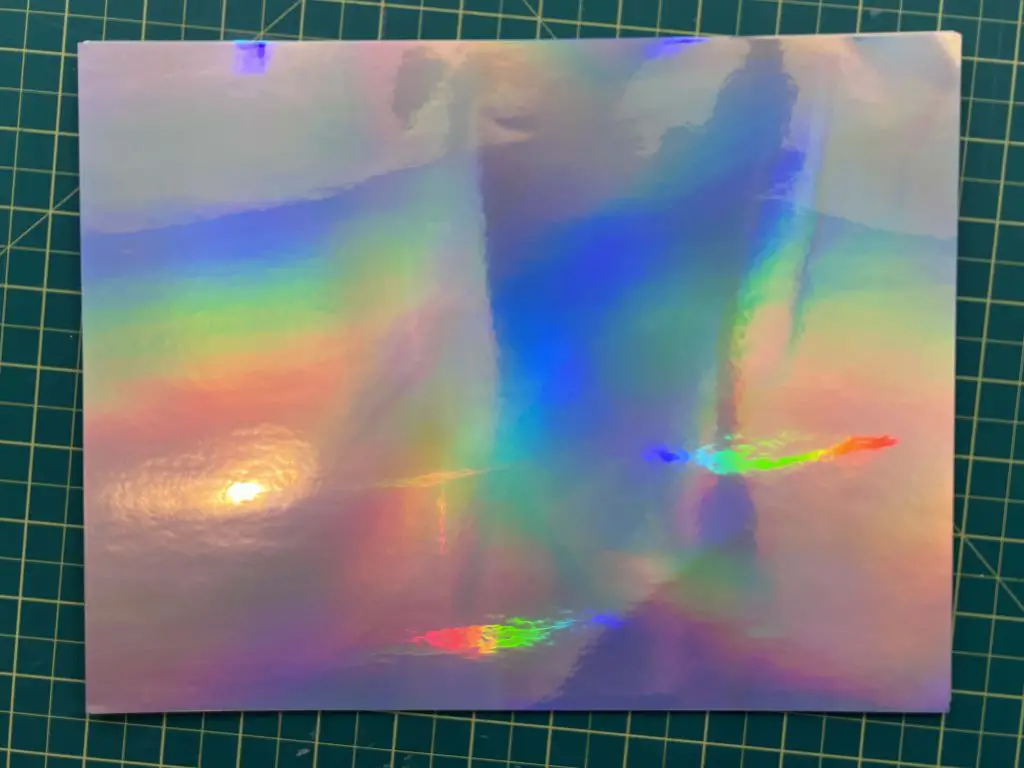
The paper is thicker than I thought, but not as thick as the normal photo paper.
Printer Settings for using the Koala Holographic Printable Vinyl Sticker Paper
I used my Epson Eco-tank 2850 for all this printing.
When setting up the print, I modified the printer settings to be glossy photo paper and I increased the print quality to High.
Now, if you are using a Cricut or other cutting machine, you need to modify the print settings within the cutting software before you print.
The really nice thing about this sticker paper was that the ink dried super quick. That means, by the time I walked from my work table to my printer (across the room) and back, it was totally dried, and I could rub my hands over it without it smudging. That was really nice.
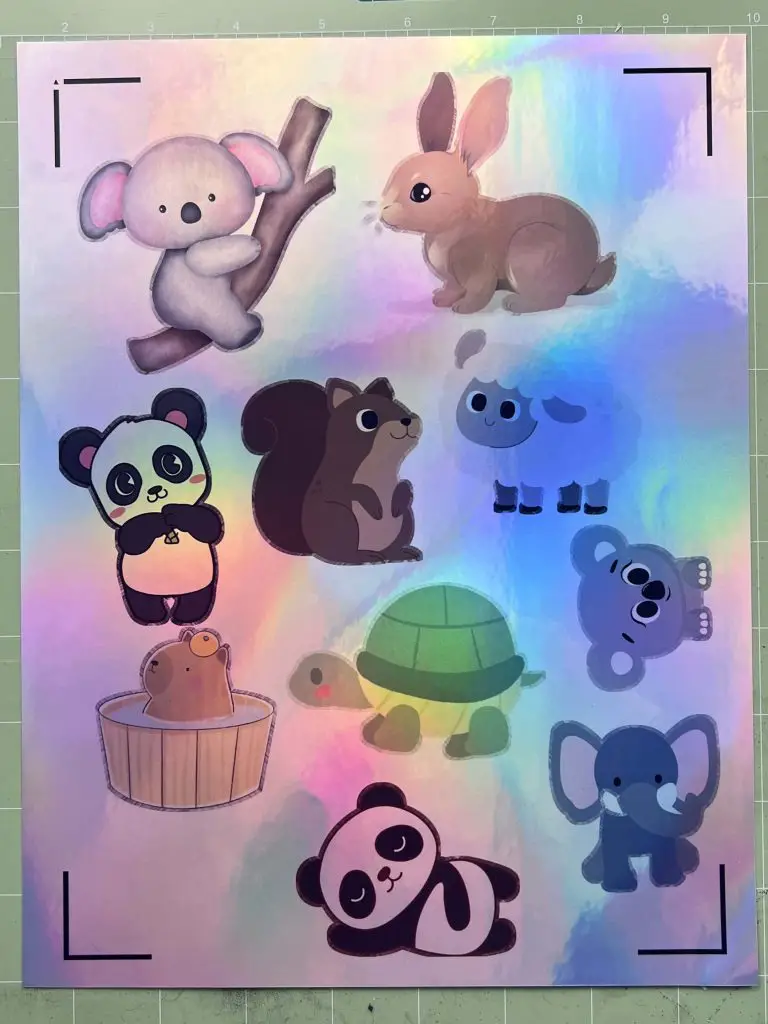
I have never printed on this type of paper before, so I wasn’t sure what to expect. The color was not what I expected, but not in a bad way. Since this is holographic paper, the holographic shine comes through the back of the paper muting the print colors. But all the items printed out very vibrant and fully visible in the colors they were supposed to be.
Cutting Koala Holographic Printable Vinyl Sticker Paper with a Cricut
As you’ve read above, I use my Cricut Explore Air 2. I pulled out some free images from Canva.com and pulled them into Cricut Design Space. After my ordeal with getting my Cricut to work with the glossy sticker paper above, I chose fewer and more simple images to hopefully speed up the process.
But if you want to learn how to maximize your Print-Then-Cut, you can read about it here.
I was really nervous about how this was going to go. The surface of this paper is shiny, shiny, shiny. But I decided it was time to try it out and see what happened.
And WOW! This paper registered on the first try! Lights on, no tape, no markers, just a beautiful Print-Then-Cut! I was floored! Even on my EA2, it just pulled it right through the machine and started cutting! Amazing! Absolutely Amazing!
I also set the material setting to cardstock so the stickers would cut out as individual stickers and not sticker sheets. The stickers cut through on the first try.
As the stickers cut out on the first try, I didn’t bother making stickers without my Cricut.
Final Results of Koala Holographic Printable Vinyl Sticker Paper
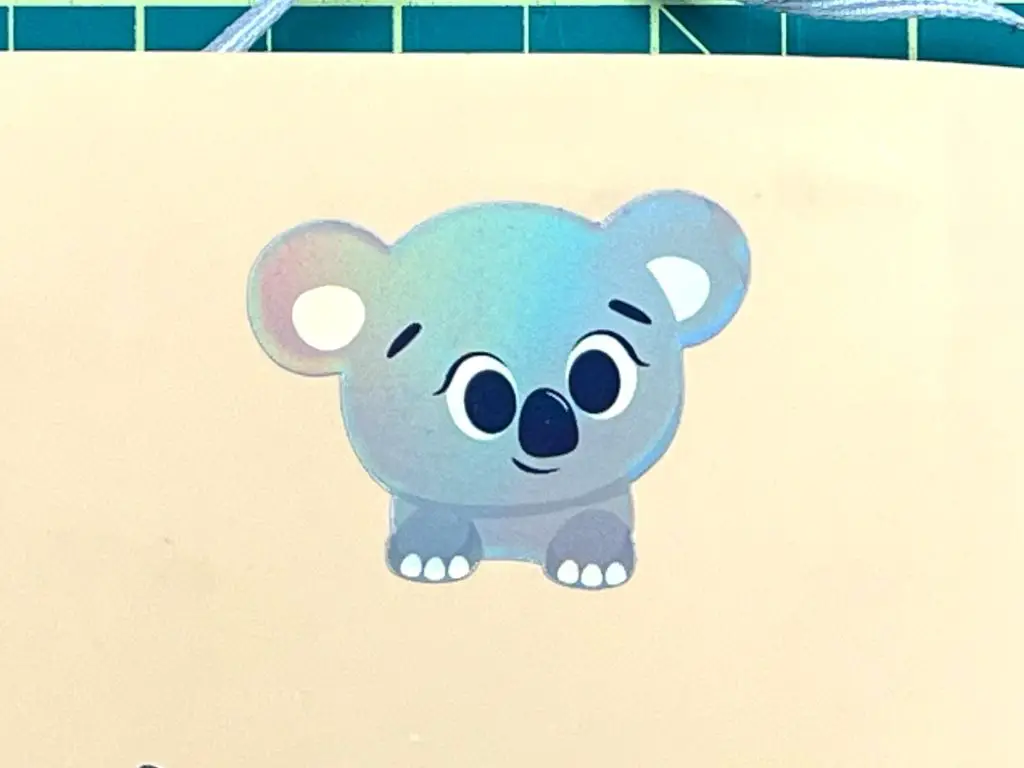
These stickers turned out amazing! And fast! They cut with my Cricut the first time, and no fancy work was needed to make it cut out! Amazing! I love it!
And, as an added bonus, it has also survived one load in the dishwasher so far! Yay!
Would I buy Koala Holographic Printable Vinyl Sticker Paper again?
When I run out of this Koala Holographic Printable Vinyl Sticker Paper, would I buy this again? Yes, absolutely yes I would. I love this stuff!
If you want to try out these items, you can use this Coupon Code to get 12% off products at Koalagp.com and A-Sub.com.
Coupon Code: LearnsStuff
A-Sub Dark Fabric Transfer Paper Review
The third product I got was the A-Sub Dark Fabric Transfer Paper. If you know me, you know I started my Cricut journey because I wanted to make t-shirts, so I was excited to try this product.
I normally make t-shirts out of different color vinyl, but I do sometimes venture into the printable vinyl territory, you can read more about that here So, I was happy to try this out.
What A-Sub Dark Fabric Transfer Paper Looks like out of the package
This package comes with 10 sheets of printable transfer paper, instructions on times and temperatures, printer settings, and 2 sheets of parchment paper to protect your project and equipment.
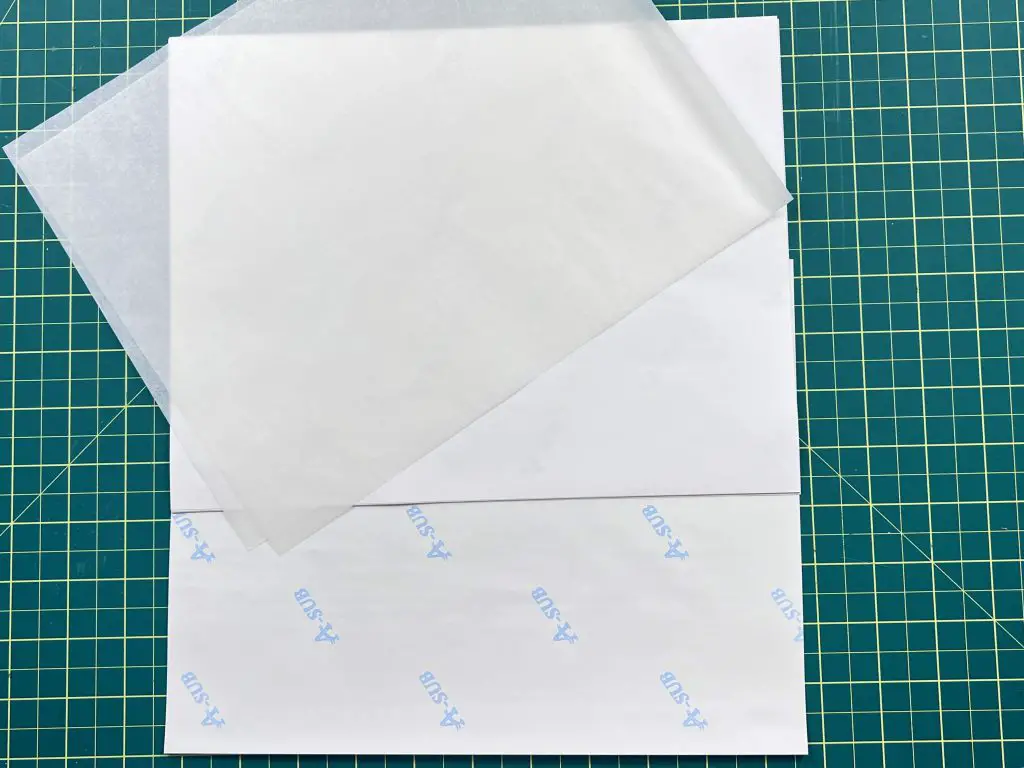
The nice thing about this is that the back of the paper has blue text on it so you know which side to print on. Trust me, this is a bonus, as I have tried some in the past that are white on both sides, and you don’t know what to do with them. So, this is nice.
Printer Settings for using A-Sub Dark Fabric Transfer Paper
Again, I printed this on my Eco-Tank 2850.
This time, I left the paper setting to normal printer paper but changed the print quality to High.
If you are cutting this out on a cutting machine, you will need to make these changes inside the cutting program before you print.
After this came out of my printer, the color was nice and vibrant and was dry before I brought it back to my workstation.

Cutting A-Sub Dark Fabric Transfer Paper with a Cricut
I used my Cricut Explore Air 2 to cut out the design. I cut this out using the Custom Material Setting and set it to Dark Printable Iron-on.
It detected the registration marks quickly and cut beautifully through the top layer but not the carrier sheet.
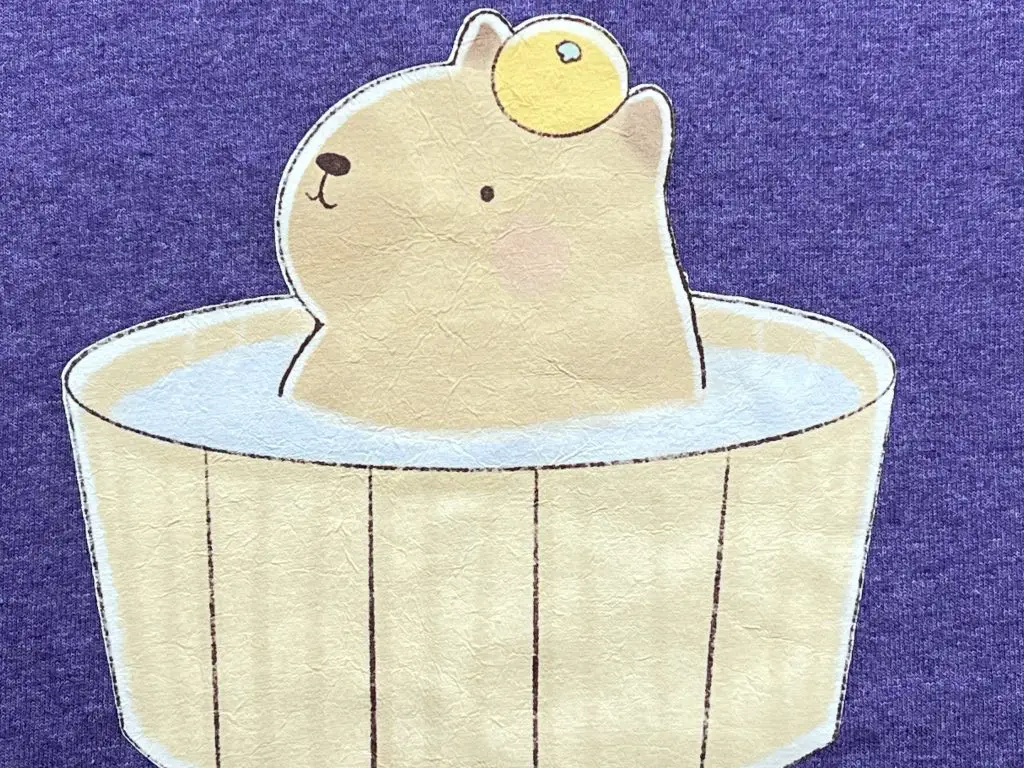
Applying the A-Sub Dark Fabric Transfer Paper to a shirt
As I have 3 kids, I ended up having to make several shirts, and an additional test run.
I used the recommended time and temperature settings of 329F and 20 seconds with my heat press. I like to use my heat press as it has good temperature control.
When using Fabric Transfer Paper, you have to peel the paper off the carrier sheet and place it onto the shirt.
Even though this is designed for dark fabric, I used this transfer paper on both dark and light fabric because those were the shirts that were selected.
The images adhered to the shirts beautify and there was no color loss or wrinkling.
What Happened to the A-Sub Dark Fabric Transfer Paper After Washing the Shirts?
After wearing the shirts, I waited a few days before washing them. Typically you want to wait a least 24 hours before washing them. This allows time for the glue to fully dry.
Also, I like to hang dry shirts that have been custom-made, be it with HTV vinyl or Transfer Paper. This way there is no chance of it being ruined by the dryer and the design lasts longer.
After I washed the shirts, I had mixed results. The designs that were applied to dark fabric were wrinkled, I would say, almost bubbled. But the ones on light fabric had no issues at all. So I’m not sure what happened there, as everything was done with the same steps, times and it was all in the wash together.
And, all of the shirts had been pre-shrunk.
Final Result of the A-Sub Dark Fabric Transfer Paper
I love how the colors turned out, and I love how easy it is to make a full design in one fell swoop. As I normally do everything in separate colors with HTV, it was a nice quick project.
Would I buy A-Sub Dark Fabric Transfer Paper again?
When I run out of this A-Sub Dark Fabric Transfer Paper , would I buy this again? Maybe. I know that’s not the best answer, but if I can figure out why it’s bubbling during the wash and get that fixed then yes. But for now, I still have a bunch of sheets to work with to try and figure it out. And if I do figure it out, I’ll update this and let you know what I did differently.
If you want to try out these items, you can use this Coupon Code to get 12% off products at Koalagp.com and A-Sub.com.
Coupon Code: LearnsStuff
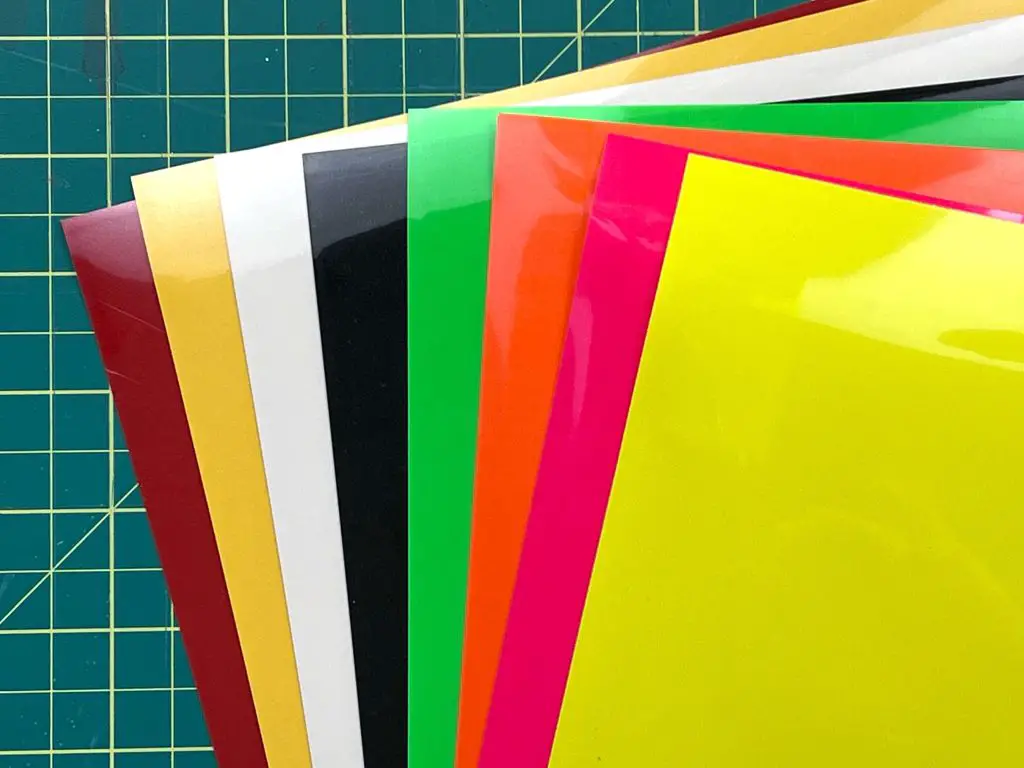
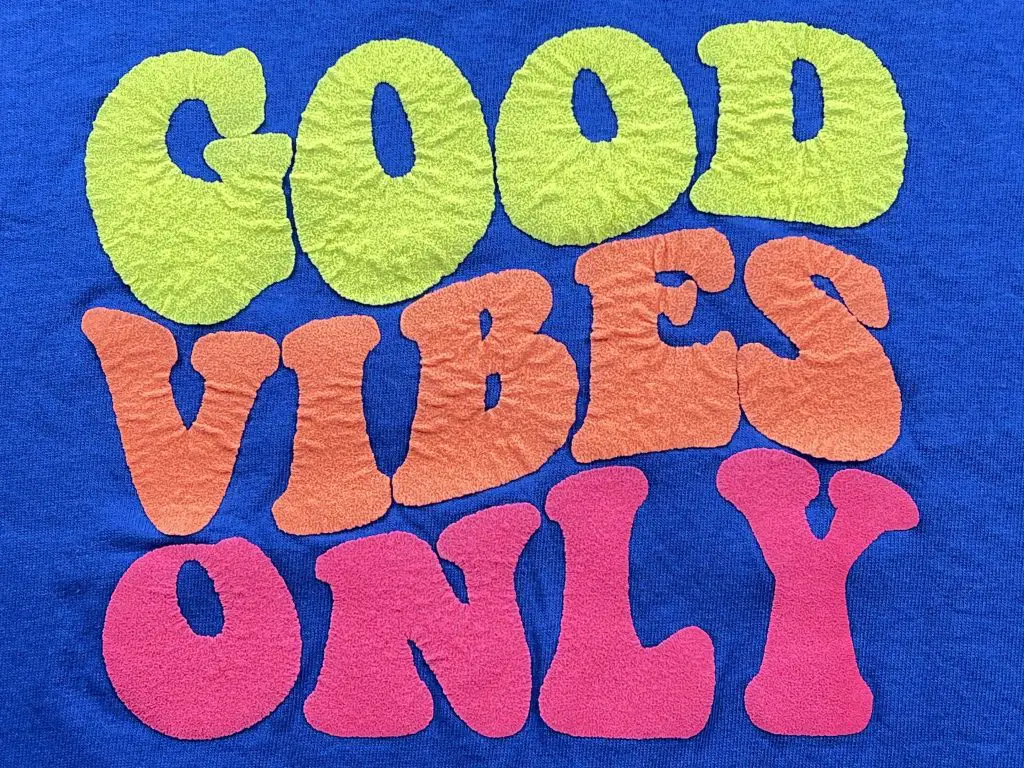
A-Sub 3D Puff Heat Transfer Vinyl Sheet
Ok, now for the last product. I have to be honest with you, I have never used Puff HTV before. I have a pack from an impulse buy I made a while ago but have not yet used it, so this is all new to me.
What A-Sub 3D Puff Heat Transfer Vinyl Sheet Looks like out of the package
This package came with 8 different vibrant colors of 8″x12″ Puff HTV. The colors are amazing! And, it comes with an instruction sheet on time and temperatures to use, as well as details on what settings are required to cut with different cutting machines.
Cutting A-Sub 3D Puff Heat Transfer Vinyl Sheet with a Cricut
I cut this out on my Cricut Explore Air 2. I used the standard Iron-On Setting with no issues, but if you are worried about the thickness, you can adjust your settings to apply more pressure.
Results of Pressing the A-Sub 3D Puff Heat Transfer Vinyl Sheet
I was really excited to used this product. I even found a cute design that I could use, so I sent it to my Cricut to cut.
And I pressed it, and it was a disaster. I used my standard setting of 315F for 15 Seconds without any test runs, and it did not turn out at all! The puff didn’t stick in some places, in others it didn’t puff properly and in the end it did not make the cute design I had wanted. I will wear the shirt but it was a learning experience.
So, I went back to my workstation, cut out a whole bunch of 1.5″ hearts, cut up an old shirt and started a full on test cycle for this puff vinyl.
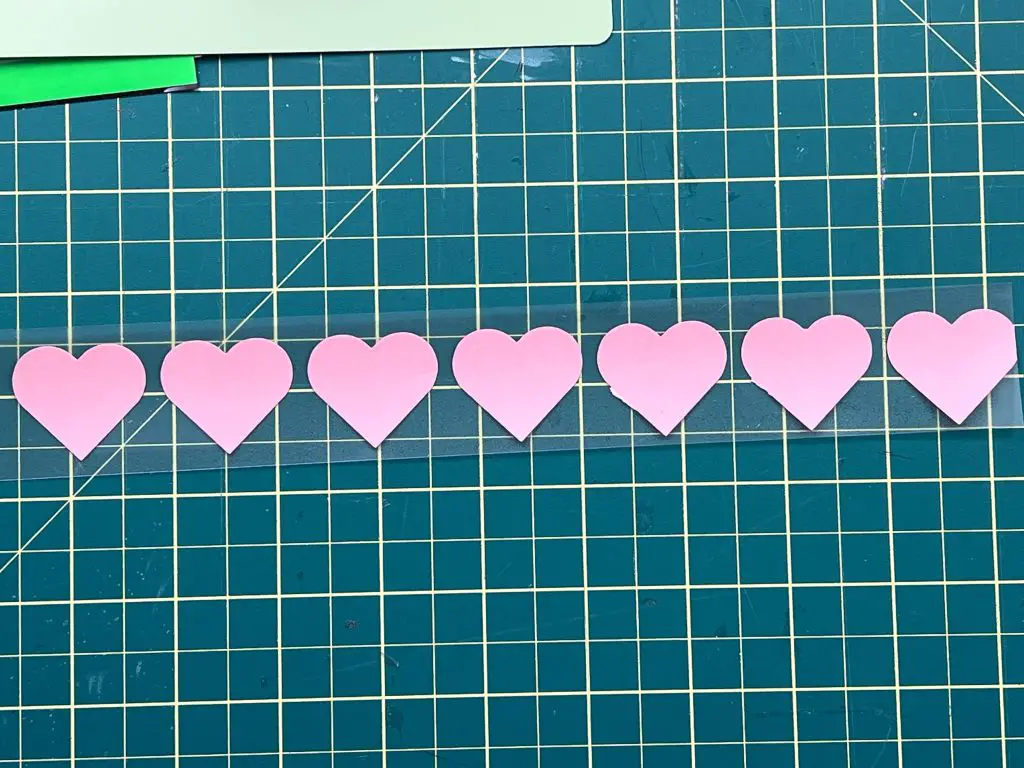
Based on the instruction sheets, I set up samples at 5 seconds and at 5F increments. I tested each piece. The results are below.
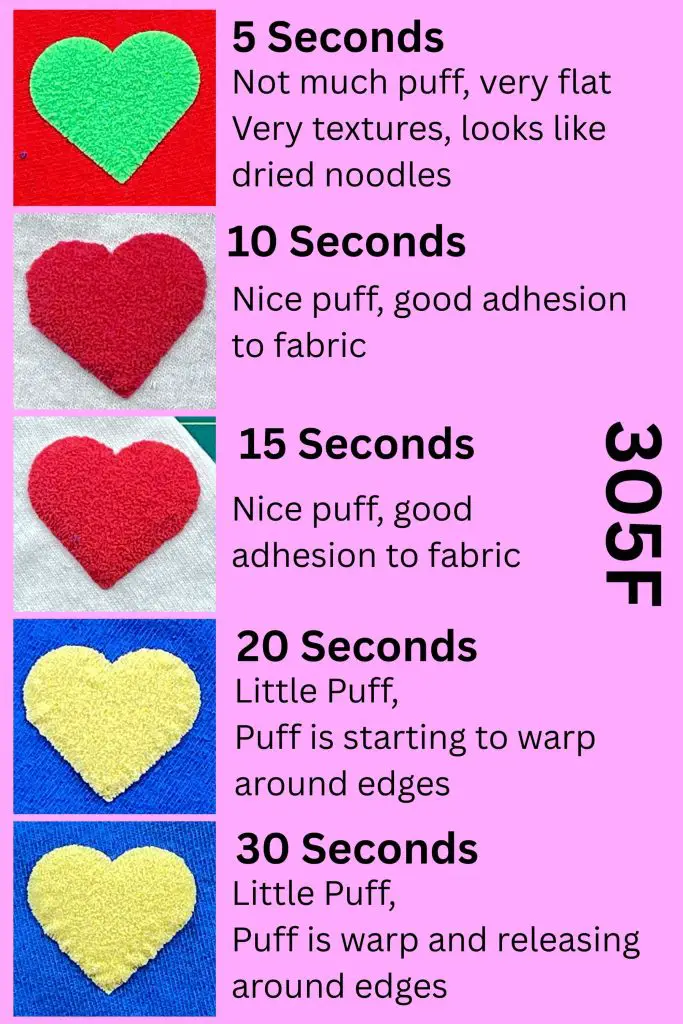
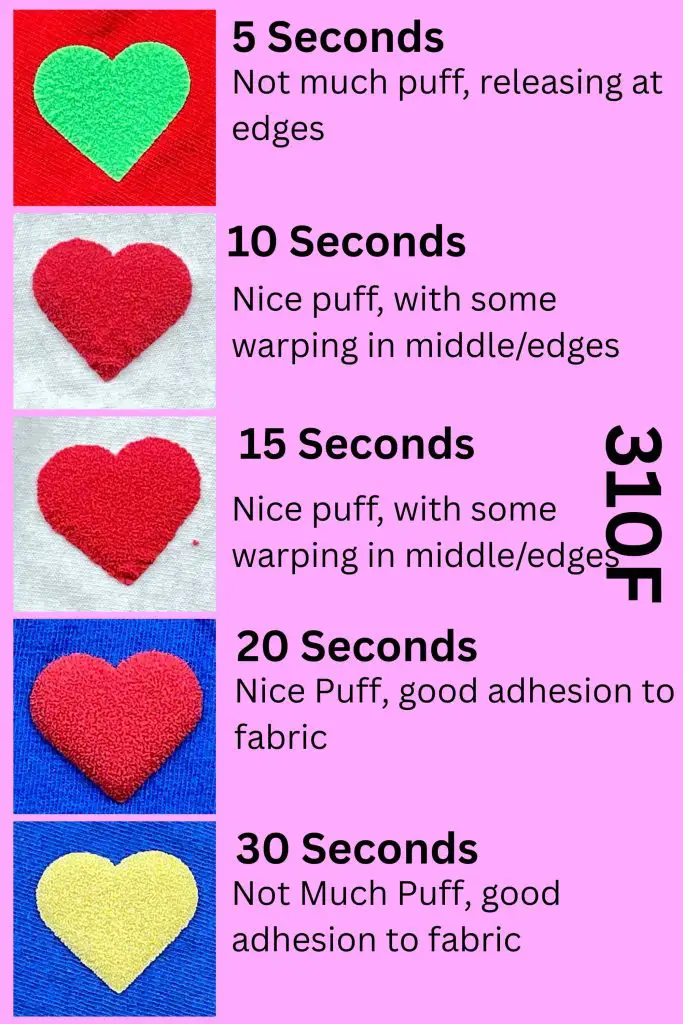
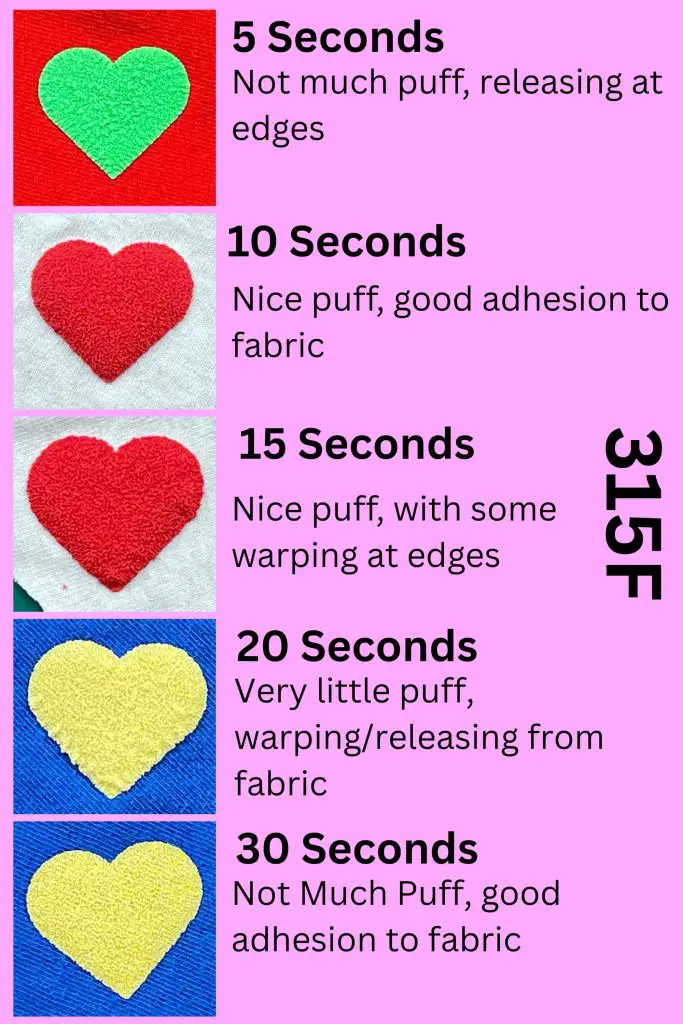
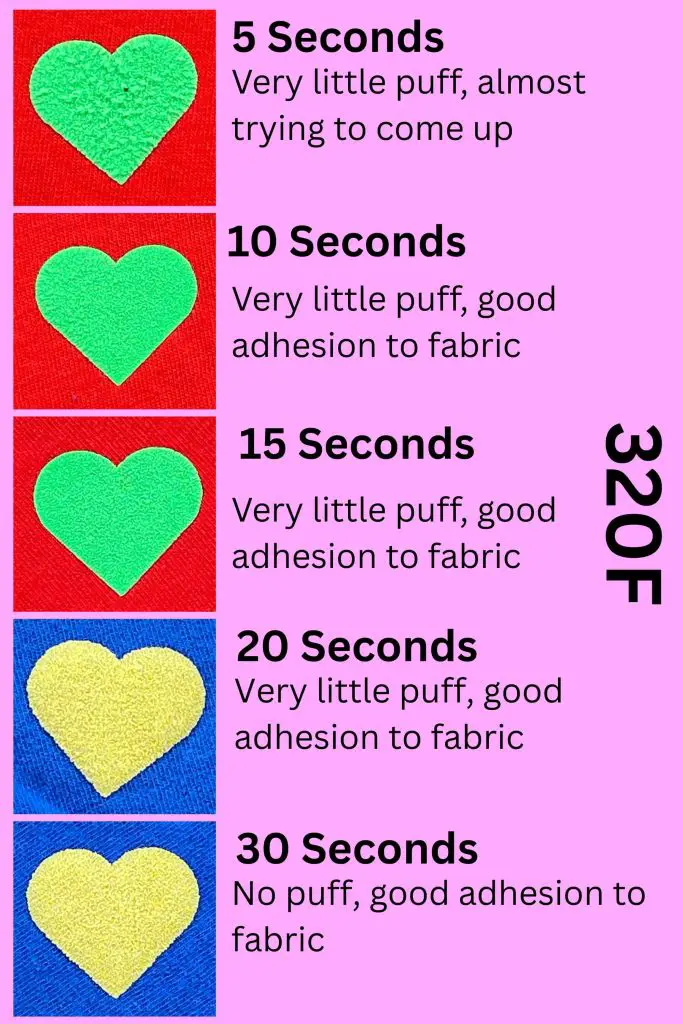
From my testing, the 305F at 15 second, 310F at 20 seconds, 315F at 10 seconds produced the best results.
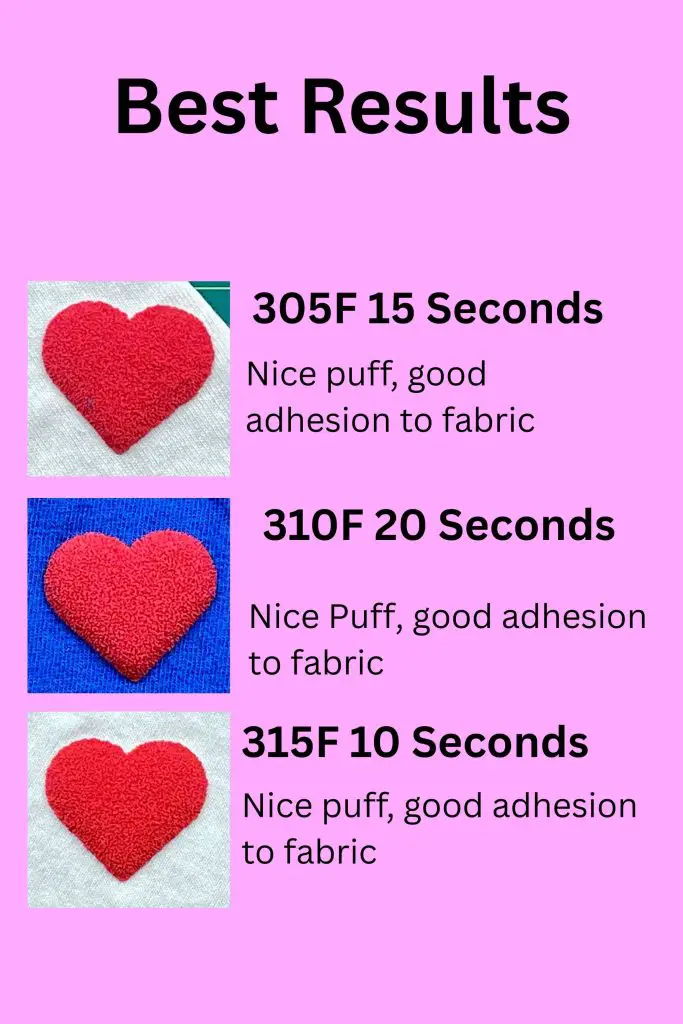
But you would need to try your own machine to make sure these settings work, in case my machine is off calibration from yours.
Final Result of A-Sub 3D Puff Heat Transfer Vinyl Sheet
Ok, so I am the type of person who never does the “try a sample first”. I like to cut out my design, put it in place, press it and done.
If you are working with Puff vinyl that will not work! Or at least it didn’t with me! I highly recommend testing several small sample pieces at different times and temperatures so that you don’t ruin your shirts.
Also, keep in mind, that you cannot re-press puff vinyl, so if it didn’t work at your time and temperature, it’s one and done.
Would I buy A-Sub 3D Puff Heat Transfer Vinyl Sheet again?
Now that I know what time and temperature settings will produce nice results, I think I can make some nice shirts. I’m not sure I have the energy to perform a full trial-and-error test on other brands of puff vinyl…
So, would I buy A-Sub 3D Puff Heat Transfer Vinyl Sheet again? I’m not sure. I think the 8-pack I have will last me long enough that I may be past my puff phase.
If you want to try out these items, you can use this Coupon Code to get 12% off products at Koalagp.com and A-Sub.com.
Coupon Code: LearnsStuff
Final Thought on Koala Sticker paper and A-Sub Vinyl’s
Wow! That was a lot of trials and errors! And it took a lot of work! But some final thoughts and things I have learned:
- The areas where I struggled because of my Cricut – those issues have nothing to do with the Koala and A-Sub products. So, where I spent hours trying to overcome the issues my Cricut Explore Air 2 was causing with the gloss on the sticker paper, had nothing to do with the sticker paper, but with my machine. Maybe one day I’ll upgrade to something new or different, I just am not there yet.
- I really like the final outcome of the glossy stickers and I Loved the holographic sticker paper.
- I really liked the color and the easy of using the transfer paper/printable iron-on. I need to get more into that to make custom shirts faster. But I need to figure out what is happening with the bubbles as a result of the washing machine. So stay tuned for that.
- I’m not sure puff vinyl is my jam. It looks great, but it was a lot of work to find which time and temperatures worked to produce nice results. I prefer to do a quick press and be done with it. And I’m not a fan of not being able to fix my mistakes… But perhaps if I try projects with puff I’ll like it more. I’ll keep you posted.
Did you enjoy this Koala Product Review?
Did you enjoy this Koala Product Review? I know this isn’t what I normally do, but I thought I would try it out. Let me know if you learned anything from this blog post and if you enjoyed this Koala Product Review. Also, let me know if you have used these products and how you liked them.