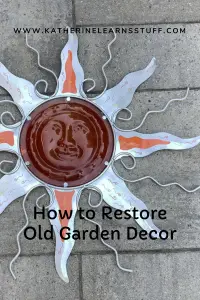
Restoring the Old to Look New Again
I have had this sun for years. The first year it hung in my back garden. However, by the end of the season, the paint had chipped and the rust was showing. After the first winter in my shed, it never came out again, as it was in too rough of shape. This seems to be the way to go nowadays, so I learned how to restore old garden decor.
So, I decided to refinish the sun, upcycle if you will
What you need:
- An old rusted piece of yard decor. (I had a sun)
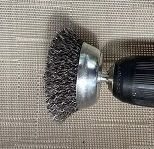
- A Drill. I used a cordless drill, but a corded one works as well.
- A wire-brush attachment. If you do not have a drill and brush attachment, you can always go old school and use sand-paper and elbow grease.
- Safety gear – safety glasses and a dust mask, long pants, long sleeves, hair pulled back.
- Primer – I used Rustoleum Spray Paint,
- A final coat of paint – I used a generic silver spray paint I had lying around.
- Optional decals for added character
Let’s Begin!
Clean up the Old Garden Decor
- First thing’s first. You need to find an old rusty garden decor item you want to salvage. I had this wonderful sun as shown on the right.
- Remove any ornamental pieces. You do not want them to get ruined during the process. My sun has a glass face, so I carefully removed that from the metal frame.
- Put on your safety gear and get your drill and wire brush attachment together.
NOTE: You need to find a safe place to do this, AWAY from prying children. The following steps are messy, and things are flying around.

4. Use the wire brush attachment on the drill to brush off all of the rust and chipping paint. Be sure to do each area carefully. Make sure to do the front and back. Get all the nooks and crannies.
5. Once you have completed the first pass of rust removal, inspect your work. This is to make sure all of the loose paint and rust has been removed. (It’s ok if your arms feel giggly right about now.) My sun was tricky and had lots of spots that needed 3-4 passes with the brush.
Below pictures, from left to right, wire brush ( just in case), the front-face of the clean sun, and the back-face of the clean sun.


Prime and Paint the Old Decor
6. You will need to find a space to paint your work. I put down a bunch of old newspaper and worked in the back of the garden. You will need to be somewhere with proper ventilation (especially if you are using spray paint). If you are working outside, preferably somewhere with little wind.
7. Apply the primer, per the directions of the manufacturer. Do not believe everything they say. My product said it would be dry in 20 mins. It was NOT dry in 20 mins.
IMPORTANT NOTE! Make sure you wait until the primer is completely dry before you flip to do the other side. I was impatient and flipped it over after the 20 mins, and everything needed to be re-done as the paper stuck to the primer. The newspaper would not come off without peeling the primer…. so WAIT FOR IT TO BE TOTALLY DRY! This will save you so much time!
8. So, when the primer is actually dry (maybe a day from now), coat the other side as well.
9. Again, WAIT for it to dry….
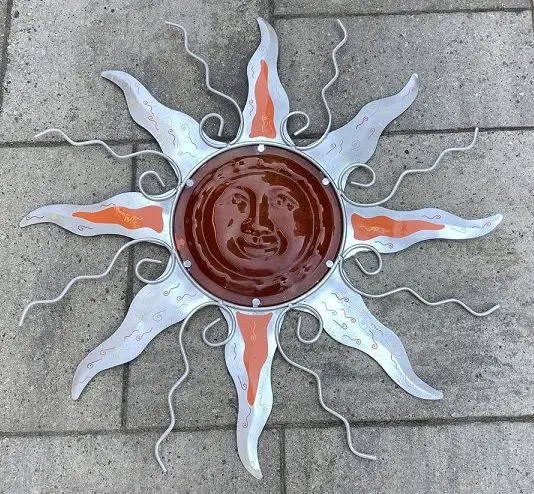
10. Once dry, apply your color coat. I had some extra silver around, so my sun is silver instead of gold.
The below pictures are of the sun with primer and then with silver paint.
Also, just something to keep in mind when picking paints and primers – you want to make the primer work with your paint color. I used white because it would not show up on the sun if I missed a spot. Black would have been visible and would have required more coats of silver.


Reassemble
Reassemble any bits and pieces, carefully as not to break anything.

Optional Additions
In my opinion, my sun looked too plain. I made some decals and printed them off with my faithful Cricut. I picked some popping colors (red, yellow, and orange) to give it some personality.
And that’s it! You’re Done!
Final Thoughts
Although the above tutorial is based on my garden sun, this tutorial on how to restore old garden decor can work with all types of old garden decorations.
This was a challenging restoration for me, as I was on a time crunch with kids napping and playing, but here are some tips:
- Try to make sure you have enough time to at least finish each step before you start.
- Working in the 30C heat in the summer may seem. However, after about 3 minutes, it will be painfully uncomfortable, and your motivation will start to dwindle.
- Make sure you wait for the paint to dry as per the instructions. I was in a bit of a rush, and I flipped the sun over too quickly. This resulted in the paper getting stuck to the wet paint.
Was this Tutorial Helpful?
Did you find this tutorial on how to restore old garden decor helpful? Let me know your thoughts in the comments below!
If you liked this tutorial, be sure to check out my other tutorials here.


I enjoyed reading this! Decorative suns always make me think of my grandmother who lived in Palm Springs. You did a great job with your restoration!
Thanks so much! It was a fun project, albeit stressful with the heat and the wandering kids!
This is so clever! You have very creative ideas. 🙂
Thanks so much. I hate having things go to waste, and I really liked that sun! Now it can last a few more seasons.
Oh my goodness what a fun creative project!
It was fun! And quite the learning experience!
creative project!
Thanks!
I love the idea of upcycling. Sometime it can be hard if you’re not too clued I’m though so thanks for this!
I like to keep things if I can or repurpose them. Even if it is just for a little while. Thanks!
This is very creative. I will have to try it
It’s a lot of fun. And you can always customize it your personality which makes it even better
This looks fun! I have to admit I’m always afraid of painting things, somehow I always mess up, but luckily I have a handy partner 🙂 Thanks!
Great tips! I usually just throw stuff out and buy new, but I have some that I might want to keep & restore.