At my house, there is never a shortage of crafting going on. Recently we have been on a kick for making canvas paintings. But as we are all severely lacking in the painting skillset, we need to create new and creative solutions to make fantastic artwork. And this is how we stumbled on how to paint with vinyl on canvas to make a masterpiece.
As an Amazon Associate, I earn from qualifying purchases. This post contains affiliate links. I may receive a commission if you purchase an item from one of my links. This will not change the price you pay.
Painting Over Vinyl on Canvas
This activity only takes about 20-30 minutes and is easy for children and adults of all ages.
What You Need:
- Canvas – any size will work but do not go too big, especially if you have little kids doing this activity.
- Paint
- Vinyl decal – I do this using my Cricut, but there are many ways you can do this.
- Glitter – as always, this is optional.
Let’s Begin!
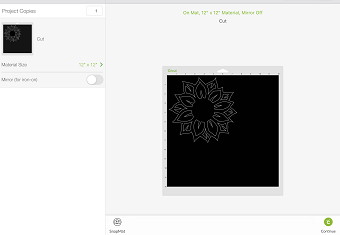
Select your Vinyl Decal
The first step is to pick out a vinyl decal. I picked out this sunflower from Design Space, as it is easy to weed and easy to transfer. And frankly, I like it.
But if you are looking to make your own, you can check out this link here. Just stop before you change to design to draw, and just cut it.
Apply the Vinyl Decal to Canvas
Select a canvas. Remember, the larger the canvas, the longer it will take to paint.
Once you have selected the canvas, apply your vinyl decal.

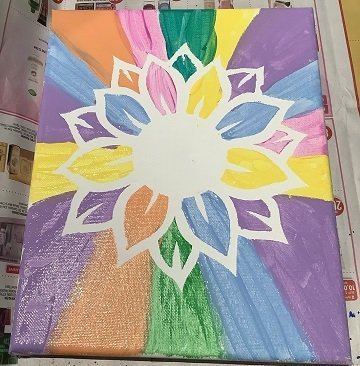
Start Painting
Let the mess begin! Start Painting! Paint the canvas, paint over the vinyl decal, paint in between the lines. Or you can imagine this is a paint by numbers picture and carefully paint each section win the vinyl to add some beautiful detail.


Remove the vinyl Decal
Either by using your fingernail, a pen, a needle, or any small pointy edge, find a spot to peel the vinyl.
If you have used permanent vinyl, you may need to use a bit of force, but the vinyl will come off.
Make sure you peel all of the vinyl off. This is where it is handy to have a thick design. We tried it with thin lines, and some vinyl got lost under the paint. It is now a permanent part of the artwork.
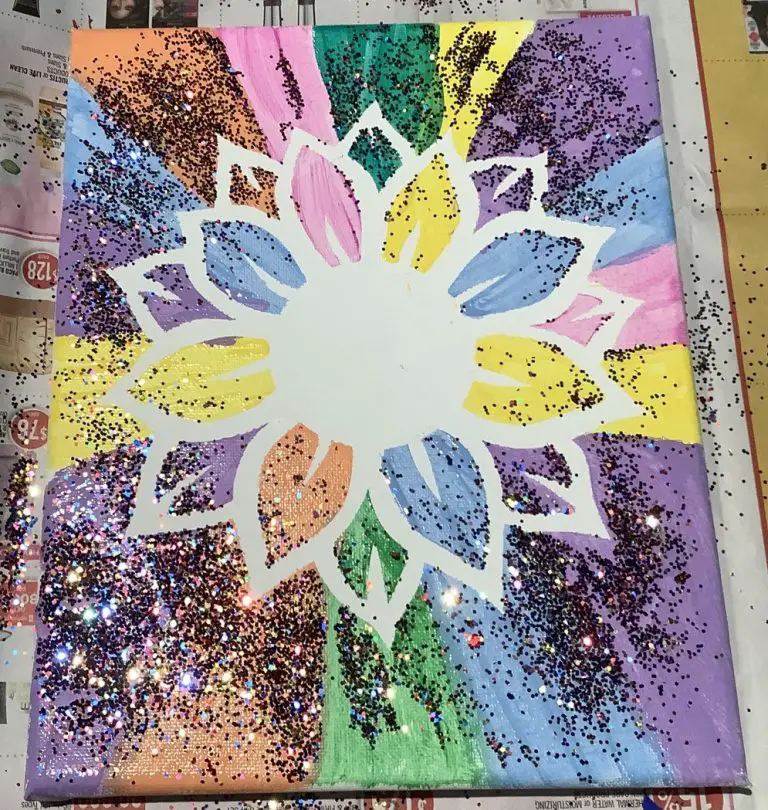
glitter, anyone?
In my house, it is all about glitter, so we added glitter to the wet paint.
Again, this is optional.
And That’s It! You’re Done!
Add Your Heading Text Here
Things I learned along the way
- Remember to size the canvas according to your kids’ age. A 5-6-year-old can work on a 10×8 to a 12×10 canvas comfortably. Anything larger will be a challenge to finish. For example, a 14×10 canvas is too big for a 5-6-year-old. Unless you want this craft to go one for 2-3 days… which you probably do not
- Working with a vinyl decal that has thick lines is easier than a thin one. When peeling the decal off the painted vinyl, thick sections hold together better.
- If using permanent vinyl, once you apply the vinyl decal to your canvas, your time is limited. But as the name suggests, it is permanent. Once it adheres and dries, it is hard to peel. I used permanent vinyl as I have an abundance of it, and I find it much cheaper than removable vinyl.
- If you use glitter, I recommend throwing the excess glitter away. No one will know. And I have yet to see the day where my kids use combined colorful glitter. I would love for this extra glitter to be used, as I now have a mason jar full of multi-colored glitter.
- My final design has a white background from the canvas. But you can paint the canvas first. Once the paint is dry, apply the vinyl, and add more paint. This will provide more color and depth to the picture. However, this will require a bit more time as you will need to wait for the paint to dry.
Was this Tutorial Helpful?
Did you find this tutorial on how to paint with vinyl on canvas helpful? Let me know your thoughts in the comments below!
If you liked this tutorial, be sure to check out my other tutorials here.
Don’t forget to sign up for my newsletters! You’ll get inside tips on upcoming posts and additional behind the scenes details about what’s happening on the site!


So cute! I’ll have to bust my cricut out of storage and try this!
It really is fun! My kids did them with me, but they wanted certain princess characters, so I had to post pics of mine instead. It’s well worth the fun!
That’s it, I’ve definitely got to get me a cricut! This will make Crafts with my son so much easier!
It really is a great tool to help with crafting. I’m hoping when my son is older I can get him involved somehow. Let me know how you’re likes it if you take the plunge!
That is a great craft activity.
It really is so much fun! And kids love it!
Wow! So beautiful and simple. Can’t wait to try this with the kids! Thanks!
Let me know how it turns out. My kids enjoy it and we currently have their entire room cover in painting, many are of this type.
This is an awesome idea and a step above just regular painting. Since we have a couple more months of colder weather, I may have to try this project with my daughter!
This is a great Saturday afternoon craft. It doesn’t take very long and the results turn out great.
Great idea! It turned out beautifully! I love using Cricuts for crafting! Thanks for the inspiration.
use contac paper instead of vinyl
I have a little painter at home who will want to read this informative post. And yes, there’s glitter all over the house when they are hard at work!:))
How pretty! Thanks for sharing how to do this 🙂
So pretty! I’d love to try that.
This is such a beautiful technique. Your steps were also easy to follow. Thank you!
How do you get the vinyl to stick? I am trying to use removable vinyl on the canvas because it is for a birthday party idea, that i will need to prep ahead of time. But i can’t get the vinyl to stick in the least. Any tricks?
Hmmm… that’s a good question. I have found that vinyl sticks nicely to painted canvas, probably best. But if you are applying it to bare canvas (or even painted canvas), make sure your transfer paper isn’t strong. Also, I like to have a book or something behind the canvas so when pressing the vinyl onto the canvas with the transfer sheet, it has something behind applying pressure. I also push on the back side of the canvas before removing the transfer paper. And when pulling the transfer paper off, I pull it flat, not up. (meaning, that it is basically flat with the rest of the transfer paper). Hope that helps!