What doll doesn’t need Fairy Wings?
Kids are hilarious. They can have a toy in a box for months and months. It can be sitting there untouched, gathering dust forever. But the minute you move it, give it away or throw it out, they have a sixth sense that instantly tells them they need this item. This is what happened at my house. Thus the creation of how to make fairy wings for dolls is now a tutorial on my site.
Welcome to my disaster of fairy wings.
I had fairies with wings. They were never played with, so they were moved into the basement in a box. They sat in the box for at least three months prompting me to gave them away. I swear, not five minutes after those fairies left the house, I hear “Where are my fairies? I need my fairies!” Queue crying.
In an attempt to save the day, I went to my crafting area to see what surplus materials I had lying around to see if I could make some new fairy wings for their dolls. It took some tinkering but I made it work! Now any doll can be a fairy! This is a much better solution as they have about 1000 dolls.
This post contains affiliate links. I may receive a commission if you purchase an item from one of my links. This will not change the price you pay.
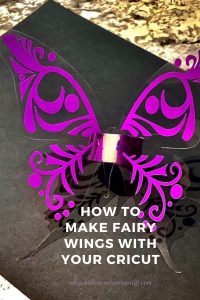
How to Make Fairy Wings with your Cricut
What better way to add to junk in your house while making more toys for your kids than making fairy wings for dolls! Follow the below steps to make fairy wings for your dolls as well!
This site contains affiliate links.
What you need:
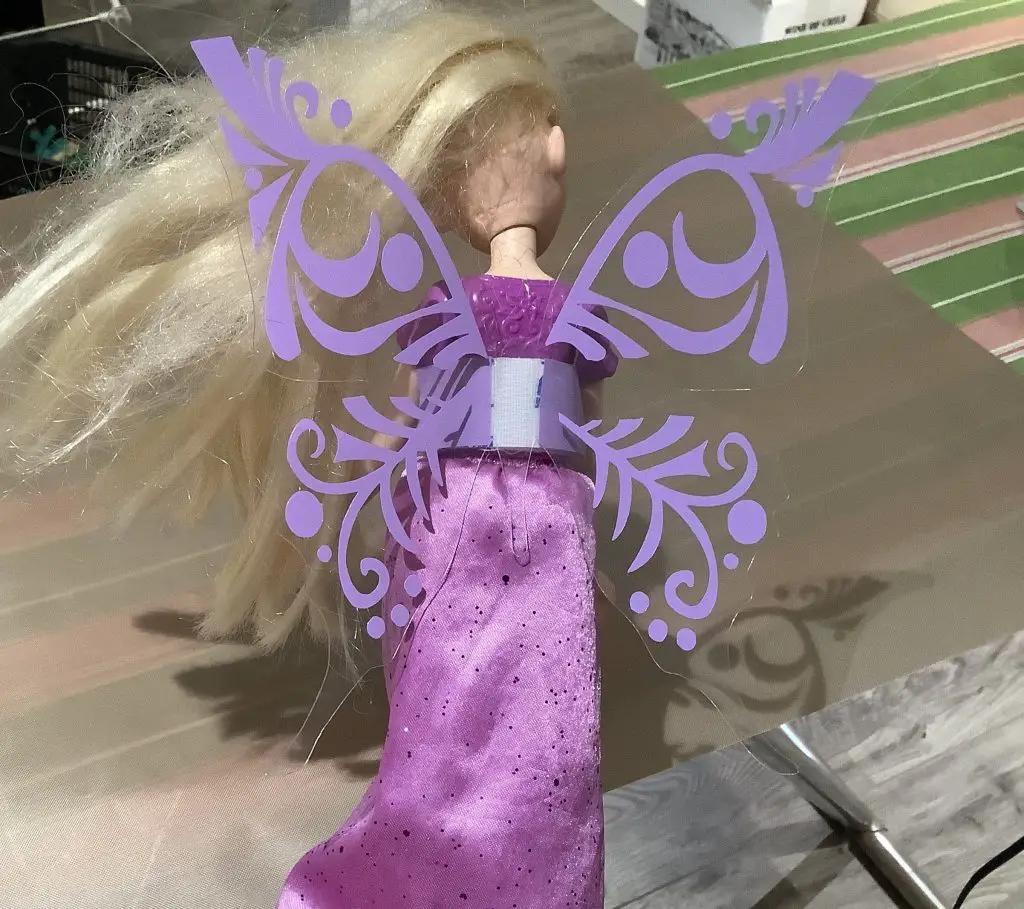
- Dolls – I used Barbie dolls, but you can do the same for any doll.
- Acetate Sheets or Plastic about 0.4mm thick, can be clear or colored. (I used a protective sheet from a canvas pack but the plastic cutting boards, old cutting mats, binder dividers would work also).
- Cutting machine (I use my Cricut Air 2) or sharp knife
- Design Space (DS)
- Stickers or permanent vinyl
- Adhesive Velcro
Let’s Begin!
Select Your Wing Design
- Find the wings you want. There are several ways to get the wing shape.
- If you have a Cricut product, you can go into DS and look for butterfly wings.
- Draw it by hand and upload it to DS.
- Google Butterfly wings and upload them to DS.
For the purpose of this tutorial, I am just using a set from DS. A quick search shows there are lots of free and paid butterfly wings to choose from. I’m going to use the free pink ones in the middle of the top row.

2. Import the wings and size them to fit your doll. My kids use Barbie dolls and dolls of similar size, so I took a ruler and figured out how big the wings could be. In this case, I did 6″ for height.
3. Optional step – if you have a scoring stylus you can add 2 score lines on the wings to bend them later.

Cutting The Fairy Wings
4. Hit Make It in DS.
5. Verify the placement of your design on the mat and click continue.
6. Make sure you set the dial on your Cricut to CUSTOM. This will allow you to choose the material that you are cutting.
7. Search in All Materials for Plastics -> select Stencil Film as shown on the right. (I have also used the Cutting Mat Protector setting.)
8. Adjust the Pressure from Default to More

9. Once the cut is complete, do not remove the mat from the machine. Do not hit the flashing arrows to feed the machine. Push the C button to cut the wings again. If you do not remove the mat, this will recut the material in the exact same spot and not ruin the design.
You can see my cut after it is completed on the right.
10. Carefully remove the wings and fold at the score marks. If you did not score the wings, just bend the plastic by hand to give the wings some shape

Assemble and Decorate the Fairy Wings
11. Add a design to the wings. You can use stickers, or make your own decals with permanent vinyl or just leave them blank.
12. Apply adhesive velcro to the wing. This is used as a belt to hold the wing on the doll. I used 3/4″ wide adhesive velcro. A smaller size would have made a slimmer belt. To keep the doll clothes from getting ruined, I applied the hook portion of the velcro to the wings, and let the loop portion run around the doll as shown on the right.

13. I had extra vinyl, so I used that to cover the velcro tape backing to give it a bit more of a finished looked.
And that’s it! You’re Done!
Was this Tutorial Helpful?
Did you find this tutorial helpful? Let me know your thoughts in the comments below!
If you liked this tutorial, be sure to check out my other tutorials here.

What a good idea. I have made paper dolls & cut butterfly wings from cardstock as fairy wings, but never thought to use acetate & vinyl.
I find the acetate last a long time, so they don’t need to be remade very often. Thanks for reading!
I love this idea. I make doll clothes for my 24″ Ball Jointed Doll. I am currently making a Fairy costume for her and planned on using the tule to try to fashion wings. Now I will use the tulle for decoration on the wings to match her outfit.
Thank you very much for the wonderful idea.
I’m so happy to hear that this has given you an idea to help with your doll clothes! My girls loved these wings! And many of their friends did too! Let me know how it turns out!