Crafting Supplies and Messy Work Spaces
If you know me, or anything about me, you know that I’m not the neatest and most organized person. I like to work in a messy area and I know where things are better if they are in a pile…. for the most part. I do have times when I just need to do a massive clean, but what I like to call it is an organized mess. And I can function like that. What I don’t like is an actual mess. Food crumbs on the table and floor, juice stains, markers running through the paper onto tables, dried up glue on countertops. This last one drives me nuts as I frequently work with a hot glue gun, and when it’s hot it oozes glue the mess just keeps grown… and this is how I made a hot glue gun holder…
As an Amazon Associate, I earn from qualifying purchases. This post contains affiliate links. I may receive a commission if you purchase an item from one of my links. This will not change the price you pay.
A little bit of background story
In the past, I have used a Teflon sheet to cover up my work station. When the glue dried, I could easily peel it off. But the glue gun would slip and slide all over the work area, leaving more glue everywhere.
Like with most things, I decided to look into a solution for this.
Now, I know what you’re thinking – but the glue gun has a built-in stand to keep it upright. Sure it does! But I have never been able to get it to work and keep the glue gun from sliding around and making a mess on my work surface.
The solution is always simple!
As with most things – you can buy a pre-made solution. Nicely packaged and you can even get it delivered straight to your house.
Amazon sells some nice solutions to all of life’s problems, you just need to know what to look for.
So, I decided I needed a real hot glue gun holder. Not just my Teflon sheets that don’t help the problem. They just help contain the mess.
So, I checked it out on Amazon, and lo and behold, they sell this neat looking one, with some decent reviews, and for ~$12, seems a reasonable price.
But for me, this just won’t cut it. Even if it is only $20, it’s more than I’m willing to spend on a crafting accessory.
So, as usual, I am off to the races to make my own!
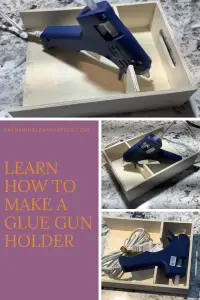
How to Make a Glue Gun Holder
In recent times, I have learned that you can buy most things used or at the dollar store and make some minor modifications to get the result you need.
In this case, I went to my local dollar store and looked for something that might work, and I found the perfect wooden box.
What You Need:
- A hot glue gun – because if you don’t have one, there’s no need to make a holder.
- A wooden box from the local dollar store (see pictures below for inspiration)
- Wood glue
- Sandpaper
- mallet/hammer/brute force.
Let’s Begin!
Find the Right Box
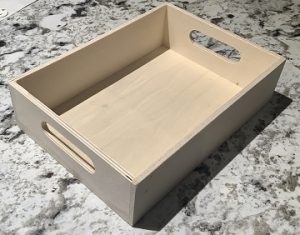
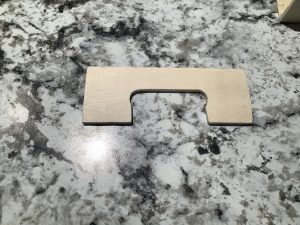
Ok, so this is the box that I found at the dollar store. It’s about 4″x6″. Nothing fancy. But it’s a simple box, and I could tell that the sides were just glued together, so they could easily be knocked out and repositioned.
So, that’s exactly what I did. I took my mallet and with two simple hits, I knocked out the end wall right off. It was almost a perfectly clean break, so little sanding will be required later.
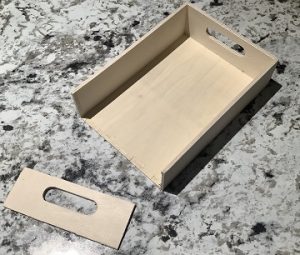
Make Minor Modifications
I want my glue gun to stand securely in the box, so I cut the top part of the box handle off with a little saw I have.
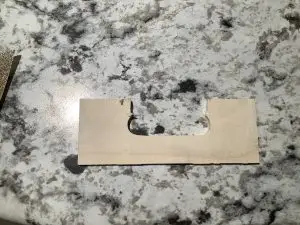
With some 150 grit sandpaper, I smoothed the edges of my cut area and the edges from the break.
I did some dry fits to make sure it would fit within the box – closer to the other end.
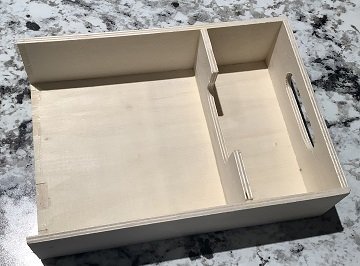
Reassembly
Using some wood glue (but really, you could use any glue or even your glue gun ;p ). But when dealing with wood, I like wood glue as I find it holds wood together best.
With a quick dab of glue around the edges, I placed the newly modified side inside the box and let it sit.
Make sure to clean up any excess glue now before it dries, as it will be a pain to sand off later.
Final Touches
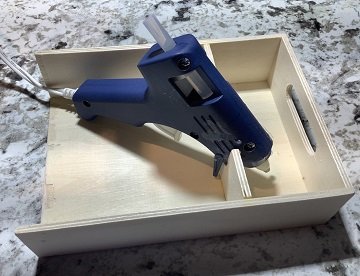
At the end of any project, I will do a final sanding to make sure all loose bits of wood are smoothed down. It’s not required, but I like the way it looks and feels.
When using the glue gun, I place a piece of paper inside the box so that the hot glue lands on that instead of the glue gun holder. Then, when I’m done using it and it has cooled down, I just through that paper in the garbage with all the extra glue drippings.
And That’s It! You’re Done!
This project took me about 20 minutes from start to finish. It’s doable and it cost me $1.25. But if you’re not crafty you can always buy this one from Amazon instead 🙂
Was this Tutorial Helpful?
Did you find this tutorial on how to make a hot glue gun holder helpful? Let me know your thoughts in the comments below!
If you liked this tutorial, be sure to check out my other tutorials here
Don’t forget to sign up for my newsletters! You’ll get inside tips on upcoming posts and additional behind the scenes details about what’s happening on the site!
Don’t forget to sign up for my newsletters! You’ll get inside tips on upcoming posts and additional behind the scenes details about what’s happening on the site!
Thats awesome, thanks the great tip and how to!
This is a super idea! Now, to just stop all the stringy strings! 😂
This is exactly the kind of thing I need to make! I was balancing my glue gun awkwardly between jam jars 🤦♀️